U5.8 How to do it – Maintain

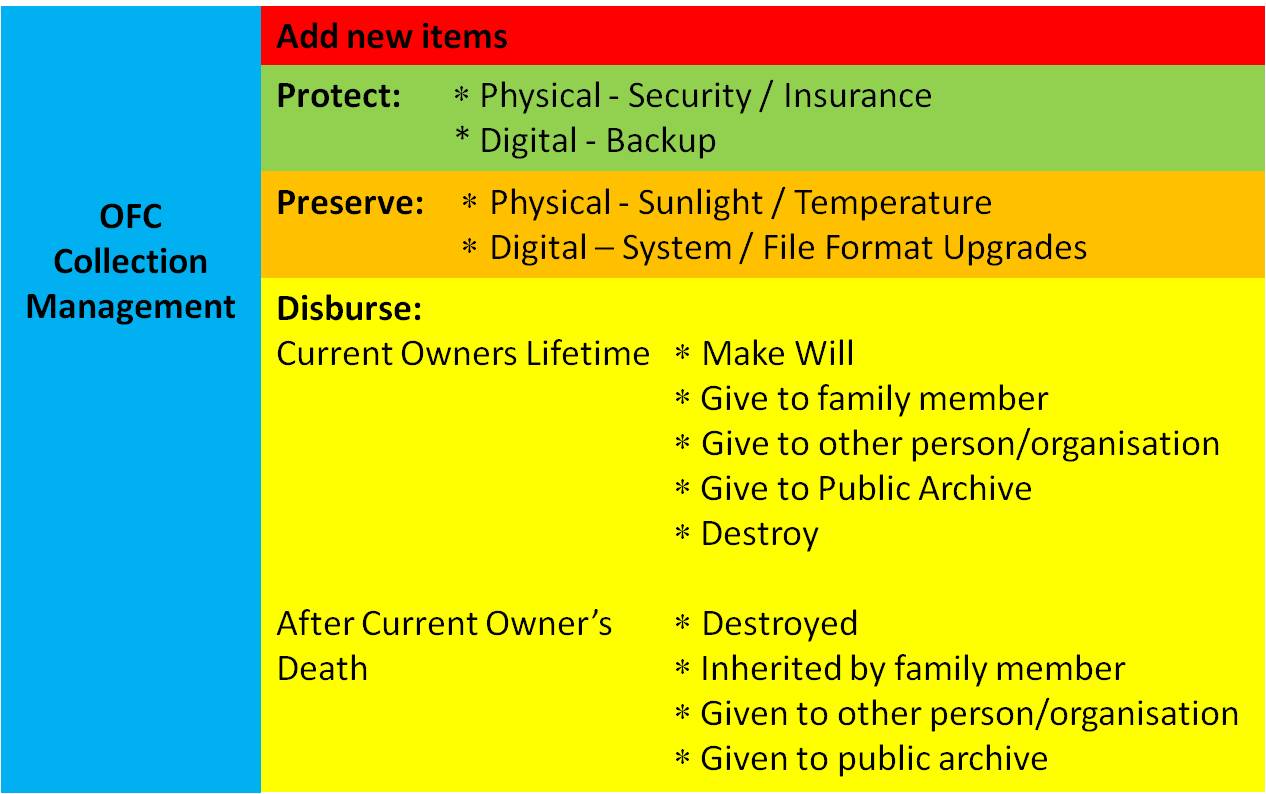
Although digital technology provides many benefits, unfortunately there are some unavoidable overheads that go with it. One of these is the absolute need to backup digital files to avoid loss by system crash, virus infection, or theft. Backups can be done in a variety of ways including to external hard disk or to DVD or to a cloud service. However, the important thing is that they are done regularly so that all your material is backed up at any one time. Background facilities that do this automatically for you each time a new file is created, are the most reliable. For particularly precious files, it is best to have more than one backup and to keep one of the copies at some other geographical location away from your house.

Even with reliable backup arrangements in place, there is another longer term threat to your digital objects – out of date computer hardware and software. Computer technology is continuing to change rapidly, so just because you can access and use your digital objects today, doesn’t necessarily mean that you will be able to do so in twenty years time – especially if you have been using less well known application programmes. Generally speaking, if you keep updating your equipment every six or seven years, and if your files are in common formats such as Word, Excel, PDF and JPG, then you should be OK. However, even then you will need to be checking every few years that you can still access all your files, and to be converting those that are in danger of becoming unreadable to newer longer-lasting formats. For small scale digital collections, this is probably best done on an ad-hoc basis when you are considering purchasing your next computer system (though, if you want to take a more structured approach, you may find it useful to construct a maintenance plan. However, for organisations with large scale digital collections, this is a very serious problem and a field of study called Digital Preservation is now well established with many umbrella organisations and thousands of practitioners throughout the world. Some of the organisations issue guidance about file formats and these can be found by searching the net for ‘digital preservation file formats’.

The above discussion concerns digital objects; however, the general issues of protection and preservation can also apply to physical objects as well. For example, particular types of physical objects can be badly affected by sunlight and hot room temperatures so these factors have to be taken into account when choosing storage locations; and periodic checks should be made to ensure that the condition of the collection is not deteriorating. Theft too is another potential hazard, though this should be addressed by the household’s general security arrangements and insurance policies. The ultimate protection of storing things in bank vaults seems to defeat the point of having the collection in the first place.

If a slightly broader perspective is taken, the overall maintenance – or management – of a collection will not only include all of the above, but also the activities of adding new material (as discussed in U5.6) and its eventual disbursement. Regarding the latter, owners have the option of either writing down what they wish to occur in a will, or of actually carrying out the disbursement themselves during their lifetime. All these activities are summarised in the diagram below.

To previous Unit                                    To Contents                                     To next Unit

U5.7 How to do it – Exploit

The exploit activity concerns the way objects from one or more collections can be manipulated and combined in innovative ways in order to unlock them from their containers, to bring them to life, and to enable owners to enjoy their collections as much as possible. In exploiting a collection, the owner may have some interesting experiences, and other people may get to enjoy the results.

The best way to get started on this activity is to explore and experiment with your materials – particularly those physical objects that you have just digitised and are about to throw away. Since you are going to dispose of the items anyway, it doesn’t matter what you do with them. Creating a collage is one of the simplest things you can make – follow this link for an example using doodles. Other things you can do are draw, or paint, or sculpt, or write, or whatever you’re inspired to try out – since this is essentially a private activity it doesn’t matter what talents you think you have or haven’t got. After you’ve finished you can either keep what you’ve made, or photograph it and throw it away, or just throw it away.

Once you have an established collection of digital objects, perhaps accompanied by some physical equivalents as well, you are able to continue to explore and experiment as and when you like. Although you do not have any unwanted physical objects that can be used, you can still reproduce the digital objects in the form of printed pages or photos for use in your exploitation projects – as in this collage using photos of T-Shirts. At some point, however, you may wish to share your objects with your family and friends (if you are not already doing so in your choice of storage – see U5.5], and to do this you can create displays of the items in a variety of different ways. An obvious mechanism is a display case, or a shelf in a display case, in which you can rotate a subset of your items for a period of time. You can also make up displays to go on a notice board, or to be mounted in a reusable frame and hung on a wall. The beauty of notice board or framed displays is that they can combine words and pictures to be interesting, informative, humorous – anything you want. For example, I’ve often thought it would be interesting to construct a framed display with pictures of all the houses we have lived in surrounded by information and pictures of key events that happened to the family in each house. Another example is a collage in which I placed thumbnails of all the posters, pictures and paintings that we have around the edges to emphasis the fact that the frame is intended to house a rotating display of posters and pictures.

Displays are relatively simple things to assemble. However, there is also huge scope for exploiting your collection to produce much more sophisticated artefacts. Under this heading are included things like photobooks, posters, greeting cards, printed T-Shirts, printed cushions, printed mugs etc.. All of these things and more are easily and cheaply obtained over the net. Since you have the digital objects, you already have the raw materials ready to manipulate and create the images and words of your choice. For example, a few years ago I had a mug for Father’s day produced on which was included an enlarged and cropped picture of both of us at my 21st; and more recently I have framed posters of the books I have digitised. Of course, photobooks (and ordinary books which can also be produced over the net) offer substantially more scope for creating much more complicated works. For example, this photobook includes items from a lifetime of work experiences. Of course, if you really like books, you could go so far as to attend a book binding course and create and bind a book from scratch as in this example of a book of a record collection.

Since one of the main aims of having collections is to enjoy them, it is also worth considering using them to create things specifically designed for enjoyable entertainment – games and quizzes. Collections can contain many objects which are known to the family, and can therefore be used to construct a game around (such as a monopoly-type game with the streets the family has lived on and chance and community cards of events that happened to the family), or straightforward quizzes, or more complicated puzzles or treasure hunts.

The above discussion has described just a few of the ways in which you can bring your collections to life, and perhaps help to enhance your enjoyment of the items they contain. I’d recommend you trying out some of them just to see if you enjoy it or not. However, there is one other thing you might want to do with your collections that needs to be included here for completeness, and that is transfer them to someone else. The recipient might be a family member or friend, or some other individual or organisation. Whoever it is, you will probably be wanting to make sure that the items go to a good home where they will be appreciated and used and exploited by somebody else.

To previous Unit                                    To Contents                                     To next Unit

U5.6 How to do it – Use

Having put the effort in to get to this stage with your collection, you’ll probably want to use the items within it in some way or other – even if it’s only to look at them from time to time. If you’ve followed the advice about storage in U5.5, the physical items should be reasonably easy to access and look through. However, there’s probably more that you can do with the digital items. For example, it is a widespread practice to load music files onto mobile phones so that they can be listened to anytime, anywhere. For photos and other images, the use of a slideshow widget (which comes as standard in Windows 7 – but a similar app for other operating systems shouldn’t be too difficult to acquire) will automatically rotate every image file in particular folders, through a small window on your computer desktop. Similarly, images in a particular folder can be specified to act as a rotating background to your screen or as a rotating screensaver image. This will ensure that every now and again you’ll get to see one or other of your collection of images.

A tablet computer is another particularly useful way of increasing the accessibility of your digital objects – especially if you use it regularly. There are a whole host of free or cheap apps that will display objects – one that I particularly like is Sidebooks which can be loaded with PDFs via Dropbox and which can present the files in a bookcase-type format. The ability to be able to call up your digital objects on such a convenient and high resolution device breathes a whole new lease of life into objects that may have been previously rarely looked at. These examples illustrate that there is no need to let your digital items remain hidden inside a computer system’s folder structure – the base files can usually be made visible and accessible; and it is recommended that you explore what can be done.

The above discussion relates primarily to using items that exist within an established collection. However, unless a collection is complete and unchanging, another aspect of ‘use’ is the addition (or removal) of items. As a general rule, it’s better to do this when the need arises, as opposed to letting a backlog build up. The larger the backlog the more daunting the task becomes – especially for things like photos where volumes tend to be large. Of course, there may be some types of collection which rely on absolute up to date accuracy for their integrity. For example, a loft management system will need to be updated immediately a change is made.

Another type of usage which shouldn’t be forgotten concerns third parties. First, the digital versions of OFC collections of valuable items (such as jewellery, paintings etc.) can be very useful when making insurance claims for loss or damage. Second, organised collections, indexes and wish tables can be useful when it  comes to passing items on down the family. If you intend to take advantage of these possibilities, you should design your collections and their metadata to serve those particular purposes.

To previous Unit                                    To Contents                                     To next Unit

U5.5 How to do it – Store

When you’ve finished digitising an item or a collection of items, the physical items that remain will need to be stored. While you’ve been sorting and organising the items, you may have been thinking about the size and type of containers you might need, which locations they might go into, and how the overall space might be utilised. Now is the time to firm up on those ideas. When deciding where to store stuff, it’s worth considering both what space is available and where you want to use the material. Clearly, if you are only ever going to use particular items in one part of your house, then it makes sense to store them in that part of the house. Likewise, If you are only ever going to use an item at a desk, it makes sense to store it in or next to the desk. Of course, sometimes it’s not possible to locate the material in the most appropriate place – but at least if one understands the most desirable place, then the most effective compromise can be made.

When you have established the space you are going to use for storage, it’s important to make the best use of that space. This often requires exploring all sorts of possible configurations to come up with the best solution. The following general principles taken from the 2 pager on ‘Practical approaches to Order from Chaos’ may help you to do that:

  • Ensure there is easy access wide enough to walk through and to get the largest objects in and out.
  • Avoid piling things one on top of another – piles make it very hard to remove things and put them back. If it is absolutely necessary, then make it just two or three or four large things like boxes which can be easily lifted off of one another rather than lots of little things. Try to avoid piles of books and papers at all cost. This also applies when you put things into boxes.
  • Avoid putting things one in front of the other unless the one behind is much taller than the one in front – it’s important to be able to see what is there and to be able to get things in and out easily.
  • Make full use of all the space – including the height. This may entail installing shelving. It may also require some experimentation to put the right shaped things into the most appropriate spaces – it’s rare to come up with the most effective arrangement at your first shot.  A particular instance of this is when using adjustable height shelving; there will be an optimum – but rarely an obvious – height for each of the shelf spaces, but it may take a little trial and error to establish what they are.
  • Finally, if possible, put things into enclosed spaces to avoid the dust accumulating. For books I am a total convert to glass fronted bookcases – particularly the IKEA BILLY range. Documents can go in filing cabinets (bit clunky though) or desk hanging folders (but they always seem to fall apart and get stuffed too full), or briefcase type filing boxes (small but pretty handy) or display folders with transparent pockets (you can get ones with 40 pockets from Wilko for about £3 – they will take 80 different A4 size documents if you use both sides, and they will sit neatly on a bookshelf – this is one of my favourite types of storage containers). For other items, I always try to put things in boxes or suitcases or plastic bags. [Another sort of container not mentioned in this extract from ‘Practical approaches…’ is the photo album with slots for slip-in descriptive tabs. If informative file titles are used, the titles can be copied and printed out for use in the slip-in slots.

Some other general points from other experienced organisers are also worth bearing in mind:

  • From Liz Davenport: A common mistake people make is to decide where to store things on the basis of where it’s easiest to take them out. This approach is a fatal trap. Clutter is caused by a failure to return things to where they belong. Therefore, storage should reduce the effort needed to put things away, not the effort needed to get them out…. Each file drawer should have at least two inches of play in it so when you want to file something, you can easily open the file with two fingers and drop in whatever you need to file.
  • From Marie Kondo: The secret to maintaining an uncluttered room is to pursue ultimate simplicity in storage so that you can tell at a glance how much you have…. The essence of effective storage is to designate a space for everything you own….. The five criteria for choosing storage containers are size, material, durability, ease of use, and attractiveness. Shoe boxes come out top by this set of criteria!

Once an item has been stored, it usually becomes invisible, concealed within its container. However, in some cases, it is possible to have the best of both worlds by using a container that doubles as a display mechanism. An obvious way to achieve this is to use a display cabinet. However, another approach is to frame items either singly or as a collage, and to hang the frame on the wall – examples of both approaches are shown in the photo below. Bookcases are, of course, specifically designed with this dual storage/display capability. Wherever possible, you should try to design storage solutions which double as display mechanisms so that items can be seen and appreciated with minimal effort.

All the above guidance relates to physical objects. However, there will also be a need to provide storage within your computer system for your digital objects. Such storage will be within a folder system, and you may be tempted to create multiple layers of folders to provide structure and organisation for its contents. As a general rule, I try to avoid this because, apart from anything else, navigating multiple layers of folders can become very tedious and time consuming. If your file titles are informative, as discussed in U5.4.2, then there will be less need to embed structure into folder layers and folder names can be kept as short as possible.

To previous Unit                                    To Contents                                     To next Unit

U5.4.3 Digitise – Choosing to retain or discard

Once an item has been digitised the critical question arises – “should I keep this or should I dispose of it?”. It’s critical because when you get rid of a physical object you are getting rid of many characteristics which cannot be experienced with the digital object (see U3.4 – the choice between physical and digital).

Sometimes, the initial motivation to undertake the OFC project may have been to get rid of a load of stuff in which case you may be more inclined to dispose of things than to keep them. On the other hand, sometimes the objects you are dealing with are things you feel a great deal of affinity for and which you have had for a long time. In this case, you may find it difficult to dispose of some of these things. Regardless of which of these positions you are in, it’s always worth remembering these two things:

  • When you take a decision to destroy something that you’ve digitised, you can take heart that its digital counterpart will still be there for you to look and enjoy.
  • With a hybrid collection containing just a few physical examples, the clutter of the physical can be eliminated while still retaining some examples of the physical for their special properties to be enjoyed.

Even with these two thoughts in mind, you may find it helpful to have some clear rationale for making such decisions – as described in the ‘Excluding items’ section of U5.3.  You may get some ideas for what such rationale might be from the following list of types of physical items that were retained in a memento collection (as reported in a broader study of the intrinsic value of physical objects):

  • Items for which only the originals confirm their validity
  • Trophy items to be collected and enjoyed in the future
  • Publications with fixed spine bindings and/or special papers
  • Publications which mention, friends, colleagues or the Owner
  • Items published by an organisation or programme that the Owner works/worked for
  • Items that the Owner has written, produced, assembled or made a significant contribution to
  • Physical features which make it difficult to digitise the item and/or to reconstruct it from the digital copy
  • Items illustrating a physical form due to a development in technology
  • Items of an age that provides a quality of uniqueness
  • Items possessing aesthetic or artistic quality including photos
  • Items that the Owner wants to keep as mementos of his and her life
  • Items that you want to have easy access for showing to others
  • Items that do not belong to the Owner

Of course, these are just a few of the possible reasons for keeping physical objects. The key is to understand what your own reasons are and to apply those reasons consistently.

To previous Unit                                    To Contents                                     To next Unit

U5.4.2 Digitise – Titles, metadata, indexes and labelling

Digital objects are held in files which have names (file titles) and a variety of associated descriptive information (metadata). In the Windows operating system the metadata is referred to as a file’s ‘properties’; whereas for the Macintosh the metadata is obtained by selecting ‘Get Info’.  While the content of the metadata is not openly displayed and is largely controlled by the operating system, the content of the file title is very visible and almost entirely controlled by the user, and so provides a wonderful vehicle for including key descriptive information about the object(s) in question. Hence, it is recommended that meaningful file titles are created whenever possible so that the contents are comprehensible without relying on any kind of folder structure or associated index. Sometimes this can produce long file names, but the advantages to be gained in terms of clarity and communication usually far outweigh any disadvantages of having lengthy names up to the limit set by the operating system. However, one thing to look out for, under the Windows operating system at least, is that the permitted total file name length includes the length of the path name of the folders that the file lies within. This sometimes manifests itself by the system not allowing you to move a file to its final destination in a folder with a pathname longer than that of the folder in which the file was prepared. Hence, it’s generally a good idea to keep the names of upper level folders as short as possible to give you plenty of leeway with the length of the individual file titles.

A file title can be used to contain information that you might actually be looking for in the file itself. For example, if you digitise your annual car insurance policy papers, you could include the name of the insurer, the period covered and the amount you paid for the cover, in the file title. Taking this approach may actually mean that looking at the file title is sufficient and that you don’t have to open up the file itself. Another advantage is that, if you have several files dealing with the same sort of thing in the same folder, then a scan of the file titles actually tells you a history of what’s been going on. For example, if you digitise your health-related documents, then you can get a good idea of your history of illnesses and operations by just scanning the file titles. In summary, file titles can constitute a mini-database of easily viewable information; we should make use of this capability whenever possible.

The information in file titles is a sort of metadata – but rather limited in its quantity and type. In contrast, operating systems hold much more metadata about each file – and some of that metadata can be specified by the user. For example, for music files under the Windows operating system, the details tab of the file properties includes artist, album, title, genre, and date fields which can all be adjusted by the user. Similarly, the metadata contained in digital photo file properties is extensive. However, sometimes the metadata you want to hold will not be catered for by the operating system, and in these cases the answer is to establish your own index and to link the entry in the index with the digital object by using a unique reference number/code. The number/code will be allocated in the index first and then included in the file title – elements of a typical file title structure are shown below:

  • a unique identifier
  • a description of the contents
  • the earliest date associated with object concerned.

Then, any amount of additional metadata about each object can be held in the index. For example, in a memento index you can include some key words (facets), how you digitised each item, and where the physical items are stored.

Specialised databases can be used to create indexes; however, these are to be avoided where possible as they lock you into specific software suppliers and, inevitably, regular (expensive) upgrades. Usually, standard spreadsheet software such as Microsoft Excel will provide sufficient functionality for an OFC collection index.

When a unique identifier from an index is included in the file title of a digital object, the same unique identifier must also be attached to the associated physical object if it has been retained. For boxes, suitcases and similar containers, I use white strung tags which are cheaply available from stationery shops. For work-type documents, I used to write on the top right corner in blue felt tip pen. However, I decided that I wouldn’t want to permanently disfigure mementos in this way, so I have been using removable post-it note index tabs for these – though it is not a perfect solution because they do come off by mistake occasionally leaving an unidentified item. All these solutions are illustrated in the picture below.

To previous Unit                                    To Contents                                     To next Unit

U5.4.1 Digitise – Technology requirements

The main digitisation techniques for OFC projects are scanning and photography regardless if you do it yourself or use a service. In addition, a large variety of other digital technologies may be useful in the course of an OFC project. Each of these aspects is discussed below.

Mainstream digitisation technologies

The main technologies you will need to undertake OFC projects are a scanner, a camera, and a computer system.

Scanning: For scanning, a flatbed is usually necessary as not all documents will be able to go through a sheet feeder. Of course, a scanner with both a flatbed and a sheet feeder provides the best of both worlds. Most scanners are capable of handling up to A4 size paper and this is usually adequate. However, A3 scanners are available if you have a lot of larger sized items to deal with – but they are more expensive and bigger to house. If you only have a few larger sized items, you may find it expedient to simply photograph them rather than buying an A3 scanner. When scanning documents, 300 dpi (dots per inch) is usually a sufficient resolution setting, and the scans are probably best output in PDF format. For images such as photographs, it is worth increasing the resolution to 600 dpi, and the scans can be output in JPG format. Documents that are purely black and white are best scanned in black and white; but all other documents and all images are probably best scanned in colour.

Photography: For photographing items, a modern camera, including those on more recent mobile phones, will provide very acceptable images of both objects and of large documents which are too big to scan. They are also useful for digitising groups of objects, such as birthday cards, which you may not want to go to the trouble of scanning each one. Cameras of around 10 megapixels and above will produce document images which can be enlarged sufficiently to view detail and read text. However, two other factors need to be taken into account to ensure a useful image. First, the photos need to be taken in a place where reflections and glare do not appear on the images; and, second, for documents and other flat objects, the camera needs to be held in exactly the same horizontal and vertical planes as the item being photographed, otherwise the image will appear shorter on one side than the other. A tripod can help to avoid this latter problem – but the camera still has to be positioned correctly on the tripod in the first place.

Computing: A computer system (i.e. a computer, keyboard and screen) will be required to store, manipulate and view the digital objects. Most modern systems with, for example, an i3 processor or above and a 500Gb+ disk, have sufficient power and storage to be able to handle the digital objects emerging from standard OFC projects. However, anything out of the ordinary such as very high volumes of items, very large file sizes, or applications with complex manipulation functions (video editors, for example)  may need a system with a slightly higher specification. Desktop systems are fine, but laptop systems take up less space and are certainly more portable. Tablet computers probably don’t currently have the functionality needed to act as the master OFC system, though this may change in the future (however, they are excellent secondary vehicles for providing easy, quick and convenient access to the digitised objects). Most modern computer systems include the basic software to display and manipulate images, to play music and videos, and even to rip (i.e. digitise) CDs. However, you may need to obtain word processing software to manipulate PDFs, and spreadsheet software if you are intending to create indexes.

Digitisation Services

You may have some items for which you are simply not equipped to digitise. For example, old reel-to-reel tape, cine film, 35mm slides, negatives, or VHF videos. For such requirements, a wide variety of services are available and advertising on the net. As always, you should check for reviews to try and ensure that the price is reasonable and that the quality of service is good. It may be best to use a local service, if one is available, so that any issues which might arise can be resolved face to face. Similar services also exist for scanning documents (which may be useful if you have very large volumes), and for more esoteric requirements such as 3D photography of objects. It’s really just a matter of weighing up the time and money you will have to spend doing something yourself, against the cost of having someone else do it for you – possibly to a higher standard.

Other useful technologies

A variety of other technologies may be useful in OFC projects including the following:

  • Recording: the ability to record someone talking about an object, or to record the sounds at an event or location, is easily acquired by downloading an app onto a modern mobile phone. The app will be either free or low cost, and the output will probably be of good quality and in MP3 or M4A format.
  • USB turntable: If you want to digitise a 78, 45 or LP record, a USB turntable will send its output in digital form to a cable which can be plugged into the USB port of a computer. Tape cassettes can also be digitised either by feeding the output from a cassette player’s headphone socket into the turntable, or directly if the turntable unit includes a cassette player as well. The digital sounds can then be edited using sound and music editing software (see below).
  • Sound and music digitising and editing software: This software allows digital sounds to be edited and output in a variety of formats. A very well known and widely respected application of this type is the free, open source, cross platform, package called Audacity which can be downloaded from the Audacity web site.
  • Movies: most modern cameras and mobile phones have excellent movie-making capabilities.
  • Video editing software: You may need such software to edit a video that you have, or to combine two or more videos. Some computer systems include video editing software, however, if yours doesn’t, there are plenty of free or low priced software packages available.
  • RFID: Radio-frequency identification (RFID) uses electromagnetic fields to automatically identify and track tags attached to objects. The tags contain electronically stored information. Passive tags collect energy from a nearby RFID reader’s interrogating radio waves. Active tags have a local power source (such as a battery) and may operate hundreds of meters from the RFID reader. Unlike a barcode, the tag need not be within the line of sight of the reader, so it may be embedded in the tracked object. The cheaper RFID systems can be acquired for a few hundred pounds – but prices are continuing to fall.

To previous Unit                                    To Contents                                     To next Unit

U5.4 How to do it – Digitise – Introduction

There are three main aspects to consider in the digitisation activity: first, there is obviously a requirement for some technology to perform the digitisation with; second, consideration must be given to the information that the resulting digital objects are labelled with or that is stored about them; and, third, a decision has to be made after each item has been digitised as to whether to retain it or to discard it. These topics are discussed in the following units:

U5.4.1  Digitise – Technology requirements
U5.4.2  Digitise – Titles, metadata and indexes
U5.4.3  Digitise – Choosing to retain or discard

To previous Unit                                    To Contents                                     To next Unit

U5.3 How to do it – Sort & organise

This is when you start to actually get to grips with the objects, and the things and places they are stored in.

An initial look

You might first investigate the items a little further to get a better feel of what there is, without actually doing any sorting. This can be an exciting time of discovery if you are not familiar with the material you’re dealing with. While you’re doing this, you should also be keeping an eye out for where the sorted material will eventually be stored, and be thinking about what containers and storage arrangements will work best. As you subsequently start to sort through the objects, you’ll be able to build upon this germ of a storage plan in your mind, and your storage ideas may actually affect some of your sorting decisions.

General Approach

The general approach to sorting & organising is summed up in the following extract from the two-pager on ‘Practical approaches to Order from Chaos”:

“A very useful technique for this is to do a quick sort through of everything, placing different sub-categories of things into different piles, and, at the same time, setting aside anything that needs throwing away or that you know definitely that you don’t want to keep. If the sub-categories aren’t obvious when you start, that’s no problem – they’ll soon start to emerge as you continue to sort through the material. After this initial sort it will be clearer what different types of things you have and what different types of storage you’ll need for different sub-categories. For example, if your boxes contain lots of documents and various artefacts, then one approach would be to put the documents into display folders and the objects into a wall display cabinet (IKEA has a good selection of these as well). Having done the initial sort through, you can then tackle each sub-category pile and do a more detailed sort, perhaps putting like with like or sorting things by date – or whatever’s appropriate. Things can be put into their storage locations/containers as you go through this process or after you’ve dealt with each sub-category pile. As you may have gathered already, this whole process is designed to gradually turn a disordered set of material into more coherent organised  groups of things. The further you get through this exercise, the less daunting the task becomes as Order starts to appear from Chaos. Right from the beginning of the quick sort, you will, little by little, have a better handle on what you have and what you need to do with it.”

Of course different types of objects may require special ways of sorting them: approaches for photos, and documents, are outlined below:

  • Photos: Identify a sort criteria (examples could include people, dates, or places), and go through all the material placing individual items into piles according to the criteria you have selected. Once you have done an initial sort, go through each subset checking the allocation is correct and getting the order correct within each subset. For prints, their physical appearance and whatever numbers or information has been recorded on them (front or back), can be used to identify which prints were produced at the same time. The same approach can be used to match up different strips of negatives that came from the same film. At this stage negatives can also be matched to the prints. If you are not familiar with the contents of the photos (if, say, they belong to parents or relatives, or are a job lot purchased at an auction), use whatever means are available to identify what they are of and when they were taken. If there is someone available who is familiar with them, talk with them about each photo. Note the contents and date on the back of each photo. Alternatively, note an interim serial number on the back each photo and record the information about it in a notebook or computer.
  • Documents: The obvious way to sort documents is by topic and then by date within each topic. However, other categorisations may present themselves. For example, payslips are substantially different from A4 letters; and theatre programmes are substantially different from bank statements. Such distinctions will become obvious as you start sorting. A more general approach is advised by Marie Kendo in her book ‘The life-changing magic of tidying’: she advocates saving documents in three categories – needs attention, should be saved (contractual documents), should be saved (others). Another angle that is worth considering is the uses to which the documents will be put: it is usually better to keep documents together that are going to be looked at together.

Excluding Items

A key part of the sorting and organising process is deciding what to eliminate completely from the collection i.e. what to dispose of or throw away. Indeed, sometimes the desire to get rid of a lot of stuff is the main reason people embark on an OFC project. Some people like Marie Kendo, and Liz Davenport advocate retaining a minimum amount of stuff. However, in the end, it is entirely up to the collection owner to decide what is kept and what is disposed of; though it will probably be useful to have some kind of rationale for doing so and to apply that rationale consistently. An example of such a rationale in the form of a list of reasons for keeping mementos is shown below:

  • So as not to forget
  • To be reminded of
  • For reference
  • Because it makes me feel a sense of pride
  • To pass on and be added to the family history
  • Because it’s too special to get rid of
  • Because it’s very unusual

For collections which are to be used not only by the owner, but also by family and friends, and perhaps by future generations, then different rationale may apply to different groups. For this level of detail it is advisable to create a table of some sort such as this Wish Table Template.

Indexing

If you are planning on using an index for the collection, you may wish to set it up at this stage so that items can be entered into it when they are organised/digitised (‘digitised’ is included here because you may decide it is easier to digitise each item as you organise each one in turn). This will enable the items to be labelled with the unique number allocated by the index, as each one completes the sorting/organisation process.

Storage Planning

Another thing that should be done in the course of sorting and organising is to think some more about storage possibilities. As you deal with each item, you will start to get a feel for the size and type of containers you might need, which locations they might go into, and how the overall space might be utilised.

Commentary

If you are enlisting someone else’s help to identify things in the sort process (as, for example, in the case of old family photos when you might ask advice from an older relative), it may be worthwhile making a recording of what the other person says about particular items. This will not only help downstream organisation / indexing; but it can also provide a valuable addition to the content of the collection. Recording a conversation can be easily done using a mobile phone for which many cheap or free recording apps are widely available.

To previous Unit                                    To Contents                                     To next Unit

U5.2 How to do it – Plan

OFC projects tend to be informal, personal activities, for which a detailed plan is not really necessary. However, when setting out to do anything, its always worth having some idea of how you are going to do it. The following points might help you to flesh out those ideas:

  • What’s the end state? Having an idea – even a vague idea – of what you’d like to finish up with at the end of the project may help you get there.
  • Do you have the equipment? Are you going to use a scanner and/or a camera for digitisation? Do you have a computer? You will need to have such equipment in place when you start the project.
  • Check the net: If you’re unsure about what equipment is available, what it’s possible to achieve, or how to do things, always remember that it’s worth checking the internet for answers.
  • Do you intend to have an index? It’s worth deciding on this right at the beginning of the project because, if you have an index, it will be central to your activities. It’s certainly not essential, but if you’re thinking about having one, this Photo Index Template or this Memento Index Template may provide useful starting points.
  • Check U4.4: Don’t forget to keep in mind the general points outlined in Unit 4.4.
  • Write down the plan: No matter how vague your plan is, it’s worth writing it down. This will help you to clarify your thinking about what you’re going to do; and it will always be there to revisit if you want a reminder, or if you want to revise your plans.

To previous Unit                                    To Contents                                     To next Unit