The Digital Display Case

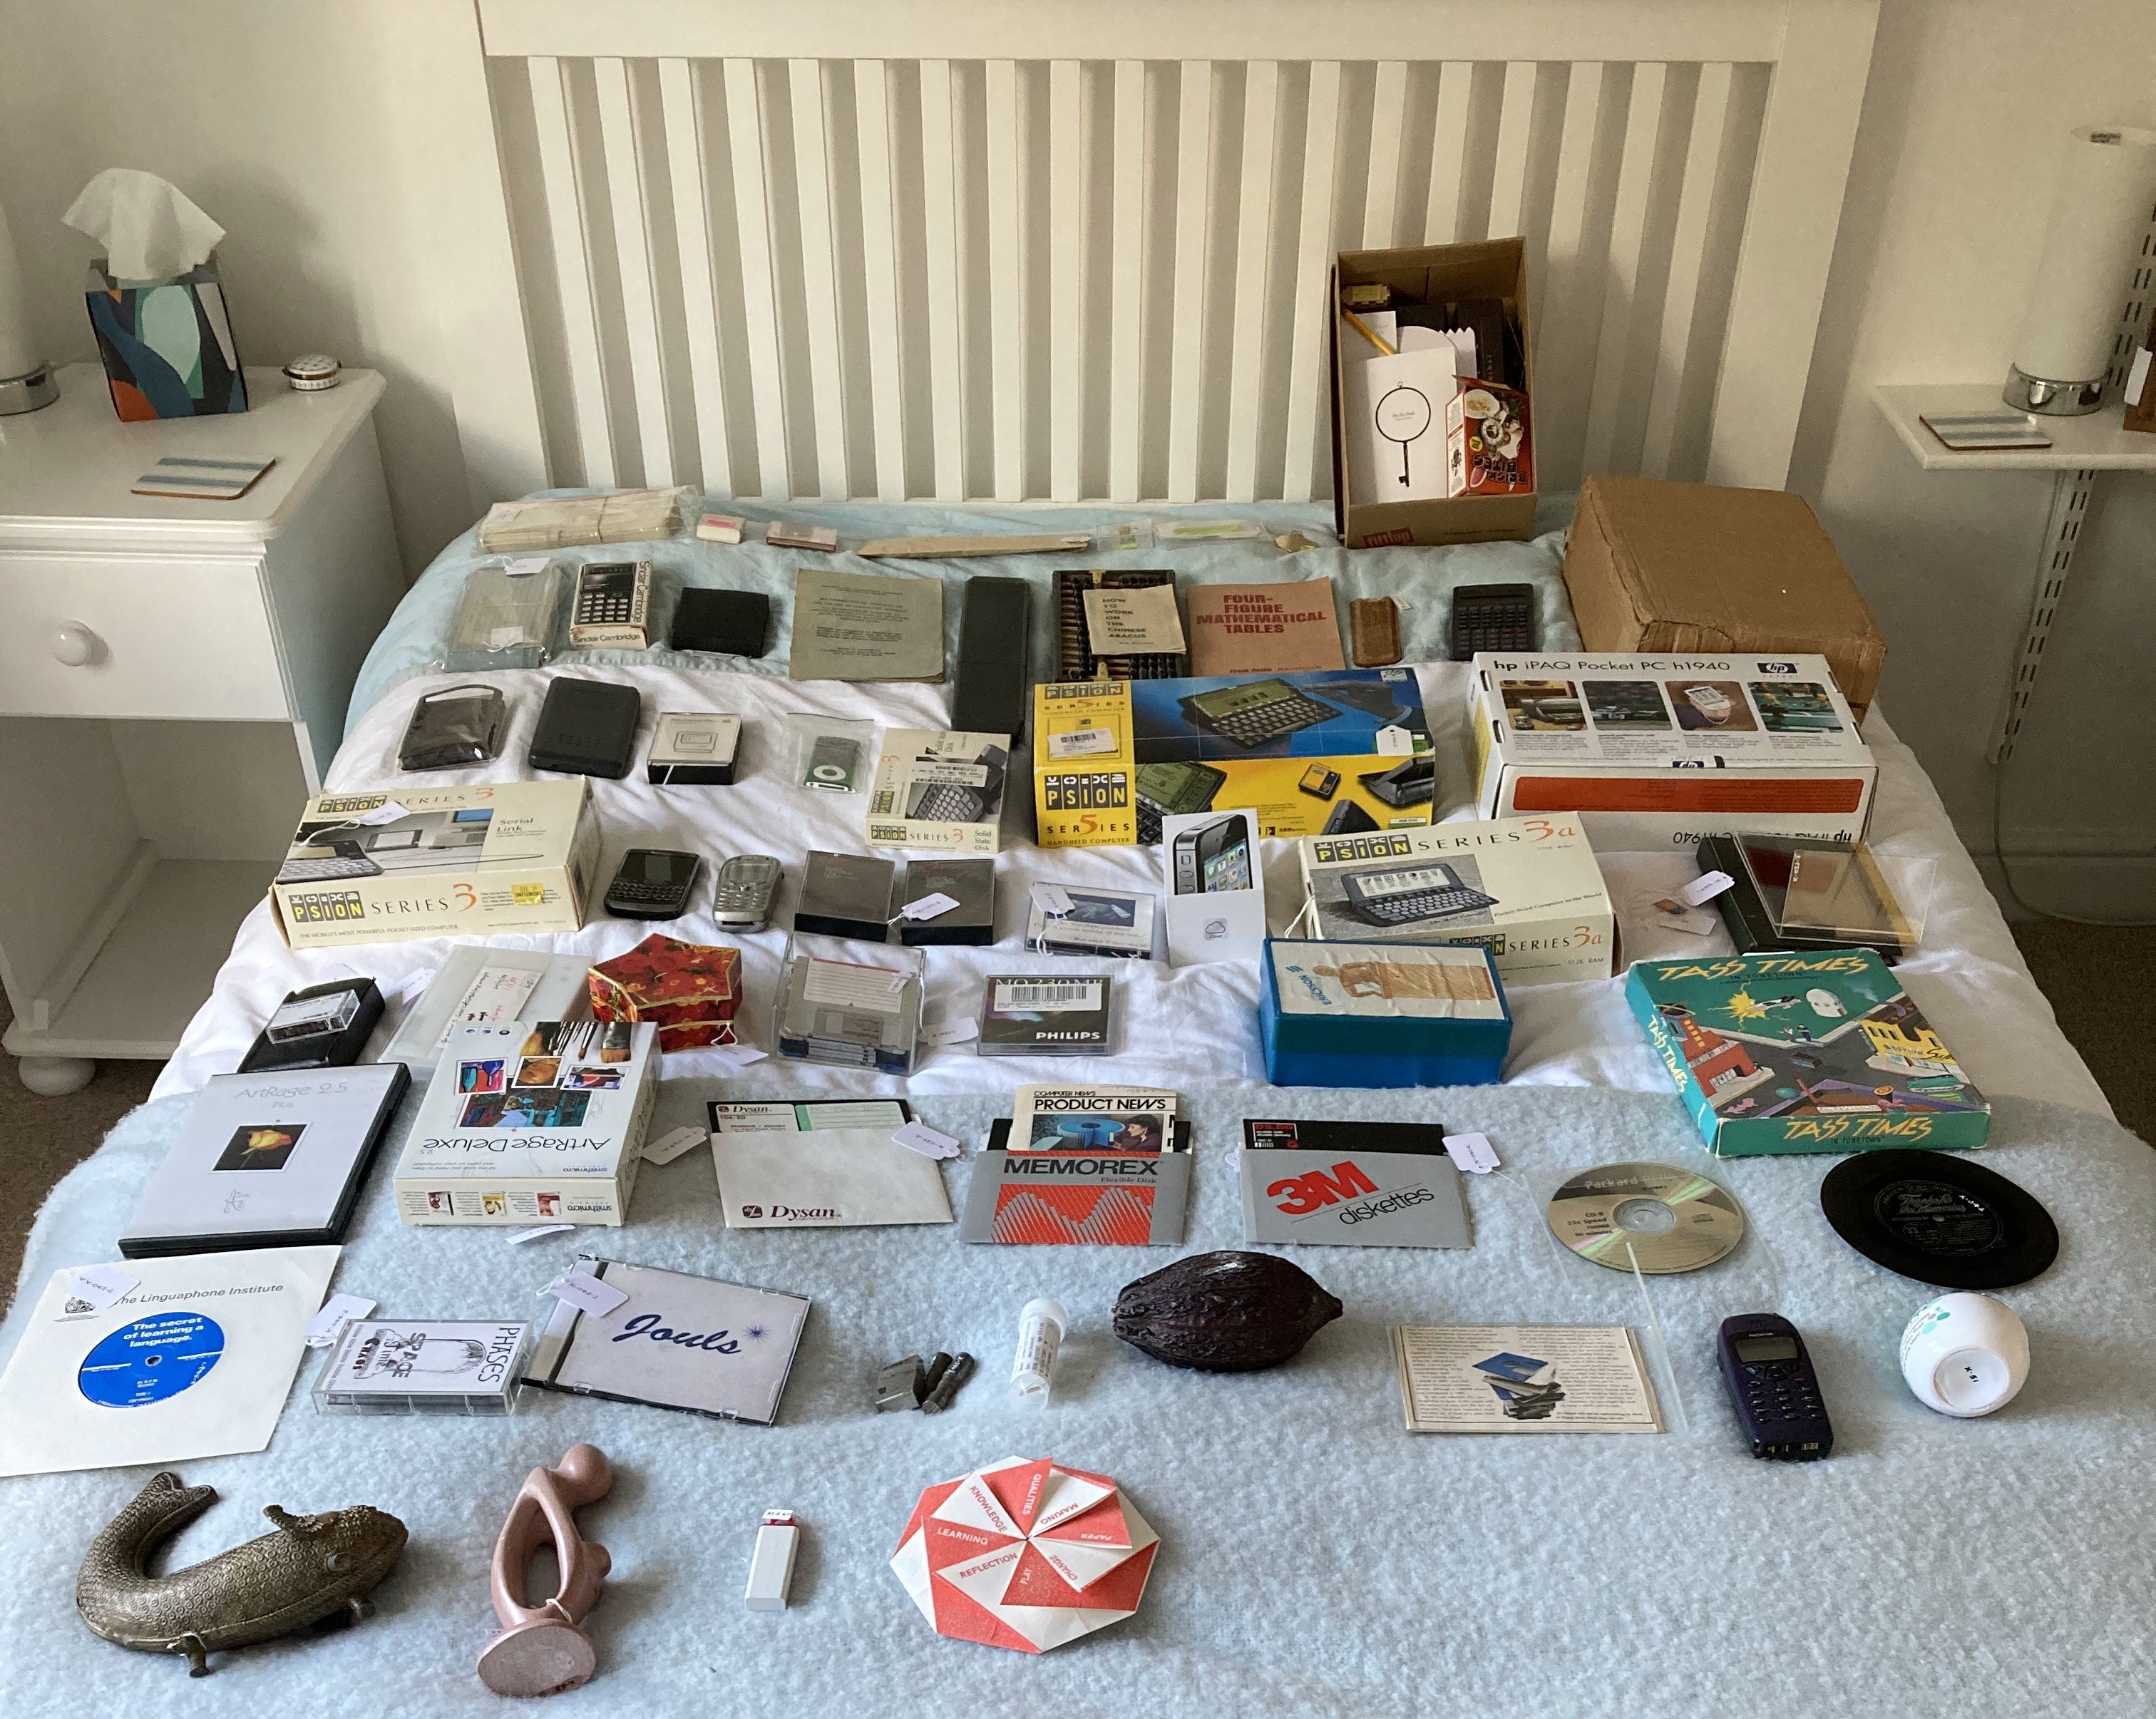
While I was cataloguing and marking the items in the display case collection, I took the opportunity to photograph each one. Not just a single photo; multiple digital images taken from different angles so that viewers could get a feel for all aspects of the object.

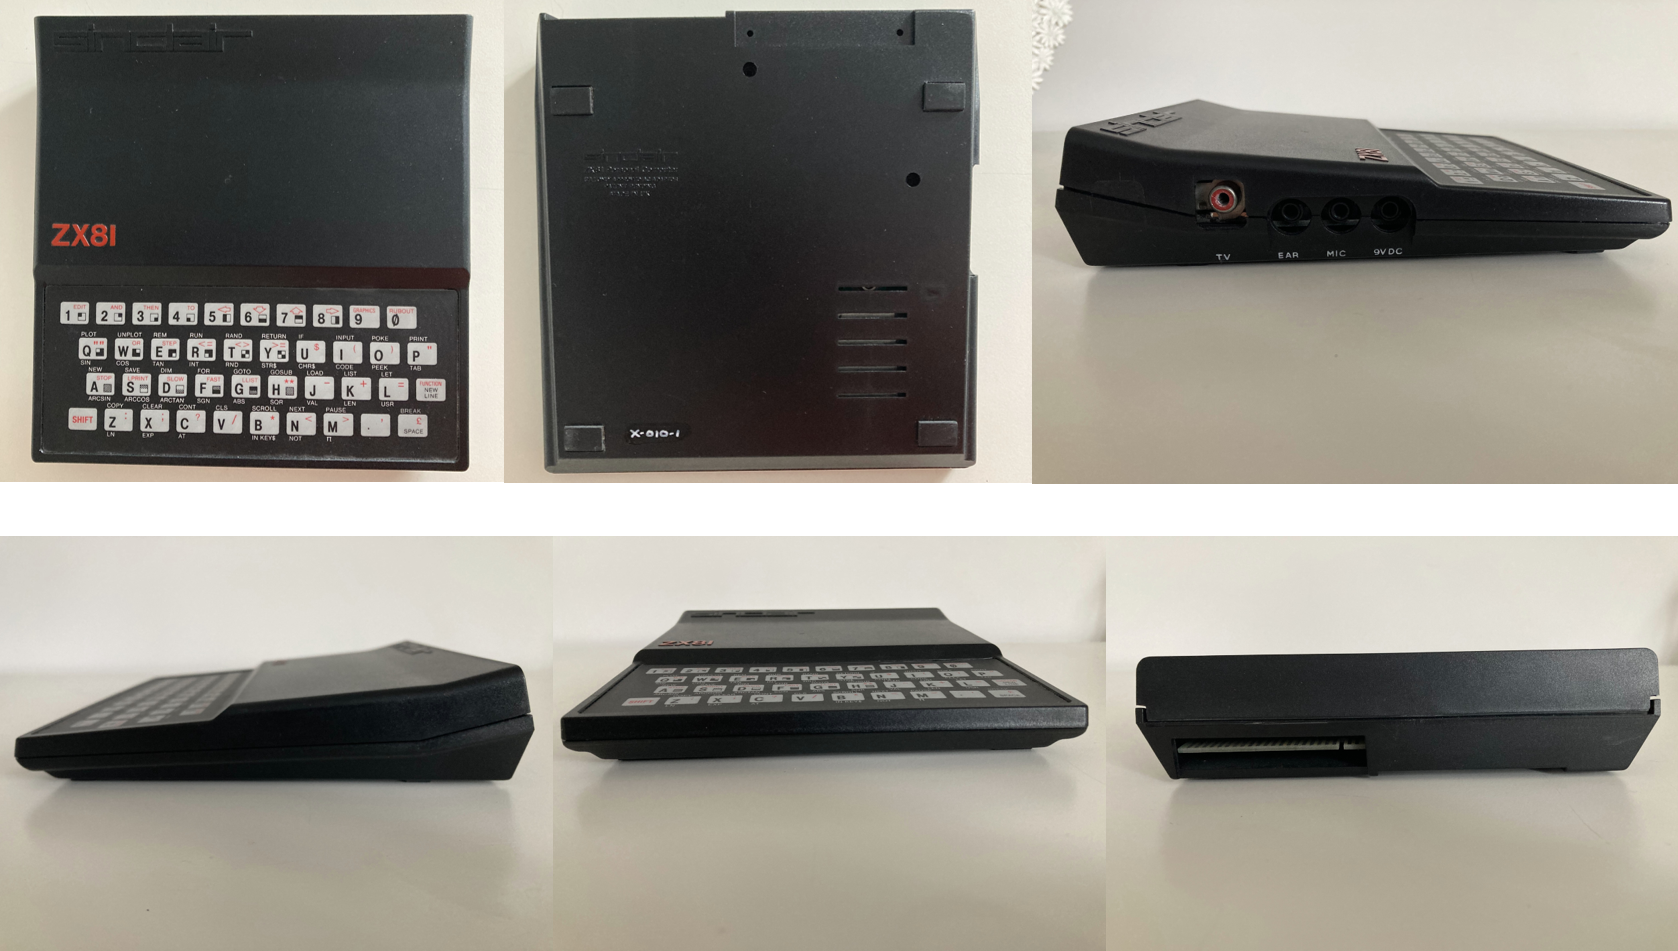
Of course, proper 3D images would have been preferable – but I don’t have the equipment or the focus at present: I want to get on with this journey and get the newly moved display case back in action.

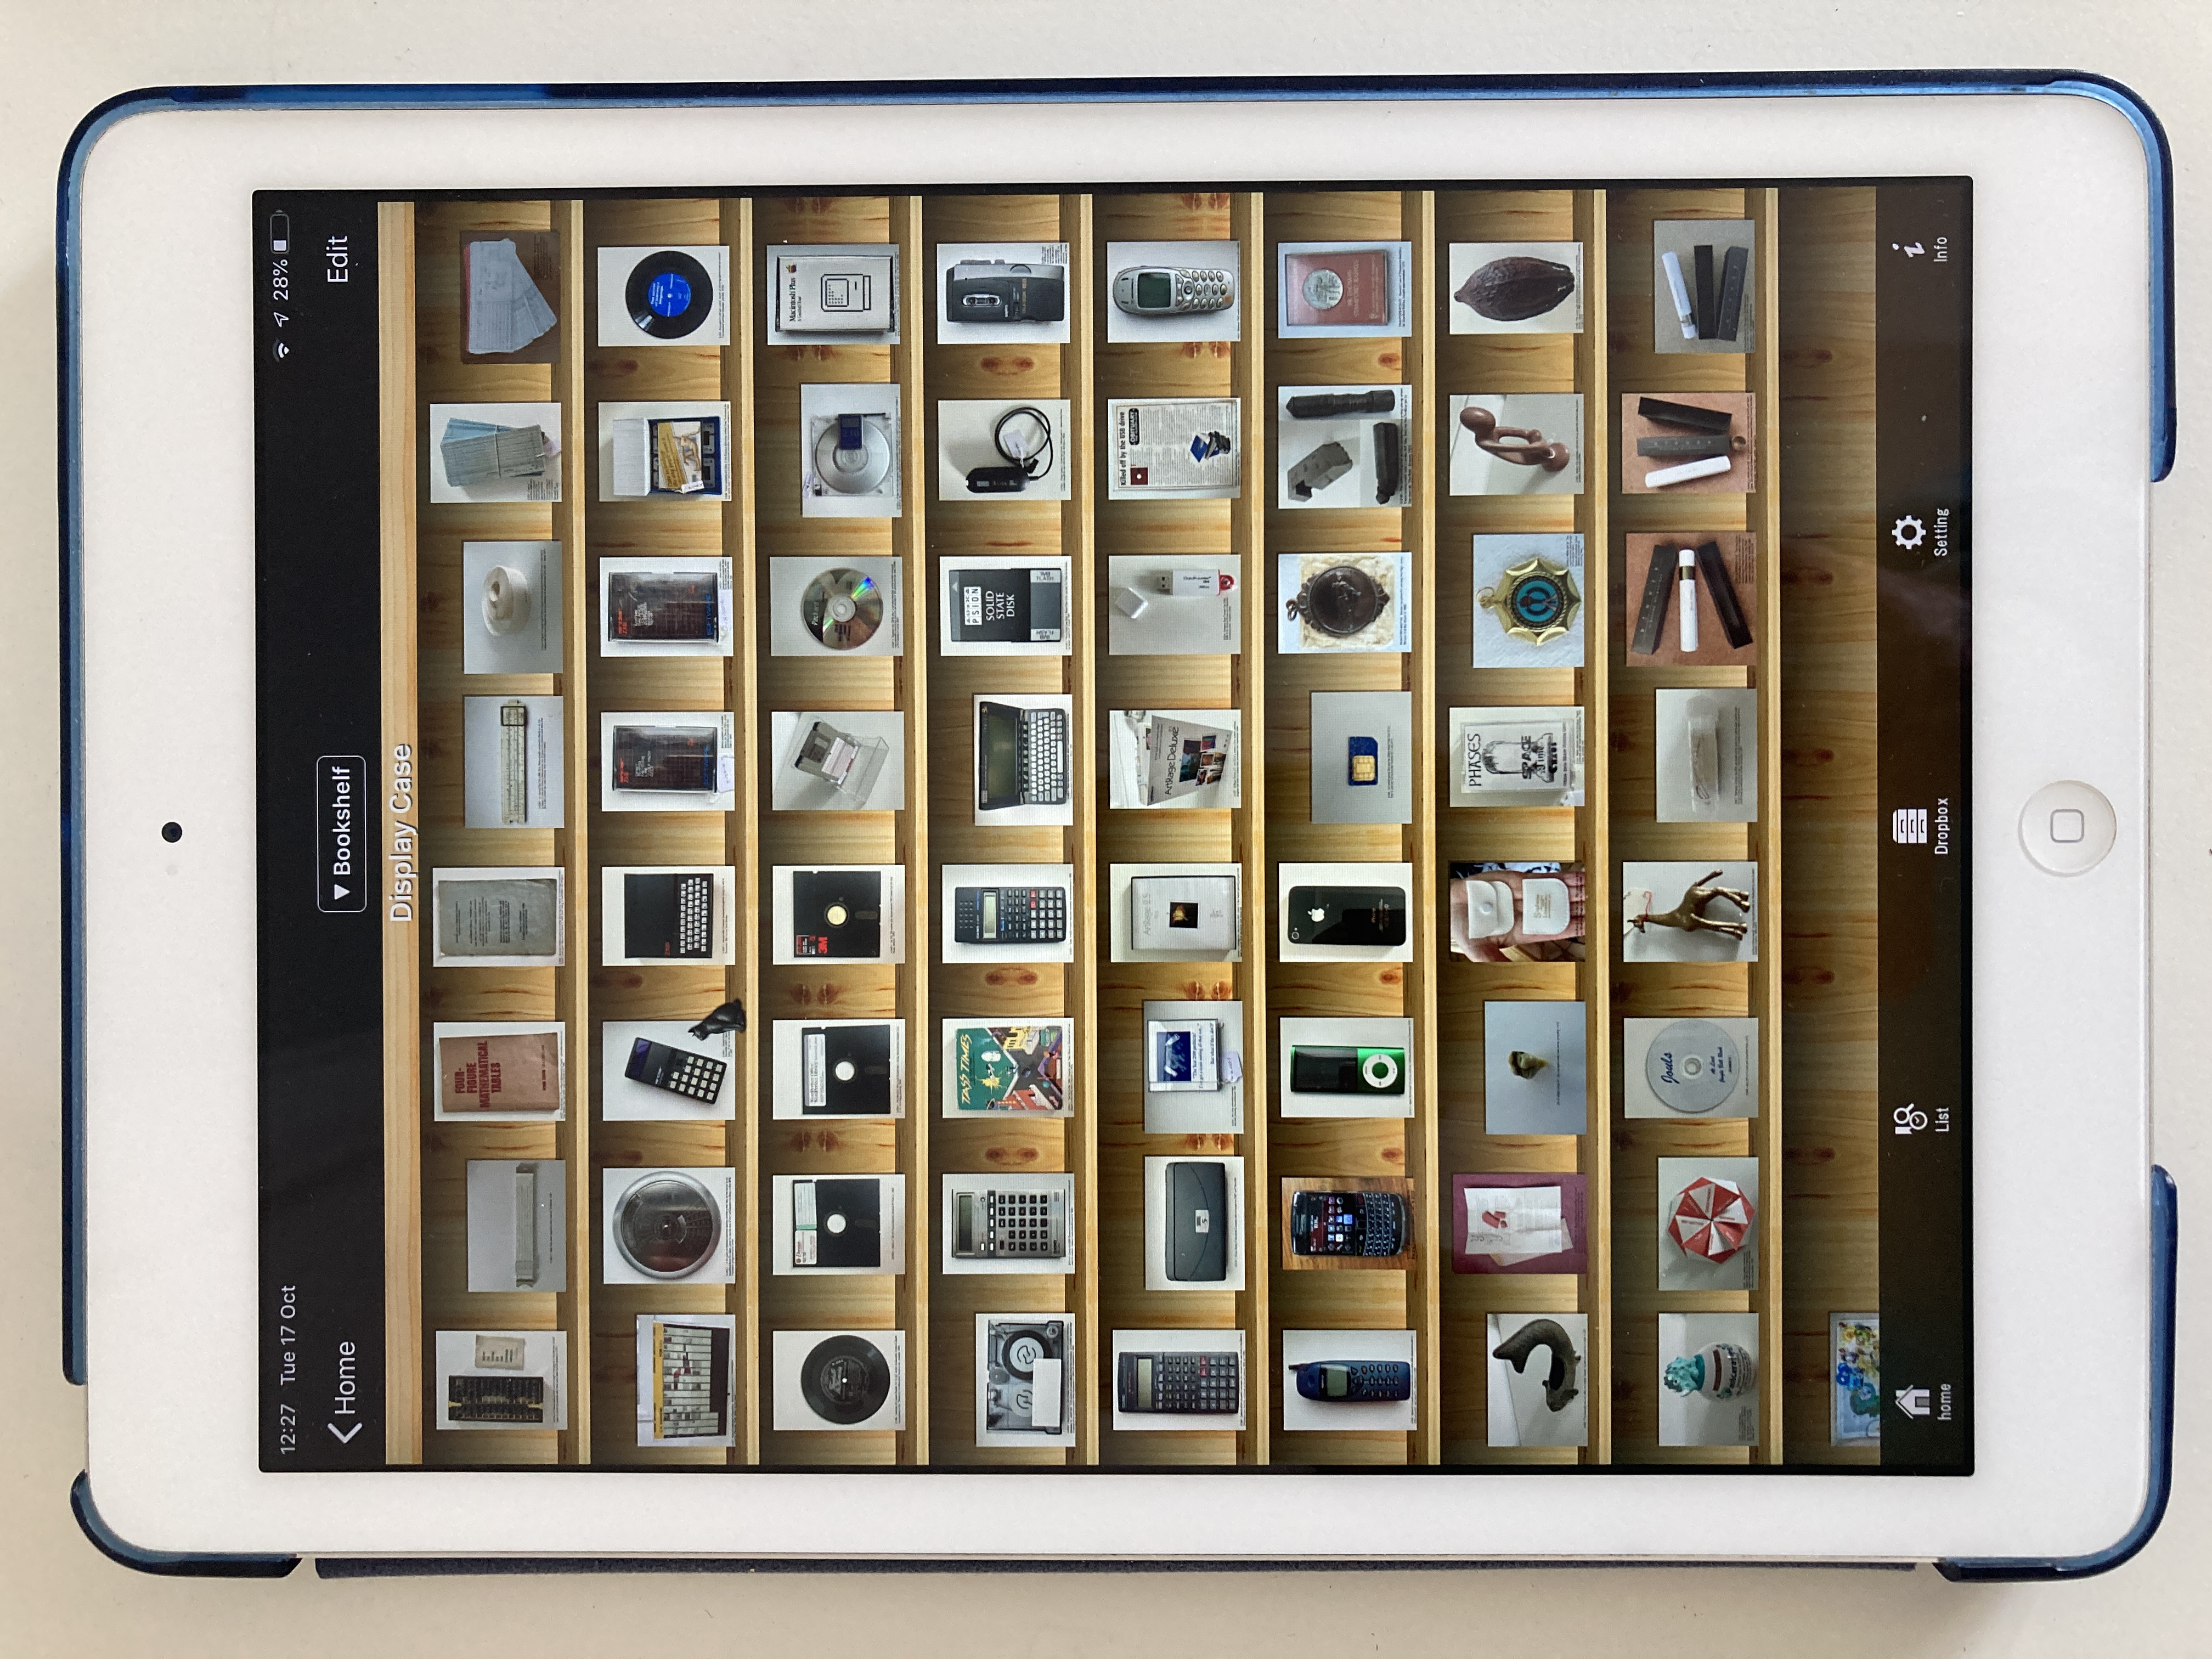
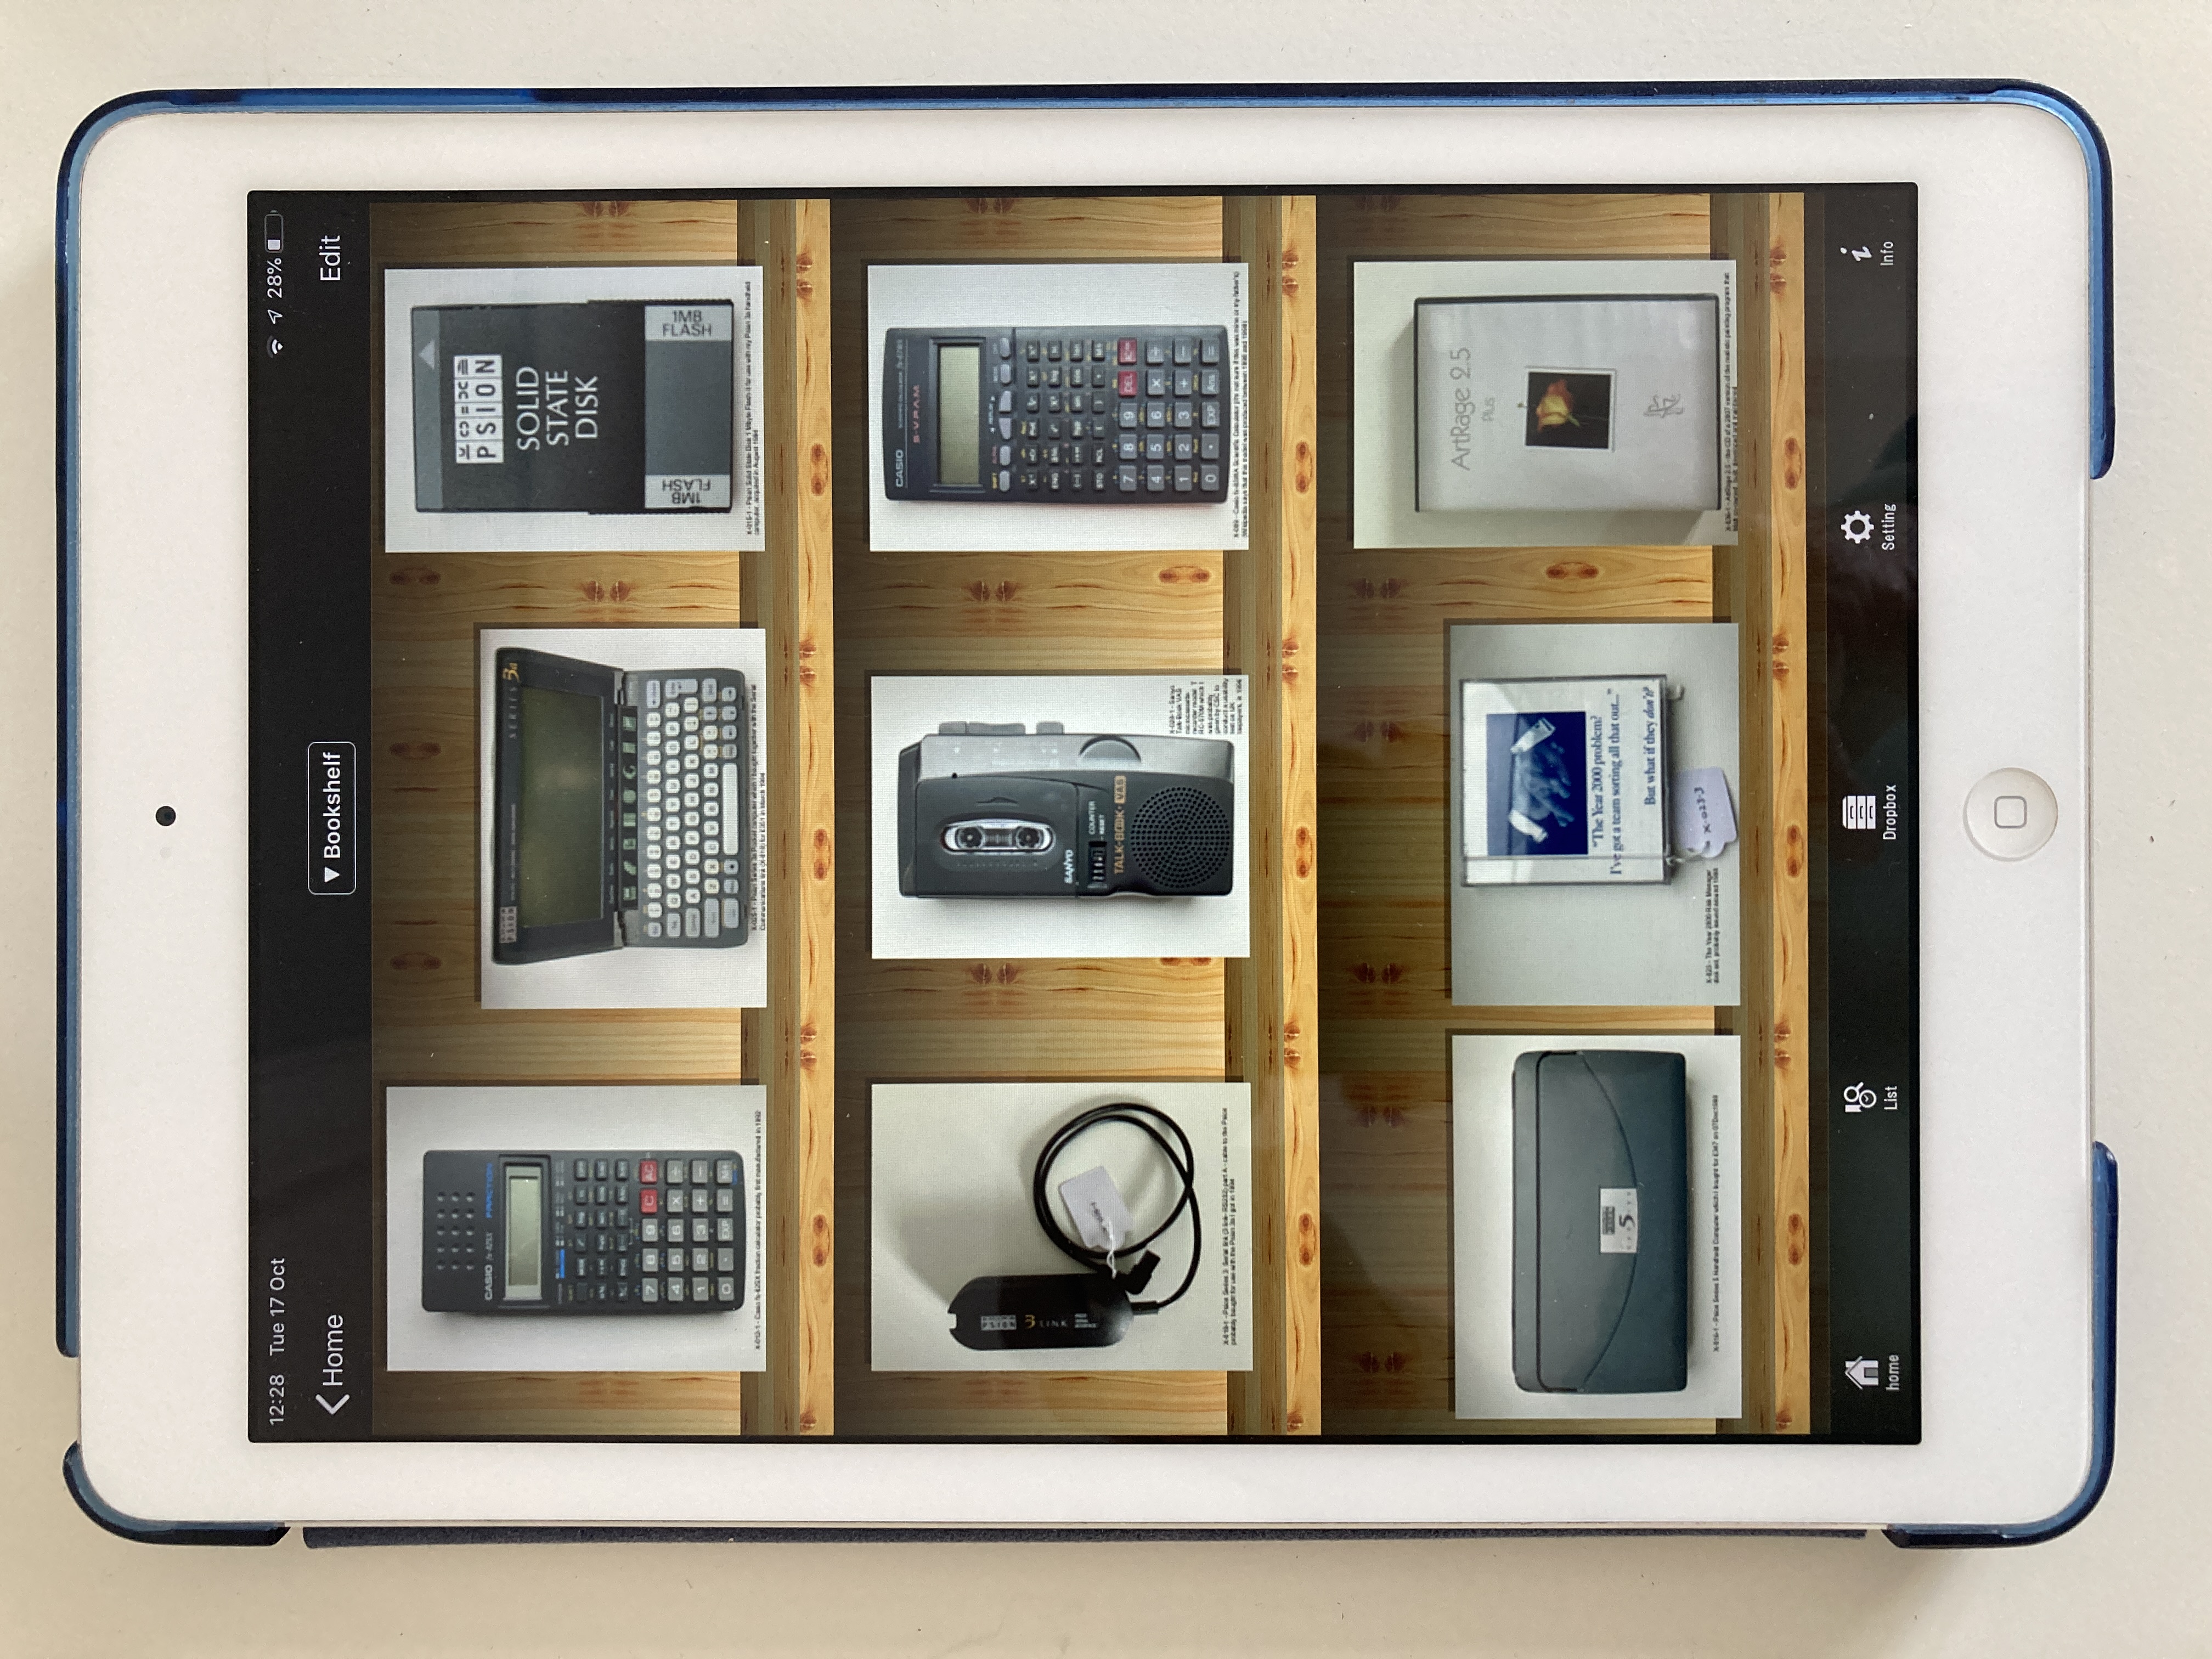
The destination for this digital version of the collection is the iPad app, SideBooks, which I have used to display objects emanating from many of the different OFC journeys, and which makes it easy to import files by providing a specific option to download from DropBox (a Dropbox account is easily set up and free to operate at a small scale). Uploading and downloading to and from Dropbox is very quick through a modern broadband connection. SideBooks displays the first page of multiple PDF files in a bookshelf format (with a selection of themes) which can be expanded or reduced to show more or fewer items accordingly, as illustrated below by a view of the complete display case collection next to a much-enlarged version.


In this digital version of the collection, each item is represented only by a single file regardless of how many individual elements it comprises. For example, the Sinclair Cambridge Calculator is accompanied by a plastic case, an instruction booklet and the cardboard box it was packaged in. Multiple images of each of these four items are all contained in a single PDF file, even though they are each individually catalogued and indexed. This is achieved by assigning an overall reference number to the set of related objects (X-002) and by assigning sub-reference number to each object: X-002-01 for the calculator, X-002-2 for the plastic case, X-002-3 for the instruction booklet, and X-002-4 for the cardboard box. Each of these individual items has its own PDF file containing the relevant set of photos, and these are the master digital files associated with the index items. However, for the purpose of the digital display in SideBooks, all the images contained in each of the four PDFs are collected together in a single PDF file titled “X-002 – Sinclair Cambridge Calculator which I gave to my father, Fred, for his birthday in 1977.pdf” as shown below.

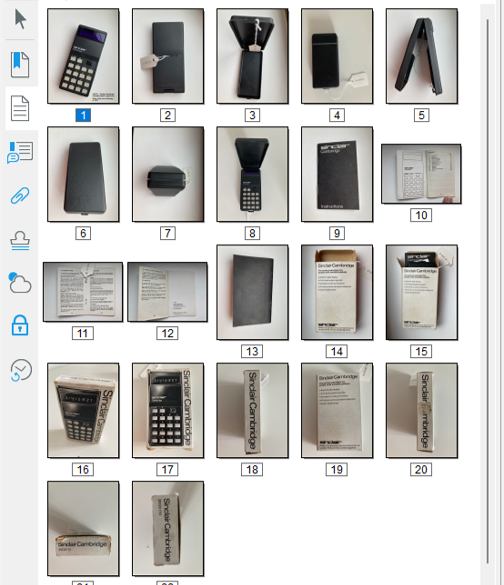
In cases in which an object has no associated elements, there is no need to use sub-reference numbers, and the same PDF file can be used as the master digital file and the file for display in SideBooks, for example “X-019 – Blackberry Bold 9700 similar to the one I started to use in CSC in 2009”.

This approach to indexing has been specifically designed to accommodate the capabilities of the digital display application that I am using – SideBooks. If some other mechanism is used, an alternative design may be appropriate. SideBooks enables individual items to be selected and then for each page of the PDF file to be leafed through. Consequently, each photo has been given a separate page in the PDF file. Some brief information about the contents of each PDF is provided at the base of each of the first photo in each file. A more thorough approach might label every photo in every file, but I didn’t think there would be sufficient benefit to make it worth the effort. A more worthwhile exercise would be to provide a short narrative for each object, telling the story about what it is and how it came to be in the collection. This could be provided on the second page of each PDF; and perhaps also delivered as a spoken word sound file which could be selected and played. Such a sound file might also be used to augment the physical display if viewers were able to verbally request that it be played – “Alexa, play X-019”.

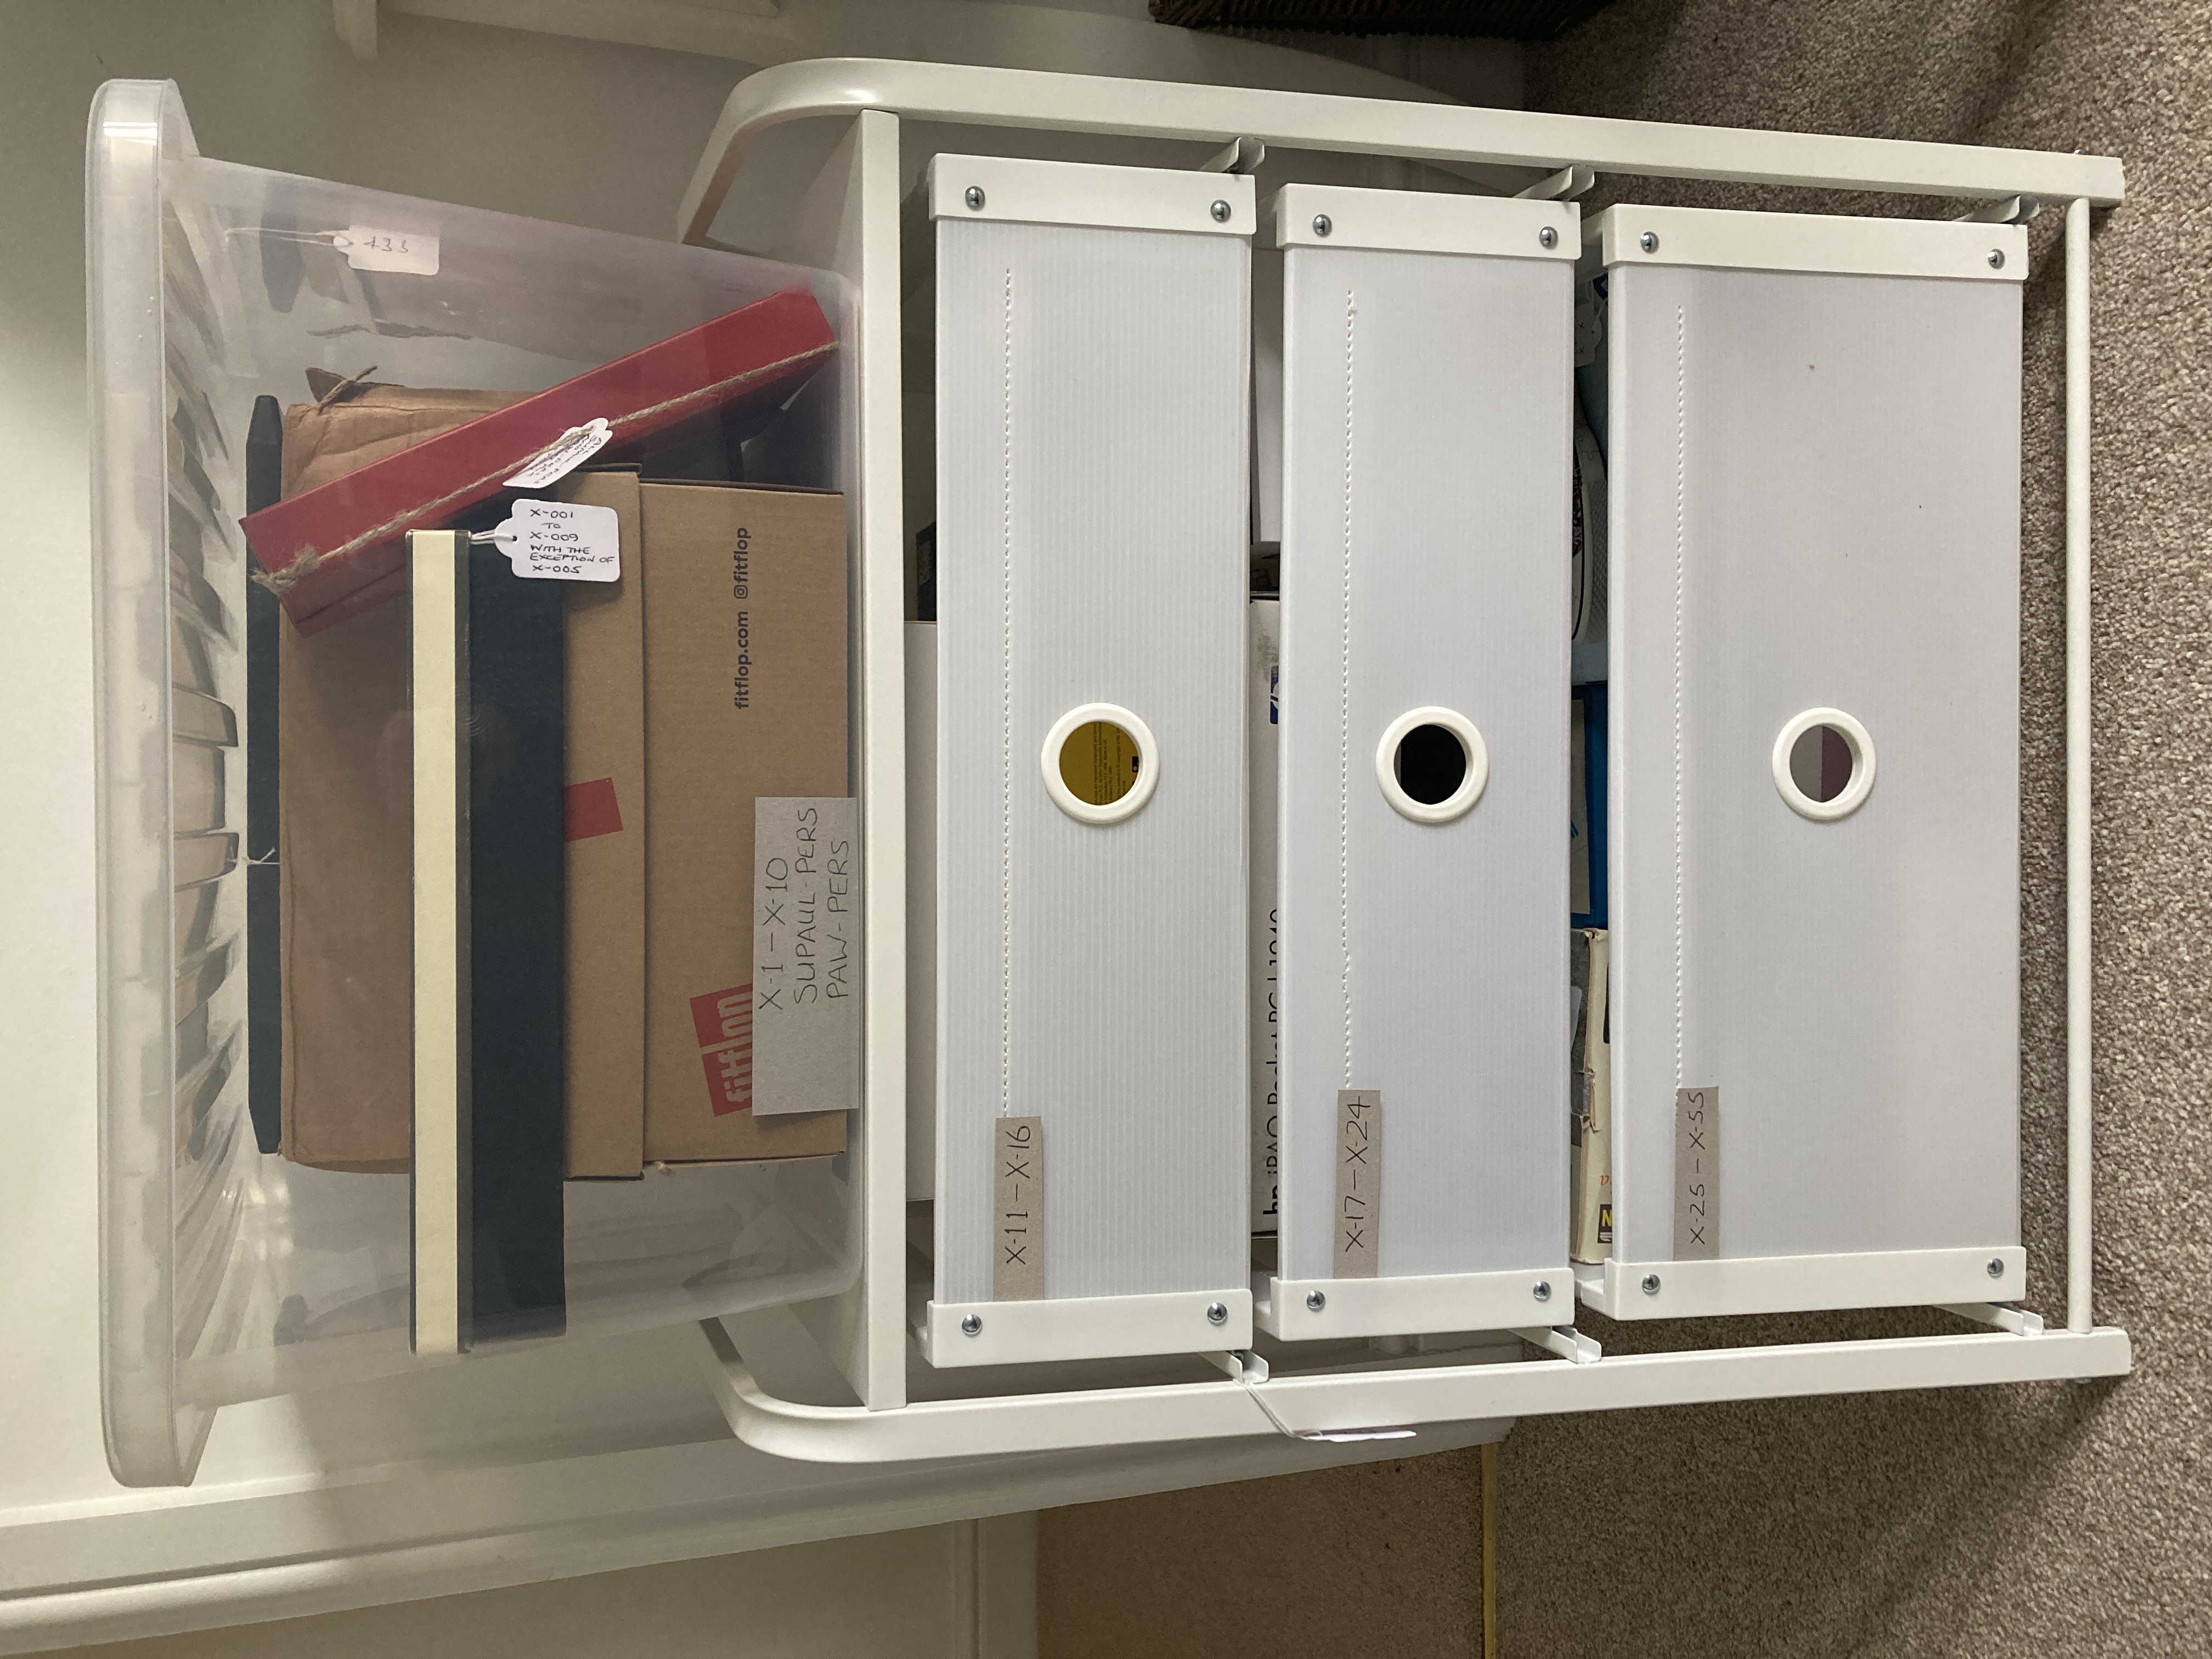
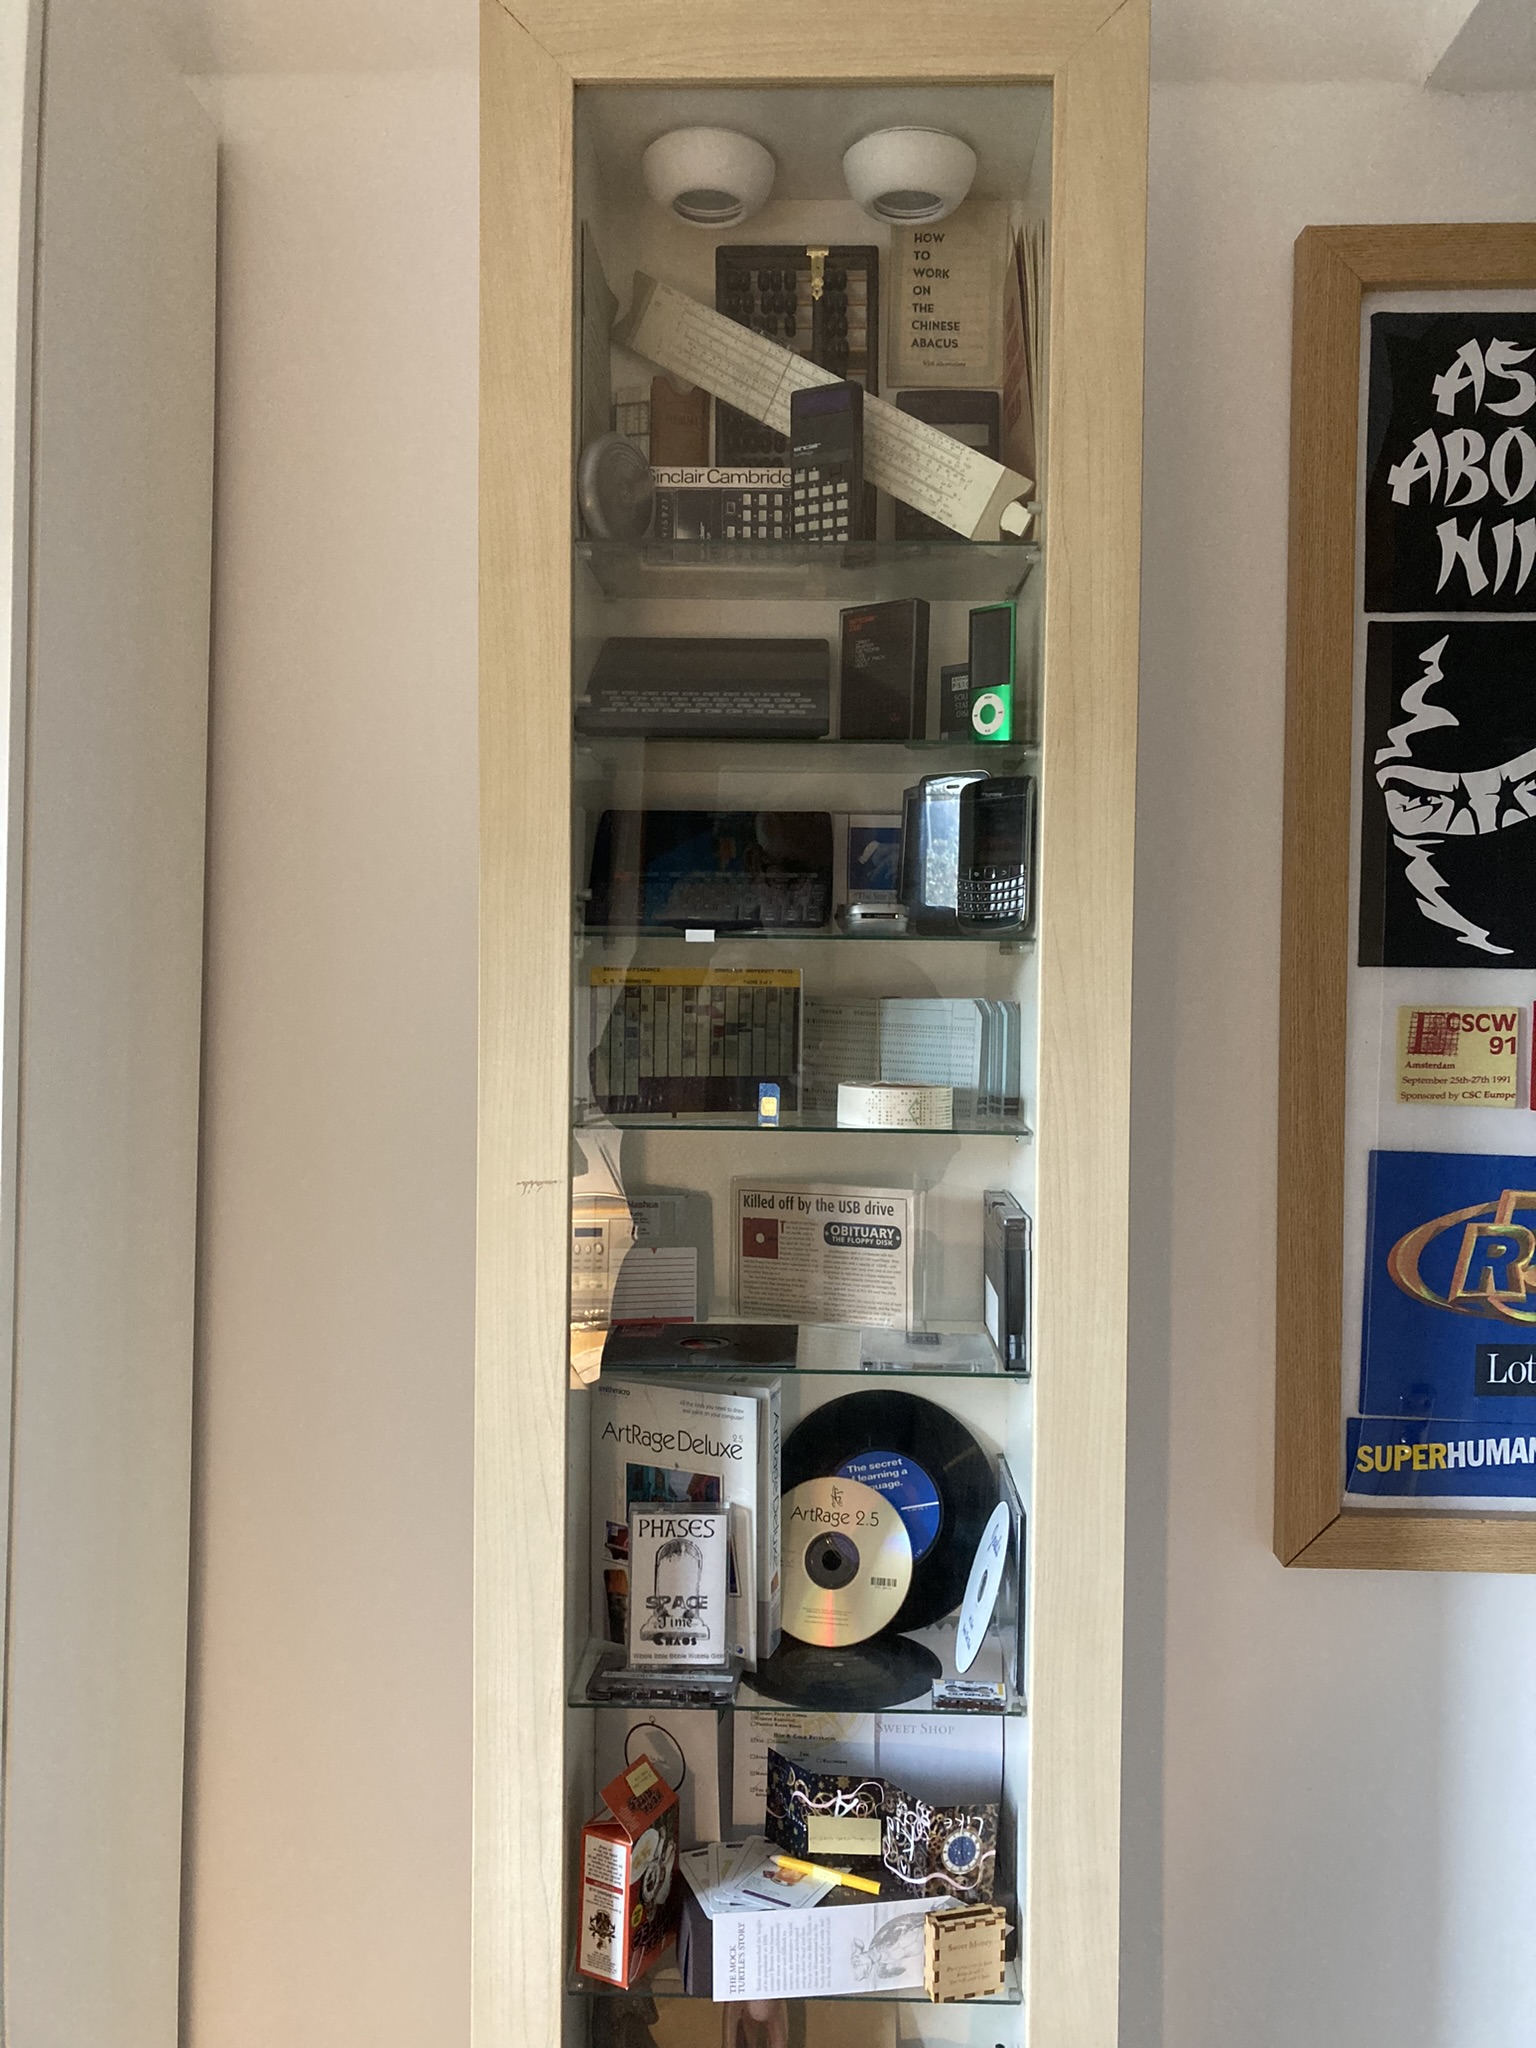
It’s worth noting that the physical display case used to present objects in this collection is too small to accommodate all the items at once; whereas the digital display mechanism can display all the items. This is the obvious but significant difference between physical and digital displays of larger collections: all items in a collection can be made accessible digitally, but may be too great in number to be presented physically to the viewer. Having said that, ordering the presentation of items in a digital display may require further effort. SideBooks presents files in the alphabetical order of their file names, which, in this collection, always start with the Reference Number. However, the allocation of Reference Numbers is random; the next item gets the next available Reference Number. Consequently, the items of this collection were somewhat mixed up when the files were presented in SideBooks, whereas I wanted to have all the computer-related items together followed by all the personal items, and ending with the items associated with our visits to four special restaurants. To achieve this ordering, I added a further set of numbers to the beginning of the filenames in Sidebooks, for example, “X-019 – Blackberry Bold 9700 similar to the one I started to use in CSC in 2009” became “SB42: X-019 – Blackberry Bold 9700 similar to the one I started to use in CSC in 2009”. The need to add such numbers is a little irritating, but necessary with this particular digital configuration. SideBooks does allow searching of the filenames – but this can only be done across all the different collections in SideBooks, which, in this case includes many hundreds of mementos, books and papers; and I don’t believe it alleviates the need to deliberately order the digital presentation of the objects.

The ability to have the whole collection on hand in the highly portable iPad is a great advantage – especially when it comes to wanting to take a look at items that haven’t been viewed for many months or years. The sheer accessibility of this combination of slim and lightweight tablet and highly visible software interface, provides a very useful and useable way of keeping a handle on what is in a collection.

Storage Strategies

I had previously kept the packaging for my display case items in a squarish cardboard box measuring 44x44x37 cm. As I emptied the display case and catalogued the items in it, I continued to use the box, piling the items on top of one another, and then removing them to investigate marking mechanisms and to come up with photos used in the previous post. The more I removed, replaced, and searched for items, the more I realised that this storage box was not effective. Smaller items would have to be gathered together into single containers; groups of containers would have to be stored in drawers; and items and containers would have to be placed in numerical sequence. With these principles in mind, I set about amalgamating groups of items into single boxes. The result is shown in the before and after images below.


I then set about trying to find some cheap stacks of plastic drawers, but couldn’t find any with suitable dimensions (they would have to accommodate the largest item – the packaging for a ZX 82 computer, measuring some 36x21x10 cm: the brown box in the second line of objects in the photos above). However, when I was in IKEA buying a new bookcase, I did find something that I thought might be big enough, for just under £30. I took a chance and bought it, but, as can be seen in the image below, it was too small and couldn’t accommodate the items sitting on the top. The answer was to stand a plastic storage box on the top. Labels for each drawer were secured in tightly behind the corner strut of each drawer; and, for the transparent box, was lodged inside against the outward facing side wall.


My plan was to locate this storage facility in my loft, and on this occasion, I got lucky; the gap between the loft rafters is some 1.5 cm wider than the rack of drawers so it fits between them perfectly.


Having got all the items stored away, in order and easily accessible, I am now able, at my leisure, to select which one’s I want to put in the display case at any one time.

Marking and Labelling experiences

The Collection Trust booklet provides very specific guidance on marking items. It advises that items are labelled and marked in ways which are:

  • Secure – The chances of accidental removal of the label or mark from the object
  • must be extremely low.
  • Reversible – It should be possible for a label or mark to be removed intentionally
  • from an object, even after 50-100 years with as little trace as possible.
  • Safe for the object – Neither the materials applied to the object nor the method by
  • which they are applied should risk significant damage to the object.
  • Discreet but visible – The recommended methods should not spoil the appearance
  • of the object, nor obscure important detail. However, the number should be visible
  • enough to reduce the need to handle the object.

For the positioning of labels and marks it suggests that you should:

  • Avoid physically unstable surfaces. Also avoid placing labels or marks across a line
  • of weakness or fracture.
  • Choose a position so that the number is unlikely to be visible when the object is on
  • display but is accessible in store.
  • Avoid decoration and painted/varnished/pigmented/waxed areas.
  • Avoid surfaces where the mark is likely to be at risk from abrasion, such as surfaces
  • on which it normally rests, or where touched during handling.
  • Locate the number so that the handling necessary to read it is minimised (consider
  • marking the packaging or adding an extra tie-on label as well).
  • With composite objects, mark the part on which the most secure method can be
  • Where duplicate marks are made these should be in different positions on the object
  • (bearing in mind, of course, the other principles listed above).

And for writing on objects, it recommends the following:

  • Apply B72 20%-in-acetone as a base barrier coat on the object.
  • Write the Ref. No. with a permanent black or white marker.
  • Apply B67 20%-in-white spirit as a top coat.

Should a mistake be made, this combination can be easily removed with acetone.

I duly searched the internet and found several suppliers of these items. In the end I bought small bottles of 20% B72 and 20% B67, a bottle of acetone, and a fine marker pen for about £20 from ZOIC PalaeoTech Limited.

After a couple of tests applying base coat, pen, and top coat, I set about removing the items from the cabinet, matching them up with any packaging etc. that had been stored separately, and creating relevant index entries.

Guidance on drying times for base coat, pen, and top coat, ranges from a few minutes to 24 hours. I chose to try to space out each part of the process by at least a few hours, and then it soon became apparent that I needed some systematic way of knowing which items were at which stage of the process. My answer was to have separate adjacent areas on my desk for each stage, so that the objects would progress from right to left.

Use of the B72 and B67 solutions wasn’t difficult; the brush applicators built into the bottle tops make it easy to apply a line in a single stroke. However, my nose certainly did pick up the strong odours emanating from the bottles; advice on open windows and, possibly, wearing a mask is worth taking note of.

Decisions on whether to use either a black marker or a white marker were easily made based on which one would stand out best on the relevant background. However, marker pens were certainly not the only way I labelled items. My preferred option was to used stringed labels whenever I found a way of attaching them: of the 223 separate objects dealt with in this exercise, stringed labels were applied to 134 of them, while Ref. Nos. were painted onto only 51.  The table below summarises all the different labelling techniques I used across the collection.

Did I follow the advice in the Collection Trust booklet? Well, broadly speaking, yes when painting-on the Ref. Nos. or using stringed labels. However, for the 12% of items on which I pencilled-on the Ref. Nos. I suspect I wasn’t following best practice; and, as for the use of Post-IT notes, well I know myself that they come away very easily. In my defence, all of the Post-IT items had been previously labelled in that way and I saw no better way of labelling them. The final category in the table above – ‘No Ref. No. applied’, is of course completely contradictory to the guidance. However, there were good reasons for not labelling each of them: one is a SIM card that is just too small to write on and, in any case, is unlikely to be lost as it is located inside an iPhone; another is the commemorative coin shown in the table above, for which a painted-on Ref. No. would certainly detract from its quality. A similar rationale applies to the tooth shown in the table – it is too small and irregular to have a Ref. No. painted-on, and even the string of a label wrapped around it would obstruct its inspection. The  final items are three pieces of terracotta pottery which, according to the marketing letter accompanying them, are supposed to have just been found in the desert sands – a claim which would not stand up if a Ref No. appeared on them in any shape or form.

Regarding my use of stringed labels, I found a variety of different ways of attaching them, as illustrated in the table below.

Although I felt my use of stringed labels was quite successful, I did realise half way through the exercise that the cotton thread I was using when I needed longer string lengths, was not strong enough and might easily break if caught or pulled; and in any case might deteriorate over time. This prompted me to look for archival quality thread and stringed labels, and I duly acquired them for about £15 including postage from Preservation Equipment Ltd as shown below. I shall use them to swap out the labels I have already applied, at some time in the future.

Indexing Arrangements

If I was to catalogue all the items as I removed them from the Display Case, I needed a clear indexing regime. There seemed to be two options; either to create a separate index, or to include the items in one of my existing indexes. I have some experience to draw on in making this choice. In my earlier work on Mementos, I’ve set up an index for my own personal items (with a Ref. No. prefix of PAW), and another index for items special to both myself and my wife (with a different Ref. No. prefix). For the most part, this separation has worked fine, but occassionally I’ve forgotten which set an item might be in, and I’ve found myself having to check both indexes. In fact, I’ve concluded that it will be better to merge them at some point in the future, especially as both indexes have the same fields, and the different Ref. No. prefixes will ensure uniqueness.

In fact, this assembly of different sets of material in the same index has already been shown to work in my PAWDOC work filing system. This includes many different types of items ranging from documents to ring binders and 35mm slides. All have different Ref. No. prefixes which not only ensure uniqueness in the numbering system, but also enables different sets to be stored in different places. The PAWDOC filing system has been stress-tested for over 40 years and has demonstrated that this approach does work in practice.

Taking all this into account, I decided I would simply add these display case items to my personal PAW mementos index; and that I would employ the prefix ‘X’ in front of the reference number. I chose X because I wanted to make the Ref. No as short as possible, as easy to write as possible, and as clearly distinguishable as possible, because I anticipated having to mark some of the display case items in small font with a marker pen.

I’ve always found marking items to be a bit of challenge. For many of the items in my document collection (for which there was no need to retain the integrity of the items), I was able to just write the Ref. No. onto the top left of the document. However, sometimes there wouldn’t be enough empty space to write in the Ref. No., or the material wouldn’t absorb the felt tip pen ink. In these cases, I wrote the Ref.No. on a rectangular piece of paper with adhesive backing and then stuck it onto the item. For the items in my loft storage experiment I’ve used stringed labels, though sometimes it’s been difficult to find a way to attach them: and for the memento collections already mentioned, I’ve been using cut pieces of Post-IT notes which have an adhesive backing which peels off very easily. This last solution ensures that the items concerned are not defaced – but I find that many of the labels simply come off in the course of handling the items, turning pages, or with the passage of time.

For this exercise, therefore, I decided I would try and do it properly and find out what the professionals do. On trawling the net, I quickly found a very useful Labelling and Marking Booklet produced by The Collections Trust with the help of Vivien Chapman at the National Conservation Centre, National Museums Liverpool (NML). This advises that not only should you give a unique number to each accessioned object and securely label or mark it with this number; but also that all detachable parts of an object should be marked using suffixes to the Object number. The latter part  of this advice was of particular significance because some of the computer objects in the display case have accessories, documentation, and  boxes with removable inserts.

Having taken this advice on board, and sticking to the principle of keeping the Ref. No as short as possible, I decided on the following reference number scheme:

  • Use the prefix ‘X’ followed by a hyphen followed by a three-digit number starting with 001 where, for numbers less than 100, there are two leading zeros;
  • For single items with no detachable parts, use the next available number, for example, X-015;
  • For items with detachable parts, add another hyphen and follow it with a serial number with no leading zeros, for example, X-056-1, X-056-2, X-056-3. Note that, in this case, there would be no X-056: the main object would have the first of those numbers – X-056-1.

In addition to the Ref.No., the existing index I intend to use contains the following fields: Description, Facet 1, Facet 2, Publication Date, Earliest Year, Physical Location, Digitisation Method, Electronic Format, # of Digital Files, Creation Date, Notes. The Description field can contain any text unconstrained by length. This is how I shall be indexing the items in the display case and all their accompanying accessories and boxes.

The Case of the Computing Collection

Sometime around the late 1960s or early 70s I acquired a Chinese abacus complete with instructions on how to use it. I already had a slide rule and associated log table and booklet of mathematical formulae for use by candidates of A Level Mathematics and Physics papers from the Oxford and Cambridge Schools Examination Board. Some years later, in 1981, my wife bought me a Sinclair ZX 81 for my birthday – an iconic present at the time: computers were NOT home devices in those days. It took me a few years to join the dots, but I gradually realised I had the basis of a collection of computing-oriented items, and that I was slowly adding to it as time went by with items such as floppy discs, calculators, and Personal Digital Assistants (PDAs). Once I’d cottoned on to the possibility, I remembered I also had a program on Paper Tape that I’d produced at University, and a pack of punched cards that I’d used for my final year project. The notion of a collection of computing objects became cemented in my mind; and I made sure to keep relevant objects as I replaced them in the surging wave of technology development.

However, it wasn’t until  around 2010 that I decided to actually exhibit the pieces. The notion was probably inspired by seeing various display cabinets for sale when going round IKEA.  I eventually decided I’d buy one of the units and I duly bought it, assembled it, installed it in my study in Aylesbury, and put all my computing items into it. When we moved in 2015, I took the cabinet with me and installed it in my new study as shown in the photo below.

However, by 2023 I’d run out of bookcase space, and I realised I could fit in just one extra bookcase by moving the display case  about 50cm to the right. As I started to plan this change, I realised it was a tremendous opportunity to explore how to curate 3D objects properly. I would have to remove everything from the display case in order to move it, and, as I did so, I could index every item and then explore how to mark it – a problem I had previously encountered with paper mementos and loft items. Then, putting the objects back into the display case would enable me to explore the crafts of display and description. I had also started putting non-computer objects into the cabinet, and this exercise would also enable me to investigate the challenges of mixed collections, of too little space, and of how to manage items that have to be kept in store. That is the journey I’m about to embark on.

The Bonus Challenge

Although it’s relatively straightforward to use HandBrake to convert a specific video file, I’ve found that there are further complications when it comes to dealing with a complete DVD. Very few of my DVDs have 1 single file; and many of them have 10 or more – some as many as 25+. A decision has to be made for each file as to whether or not to convert it. Unfortunately, each file is only identified by a number, though HandBrake does also provide 10 snapshot stills across each one together with its playing time. To identify what a file contains, you have to match this set of clues with the information provided on the DVD box and the DVD itself.

The ’Billy Elliot’ DVD provides a simple illustration of the elements of this challenge: the files were numbered 1 – 6 but HandBrake was only able to read 4 of them – files 4 and 5 were missing from HandBrake’s list. The file with the longest playing time – 1:45:49 – was obviously the film itself. From the HandBrake stills, I was able to see that the 2-minute file was probably a cinema trailer and the 14 second file was the Universal moving logo at the beginning of the film. The DVD box advertised the following Bonus Features: Breaking Free Featurette, Theatrical Trailer, Cast & Film Biographies, Interactual (whatever that means), and Production Notes. Since the remaining file read by Handbrake had a playing length of 00:21:36 I deduced that it was likely to be the featurette, and, sure enough, when I did the conversion, that’s what it turned out to be.

The Billy Elliot example was relatively simple. ‘Love Actually’, with 28 files being read by HandBrake was more difficult; and the Special Edition of ‘Titanic’ was like a Sherlock Holmes mystery with two Discs each containing 43 files (of which HandBrake read 41 and 38 respectively) and a DVD box specifying additional material including various commentaries, a spectacular alternative ending, and branching footage while watching the film. Of course, menus are the key navigation aids to all this material when you are watching using a DVD player; but HandBrake doesn’t pick up the menus. So, even if you converted all the files, you would still not be able to recreate the experience offered by playing the DVD. That just seems to be the hard-stop limitation of using a converter program like HandBrake. Of course, the full functionality of the DVD could be recreated if you were prepared to hand-craft code and integrate all the elements together. However, I’m certainly not prepared – or able – to do that.

There’s another factor to be take into account when deciding what files to convert: how much of this extra material is going to be looked at? I’m pretty sure I have never viewed all the extra material  provided on each of the DVDs I’ve watched; and often I’ve never watched any of it. That might be a good indicator of whether I’ll ever want to view it in the future.

Given the complications of multiple unidentified files, and my lack of general interest in ‘bonus features’, I soon decided that I was only going to convert extra material if it was properly assembled and of particular interest. So, for example, for ‘Love Actually’ I converted an extra 37-minute piece of Richard Curtis introducing bits cut out of the film; and for ‘Cabaret’ I also converted the 1972 documentary ‘The re-creation of an era’, and the 1997 documentary ‘Cabaret – a Legend in the Making’. However, for the films ‘The Holiday’, and ‘The Full Monty’, I didn’t convert anything else.

Conversion Alternatives

There are three ways of being able to watch a DVD without a DVD player: either by converting the DVD into a single software file and storing/playing it on your PC; by obtaining that software file from elsewhere and storing/playing it on your PC; or by streaming the movie from an internet service or location. Having established that conversion is a definite possibility, I thought I’d explore the other options.

I started by investigating the five DVDs which claimed to also provide a downloadable version for a limited period. In three cases, specific expiration dates were quoted (02Dec2014, 27Feb2019, and  31Dec2019) – though two of these just said that the download may not be available after the date specified. One of the remaining two specified that the download code “may expire two years after the release of the film”; and the other one simply said “redemption code subject to expiration”. Given these caveats I wasn’t very hopeful as I set about accessing the specified websites to try and obtain the digital copies.

In one case, the website specified no longer existed. In a second case the process took me to the Apple Store after which it hung and I had to abort; after two attempts I gave up and assumed the code had expired. The third one said “Sorry this code has expired”, and the fourth one proclaimed that “Support for digital copy redemption has ceased”. However, the fifth one, despite specifying the 27Feb2019 expiration date, was successful! I put in the voucher code and after confirming it was for the movie Jack Reacher – Never Go Back, it offered me just one provider option – Apple TV. I put in my Apple account info, downloaded iTunes, and, after taking me to the iTunes Store, it said the movie was being transferred to my iCloud library (though there was no sign of it when I looked). However, shortly afterwards it appeared in the Recently Added section of the iTunes app. When I clicked on it, it started to play in a new window. These results are summarised in the table below.

Movie Expiration Date Website Result
The Dark Knight Rises [2012] 02Dec2014 ultraviolet.flixster.com opens as ww7.flixstervideo.com/redeem The website has 3 options (ultraviolet technology; a video streaming app; and info about Disney Plus subscriptions). Assumed voucher had expired.
Minority Report [2002] Two years after release None specified: 2nd disc initiates a process requiring the iTunes app, and linking to the Apple Store Apple Store hung and required aborting. Assumed voucher had expired.
The Lady in the Van [2015] 31Dec2019 sonypictures.com/uvredeem opens as redeem.sonypictures.com/ Got message “Sorry this code has expired”
Jason Bourne [2016] Redemption code subject to expiration www.universalredeem.com/ Got message “Support for digital copy redemption has ceased”
Jack Reacher – Never Go Back (2016) 27Feb2019 paramountdigitalcopy.com/support/uk

opens as https://paramountdigitalcopy.com/

Put code in and it said “Select a provider” listing one option – Apple TV. I provided my apple account details, downloaded iTunes, was taken to the iTUnes store and the movie appeared in the recently added section of the iTunes app where I was able to play it

Despite being able to actually play the Jack Reacher movie, it is not a stand-alone file. It can only be played from within iTunes. When it is copied out of iTunes, DRM functions (Digital Rights Management) are introduced such that it will only play a series of static scenes. In similar fashion, Amazon applies DRM controls when it offers movies to rent or buy: for both types of purchase, access to the movie is via the Amazon Prime Video app. The files cannot be copied and moved outside the app. So, you are not actually buying the file – just access to it. I believe this is the way all internet sales of movies work; it is not legally possible to acquire the actual video file. Having said that, if you simply want to watch a movie again at some unspecified point in time, then it’s a reasonable assumption that you will be able to find a copy to rent. A quick trawl of Amazon Prime determined that 49 of the 58 titles in my collection are available for rent at prices between 99p and £3.49. I also did a check of Netflix (which provides free access to subscribers) but could find only 6 of the titles.

My conclusion from this rather cursory investigation is that for movies you might want to watch again sometime in the future then it should be possible to rent them relatively cheaply and easily; but that if long term reliable access is required, then conversion by HandBrake is the best option. It goes without saying that you should not pass a converted copy to anyone else. I, personally, always store away the originals of CDs, videos, and books that I copy, to demonstrate proof of ownership.

HandBrake Conversions

The obvious way to dispose of physical DVDs and yet still have them available to view is to convert them to digital format and to store them on a PC or hard drive. In theory, they could then not only be copied to and viewed on any device (such as a tablet or phone), but also viewed on a large screen TV via the domestic wi-fi network. To explore these possibilities, I downloaded the free open-source HandBrake video converter tool (as recommended in issue 664 of the UK ComputerActive magazine).

HandBrake complies with Digital Rights Management (DRM) legislation and so is not able to circumvent standard copy protection measures built into most movie DVDs. However, a separate piece of open-source software called libdvdcss-2.dll is freely available to overcome this problem.  This is effectively a plug-in to HandBrake and simply needs to be placed into the HandBrake program folder. I duly installed both HandBrake and libdvdcss-2.dll and set about trying to convert some DVDs.

I had a minor problem getting started as, after completing my first conversion, Handbrake seemed to be unable to read a large number of the DVDs. I eventually found that the problem was something to do with pointing to the correct file for HandBrake to inspect: I’d been selecting the “D: DVD name” entry in the Source Selection menu, and this was producing a screen announcing “No valid source or titles found”. The problem was rectified by choosing the Folder option in the Source Selection menu and then selecting the “D:DVD name” that appeared in the Windows Explorer menu. I don’t really understand why this made a difference – but everything worked fine doing it that way….

Overall, I found ndBrake very easy and effective to use. It was able to read all but one of the 54 DVDs in my collection. The one that it couldn’t handle was designed to enable the downloading of a copy of the film ‘Minority Report’ so there was actually no film on the disk for HandBrake to identify. I was unable to even try to convert any of the four Blu-Ray titles in my collection as my DVD player simply won’t read them. In the course of the exercise, I successfully converted 19 of the 54 DVDs to MP4 using the standard presets advised by HandBrake, and encountered no problems in doing so with each conversion generally taking between 20 minutes and half an hour. I shall comment on the quality of converted files later on in this process after I’ve tested viewing them on my TV.

I decided to limit the number of DVD conversions at this stage because of the time required to undertake the conversion, and because of the large file sizes being generated. The films I have converted are either ones I created to get me started with HandBrake; or ones I definitely know I want to keep; or ones that I want to see before deciding what to keep. The 19 titles I converted take up some 18.5 Gigabytes and play for a total of about 40 hours. I shall return to the question of what converted DVDs I want to keep after I’ve investigated some related issues such as whether they can be easily obtained through streaming services, whether the converted files play successfully on the TV via wi-fi; and whether the quality of the converted files is good enough.

One final note on the converting experience: I’ve had to handle the DVDs a lot during the process and this has definitely induced a sense of appreciation of their characteristics. No doubt this is partly due to the stirring of good memories of some of the films; but its not just that. These products with their different designs – triple fold overs, slip cases, multiple DVD holders, metallic casings, eye-catching graphics, special editions, and the odd booklet – do have their own kind of kudos. But I must restrain myself… we’ve decided to dispose of these physical goods and that’s that…..

Hardware considerations

A few days ago, I tried using the external DVD player that I bought to go with my laptop, to play a film on my Smart LG TV. I discovered that the DVD player only has a USB interface and that films on DVDs won’t play without an HDMI interface. So, to be able to play any of our collection of DVDs , we would have to buy an HDMI-capable DVD player which a quick search of the net determined would cost in the region of £30 – £50. Unlike my current very compact and easy-to-store external DVD drive (measuring some 14x14x1.5 cm), such beasts are larger, may employ a pop-up lid as opposed to a sliding drawer, and require an external power source. These are all factors which would affect the aesthetics of the piece of furniture on which our TV sits: it would mean accommodating an extra big black box with two lots of additional wiring for a facility that might be only rarely used – and this after having been pleased to get rid of our previous very large DVD recorder box. I guess it could be kept in a drawer and just installed temporarily when needed – but setting it up wouldn’t be easy because there is little space to get behind the 65inch TV screen to access HDMI ports and power points. Of course, such a device could also be used on my laptop – but I don’t really think I’d want to watch films on my laptop screen or even the 27-inch screen on my study desk. In fact, I wouldn’t want to watch films in my study: movie-watching is more of a relaxing lounge activity.

Many of the above factors are the reasons why we decided to dispense with a video recorder and the physical DVDs in the first place; so, I’m not really envisaging going down that route again. Nevertheless, it will be useful to have a clear understanding of all the possibilities and constraints when I get down to deciding which films, if any, I particularly want to keep and in what format.

Musings about video collections

When I saw my first movies in the late 1950s, there was no way of keeping a copy of the one’s you especially enjoyed to view again at some time in the future. This was in contrast to some of the first books which I really enjoyed in the early 1960s – such as Coral Island and Greenmantle – and which have resided on my bookshelves to this very day, available for dipping into or re-reading at will (though, truth be told, this hasn’t happened much). All this changed in the 1970s with the emergence of the domestic video recorder, and movies could be rented, and eventually purchased, on video tapes. In the 1980s, you could have a collection of films in your bookcase along with your favourite books.

Unfortunately, there was – and still is – a significant distinction between the two media: books don’t require anything else to be able to read them, whereas video films need equipment to play them on – equipment that keeps changing as the technology develops. So, my collection of films on VHS video had to be swapped into DVDs; and last year we got a new TV streaming box which doesn’t have a DVD player at all.

However, leaving aside this pesky technology problem, I’m wondering if the introduction of films to our bookshelves has truly made a difference. As I hinted above, I don’t reread books very often; and yet having them on my shelves does make a difference. I guess their presence acts as a reminder of the impressions they made on me; and their physical presence does afford me rereading opportunity, whilst their absence might fuel a desire to obtain them. Is the same true of films? Well, I think in my case – yes! The visuality and motion in films undoubtedly make them seem more attractive than a book, and may be more likely to inspire a second viewing; nevertheless, as with my books, I don’t seem to have  taken much advantage of their availability. But I would, in principle, like to have a collection of my favourite films, even if only to know what they are.

Of course, films are not the only video material that we encounter today: we also watch huge amounts of TV, some of which we really enjoy and regard as memorable. Some people recorded and had collections of such material – and then encountered the changing technology problem. In the face of today’s streaming services, only the dedicated will have managed to retain such collections in a form that Is still accessible. My wife and I, thankfully, never went down that particular rabbit hole.

There are two other types of video material that I do have collections of. One is about a dozen pieces relating to office technology developments that were relevant to my job as an IT consultant. These were included in my work filing system, converted to digital files several years ago, and continue to be maintained within the filing system under its digital preservation maintenance plan. I feel no need to have these items displayed anywhere: they are accessible via the filing system’s index in just the same way as all the other 25,000+ items in the collection. The other type is the family’s collection of cine films from the 1950s onwards, and more recent videos taken on video recorders and then on mobile phones. These are included in the family’s photo collection, and maintained under that collection’s digital preservation plan. Interestingly, we do have these items on DVDs in very thin cases and on display in our living room bookcase, so the fact that we no longer have a DVD player attached to our TV does affect the accessibility of these family records as well.

While there are numerous similarities in the motivations and practicalities associated with collecting these three different types of videos – films/TV, work, and family, I nevertheless feel that I’ve collected the work and family videos for very specific reasons, whereas the collection of film/TV videos is much more like collecting books – it is based on very subjective appreciations of the content and, importantly, whether you own the item in the first place: if you really enjoyed a book you borrowed from a library would you be likely to go out and buy a copy just to put it on your bookshelf?

This last point is critical in todays streaming world, and it applies not just to video but also to music and books. The lack of physical media when films/TV, music, and e-books are consumed mean that there is nothing physical to go on our physical bookshelves; and in the case of films/TV and music, there is not even a digital file to store on your local device. This simple fact is probably the most significant factor in our decisions about collecting films/TV and music in today’s streaming environment. It also highlights the point that most physical collections of books and films/tv exist simply because the media was purchased in order to consume it – not because you wanted to build a collection. The collection was just a by-product of the process. I shall carry this thought with me as I set about deciding what to do with my DVDs.