Organising your old photo collection

It’s taken me some 22 years to get 4 major family photo collections in order – my own up to when I got married; my wife’s and her forebears up to when she married me; the photos we have collected over 35 years of marriage; and my parent’s entire photo collection including those passed on from their forebears. In total, this amounts to around 18,000 photos, slides and movies. The digitised versions of these items take up about 63Gb of computer file storage (of which about 12Gb is taken up by the 90 or so videos).

Throughout this work, I’ve tried to derive the most effective ways of organising, indexing and storing the material, and many of these insights are recorded in this blog. However, now that I’ve finished, I’ve summarised my preferred overall approach in an article published in the Spring 2016 edition of the Watermead Village View magazine. The templates referred to in the article can be downloaded from the links below:

Photo Index Template v2.0 – 21Feb2016

Slip-in Tabs Template v2.0 – 21Feb2016 (try looking at this in Print Preview)

If you want to read more detail about my experiences and suggestions, try looking at the earlier entries in this blog. If you have questions or comments, feel free to provide them here or to email me directly at pwilsonofc@btinternet.com

Verbal commentaries

When I was setting out to organise and digitise my parent’s photo collection, I decided I’d try and record my mother talking about some of the photos. I thought this would a) help me to catalogue the photos, and b) produce a record for posterity of my mother talking about her past.  As it turned out I didn’t need the recordings for cataloguing because the notes I made were sufficient; however,  the recordings are certainly excellent additions to the family archives.

To make the recordings, I downloaded the ClearRecord Lite app onto my iPhone. It’s very easy to use – I put the phone on the kitchen table and, when we started to talk about a particular photo, I just pressed the big button with the microphone picture. The recordings produced files in the ‘m4a’ format which Windows Media Player has no problems in playing (M4A stands for MPEG 4 Audio and is a file encoded with advanced audio coding (AAC) – it was generally intended as the successor to MP3, which had not been originally designed for audio).

I ended up with 9 different files ranging in length between 1 and 4 minutes and with file sizes of between  400Kb and 1Mb. To get the files from my iPhone to my laptop I used ClearRecord’s ‘share’ ‘email’ function, and then picked them up from my email in my laptop.

I gave some thought as to how to name the files and where to store them. In the end I decided to keep them with the photos they referred to, and to number them in the same way. For example, if the recording referred to a photo in the set number 894 which contained 10 photos, I would give the recording the number 894-11 and put it in the 894 folder. To highlight in the index which photos have associated recordings, I created a new column labelled ‘Verbal commentary’ to be completed with either a ‘No, or a ‘Yes (mm:ss)’ where mm and ss refer to the length of the recording in minutes and seconds. I’ve also taken to noting the reference number of the recording in the Comments column, for example, ‘The verbal commentary is numbered 894-11’.

I’m very pleased with the results of this exercise. The recordings are clear and give a good sense of what my mother sounds like, how she talks and, to some extent, the sort of person she is. They are short enough to keep the listener’s interest, and they actually  convey some useful information about our family history and about times and places gone by.

Nearly finished

For the last 4 years I’ve been tackling my parents lifetime photo collection which includes all the photos they have inherited from their forebears. It’s required a good deal of effort and persistence. If you intend to take on such a challenge you’ll need to be prepared for the long haul.

In order to find out what/who the photos are of and when they were taken I’ve had a discussion with my mother about most of them. Inevitably, she remembers less about some of the older ones (taken, say, 70 or 80 years ago) than some of the newer ones; and she can’t provide any light at all on some of those she inherited from her parents or from my father’s side of the family.  In those cases, I’ve used every clue I can find (type and size of print, numbers stamped on the back, writing on the back, similarity of scene, etc.) to identify related photos and deduce some information about their progeny. I’ve recorded a few of the conversations we’ve had about the photos; and deciding how to keep those recordings is one of the remaining tasks I have to do. However, apart from that and putting  a few remaining photos in albums, the job is just about finished. All 7000 or so photos have been indexed, scanned, and the file titles populated with reference number, contents and dates; and then the physical photos have been put into one of about 19 slip-in albums.

I’ve done similar jobs on my own pre-marriage collection, on my wife’s family collection, and on our own family collection. That is where the insights I’ve recorded earlier in this topic have come from. Now it remains for me to tie up loose ends and to decide whether to collect everything I’ve learned into a single article or not.

Movie editing and formats

Over the last week or so, I’ve been exploring how to convert DVDs into a format that I could edit, store and view on my laptop. It was a task I’ve been waiting to do for a couple of years, ever since getting some family cine film transferred to DVDs and finding that copying and editing them would take some specialist software and time and effort.

I’ve found that there are typically around seven or eight files on a DVD with various file extensions including .IFO, .BUP and.VOB; and that the major part of the content is in the VOB files. A quick bit of research on the net established that a VOB file is part of a standard container format for DVD-Video media which breaks up the content into a series of 1 Gb or less computer-compatible files. The VOB files can be converted into a single file in  another format such as MP4, using specialist packages, conversion tools, or freeware.

I decided to use DVDVidesoft’s FreeStudio which includes a specialist DVD Converter program amongst its many facilities. This appears to work very well and I have converted several DVDs into MP4 files with no apparent loss of quality with one exception: when the camera moves very quickly across a scene, the conversion process seems to make it a little more distorted than it already is. For this reason, and because I’m no expert in these formats, I’m keeping the original DVDs just in case.

Several of my DVDs contained converted cine film which I wanted to break apart into separate logical units which could be viewed and stored individually. To perform this editing work I chose the Microsoft software “Movie Maker” which comes bundled with the Windows operating system or which can be downloaded from a Microsoft web site. The version of this software released in mid 2012 will output files in MP4 format (previous versions did not have this capability).

There appears to be no help facility with Movie Maker, however I eventually got the hang of it after a bit of trial and error and some advice from various sources on the net. The process I followed was something like this:

  • Start work on a movie: Use the ‘Add videos and photos’ function to browse and select the movie to be worked.
  • Remove unwanted frames: Identify  the start and end of any parts that you want to delete because they are of poor quality etc,, then put the timeline curser onto the start point and select the SPLIT command. Do the same for the end point. The section to be removed is now a separate element in the timeline and can be deleted by right clicking on it and selecting REMOVE.
  • Break into separate parts: Use the SPLIT function to break up the material into all the separate elements that you want to save as individual MP4 files.
  • Save a version: Use the Movie Maker function ‘Save Project’.to save a version that you can return to later.
  • Select the first element to be saved as an MP4 file: Click on each of the unwanted elements in turn, right click on them and select the REMOVE function. When this has been completed, only the element you want to save as a single file will remain.
  • Insert a Title: Use the TITLE function to include a title frame at the beginning of the movie.
  • Save the element as an MP4 file: Use the ‘Save Movie’ function to save it as a file in its own right. I use the ‘Recommended for this Project’ setting to specify the quality and standards to be used.
  • Close Movie Maker and start again to save the next element: To select another element to be output as a file in its own right, close down Movie Maker, then open it up again with the Movie Maker Project that you saved earlier. Then follow the same steps already described to isolate the next element and to save it as an MP4 file.

Overall, the combination of FreeStudio and Movie Maker seems to enable me to do everything I need to produce stand-alone movie units which can be itemised in my photo index, stored and played individually on the laptop. For the most part I have produced each element in MP4 format since that seems to be a widely used standard which is likely to be long lasting. However, in one case I was unable to do the conversion and have retained the file with its original .mov extension (an Apple QuickTime format) which works just as well on my laptop.

How to print Slip-in Tabs

Some photo albums have slots for thin cards that can be written on to describe the photograph they are adjacent to. However, since I include a unique reference number and short description in the file name of each of my photos, I prefer to print out that information onto a Slip-in Tab prior to inserting it into its slot. If you want to print your own slip-in tabs, This is how to do it:

  1. Create an Excel file with rows the exact length and height of the slip-in tab you desire. When the file is printed onto thin card, these can be cut-out to produce the individual slip-in tabs. For slip-in tabs which have two rows, one referring to the photo above and one referring to the photo below, the overall height of the two rows together must be the exact height of the physical slip-in tab you will eventually cut out. For such tabs, insert a heavy black divider line between the two rows to distinguish between the text for the upper photo and the text for the lower photo.
  2. Insert cut markers into the file to assist with the production of the physical slip-in tab. Do this by inserting narrow columns before and after the slip-in tab column and reduce the width of the slip-in column by the width of the narrow columns just inserted. Insert a faint border line in each narrow column to mark where the horizontal cuts are to be made. Insert the same faint border down the left hand side of the left hand narrow column and the right side of the right hand narrow column to act as a cut marker for the left and right sides of the printed sheet. Since this all a bit fiddly to construct here’s a template I made earlier (Slip-in Tabs Template v2.0) – its all set up to produce slip-in tabs that are 15.4 cm long, 1.8 cm high and with a divider line to distinguish between the text for the upper photo and the text for the lower photo.
  3. Go to a folder containing some or all of the photos you want to print tabs for. Highlight all the files you want to obtain the file title information for. Then, while holding the shift key down, right click any of the highlighted files. When the context menu pops up, left click on the COPY AS PATH entry that has magically appeared because you’re holding the shift key down. Next, go to the Excel spreadsheet, place your curser into the first of the slip-in tab rows that you have already prepared, and select PASTE SPECIAL – VALUES ONLY. This will place the full path name, including the file title, into each row
  4. To eliminate the unwanted elements of a particular path name, select the elements concerned and copy them (for example, ‘C:\Users\Paul\Pictures\0034 – Christmas 1986\’). Then select all the cells that that exact unwanted text appears in and press CTR-F. When the Find dialogue box comes up, paste the unwanted path elements into the FIND WHAT box and then select the REPLACE tab but leave the REPLACE WITH box blank. Then select the Replace All button. This will effectively replace all the unwanted text with nothing i.e. it will remove it.
  5. Do the same Find and Replace operation to eliminate the file extension (such as .JPG).
  6. Perform any final formatting you require (such as font size and wrap around) and then print out onto A4 soft card (180 GSM upwards).
  7. Take each printed page and use the cut markers to cut out the slip-in tabs. I use a sharp paper knife for the purpose and first cut away the sides and top and bottom of the set of tabs. Then, for each tab, I cut it so that there is just a sliver of paper at the end attaching it to the rest of the tabs (see the picture below). That way you can cut out a whole A4 page of tabs without losing their order. Then, when it comes to actually putting them into the album, they can simply be pulled away from the adjacent tab they are attached to. If you’re cutting several pages at once its convenient to keep them in the pages of a magazine until you use them.


Dealing with Physical Images and Negatives

In the first post in this topic, three aspects were identified as being key to organising photo collections: dealing with the physical images and negatives, digitisation of the images/negatives, and indexing. I’ve already discussed Indexing so this post is going to be about the physical images and negatives.

Whether your photos and negatives are in lots of different places and all mixed up, or are a little more ordered than that, the first step is to organise them so they can be indexed. To do this follow the general Order From Chaos approach outlined in the OFC White Paper i.e. assemble, sort and index.

Assemble: Be clear about what material is being included and identify where it all is. If possible collect it all together in one place – and then do another check to find anything you might have missed. Generally speaking the material should include printed photos, negatives, photo albums and electronic images.

Sort: Identify a sort criteria (examples could include people, dates, or places), and go through all the material placing individual items into piles according to the criteria you have selected. For example, if your criteria is date, have a separate envelope for each year or span of years and place the photos into the relevant envelopes. Once you have done an initial sort, go through each subset checking the allocation is correct and getting the order correct within each subset. For prints, their physical appearance and whatever numbers or information has been recorded on them (front or back), can be used to identify which prints were produced at the same time. The same approach can be used to match up different strips of negatives that came from the same film. At this stage negatives can also be matched to the prints.

If you are not familiar with the contents of the photos (if, say, they belong to parents or relatives, or are a job lot purchased at an auction), use whatever means are available to identify what they are of and when they were taken. If there is someone available who is familiar with them, talk with them about each photo. Consider recording the conversation (perhaps using a mobile phone app) to both assist with identification downstream and to augment the historical background of the material. Note the contents and date on the back of each photo. Alternatively, note an interim serial number on the back each photo and record the information about it in a notebook or computer.

Index: When all the material has been sorted, decide what you want to do with the physical items. An obvious option  is to put them into a photo album – I use slip-in albums that take two 6×4 prints on a page. An alternative is to keep them in envelopes or some other storage system and just access the images on screen or in a printed photobook.

Once you have decided on your approach, do a final check to ensure that you have sorted the images into the same order that you are going to put them into photo albums or to store them. If not, sort them again to get them into the right order. Now create the Index and ensure it has columns for all the information you will need to manage and find the images downstream (further details about index contents are in my earlier post on the subject).  I use an Excel spreadsheet to maintain the index – here’s a template as a starting point if you want to go down that route (Photo Index Template v2.0).

Once your index is ready for use, go through all the images methodically creating index entries and numbering each print accordingly (I tend to use a biro on the back of each print and haven’t noticed any problems with doing it this way). Negatives should also be numbered according to the index and can be stored in a separate box, folder or other storage system (I keep negatives in the pockets they came in, write the numbers on the pockets and keep them in serial number order in a box in the loft).

After you have indexed all the material, now is the time to scan the images to obtain electronic versions of each one (this exercise will be discussed in a subsequent post). Once the scanning has been completed the material must then be placed into its final destination(s). If this is to be a slip-in photo album, here’s some further guidance based on my own practical experience:

Spaces: There’s nothing more infuriating than coming across another photo sometime later only to find there’s no room for it in the album. To avoid this, leave a couple of empty spaces after every 20 photos or so.

Large photos: If you are using an album that will take two or more 6x 4 prints on a page, I’ve found that you can include larger prints by slicing a slot in the top of the acetate of the lowest print slot and slipping the photo into it as shown in the example below.

Small photos: To keep multiple small photos (such as photo booth prints) in place in a single 6×4 slot, take a piece of paper or card roughly the size of the 6×4 slot and make some diagonal cuts for the bottom corners of the prints you want to include as shown below (the photos have been reversed for the purposes of this illustration).  These don’t need great accuracy and can be done very quickly and roughly. Once the prints are in place, just slide the piece of paper into the 6×4 slot. Here’s a Template for printing out a piece of paper that will fit in a 6×4 slot – cut to the guide marks – there are two to a page.

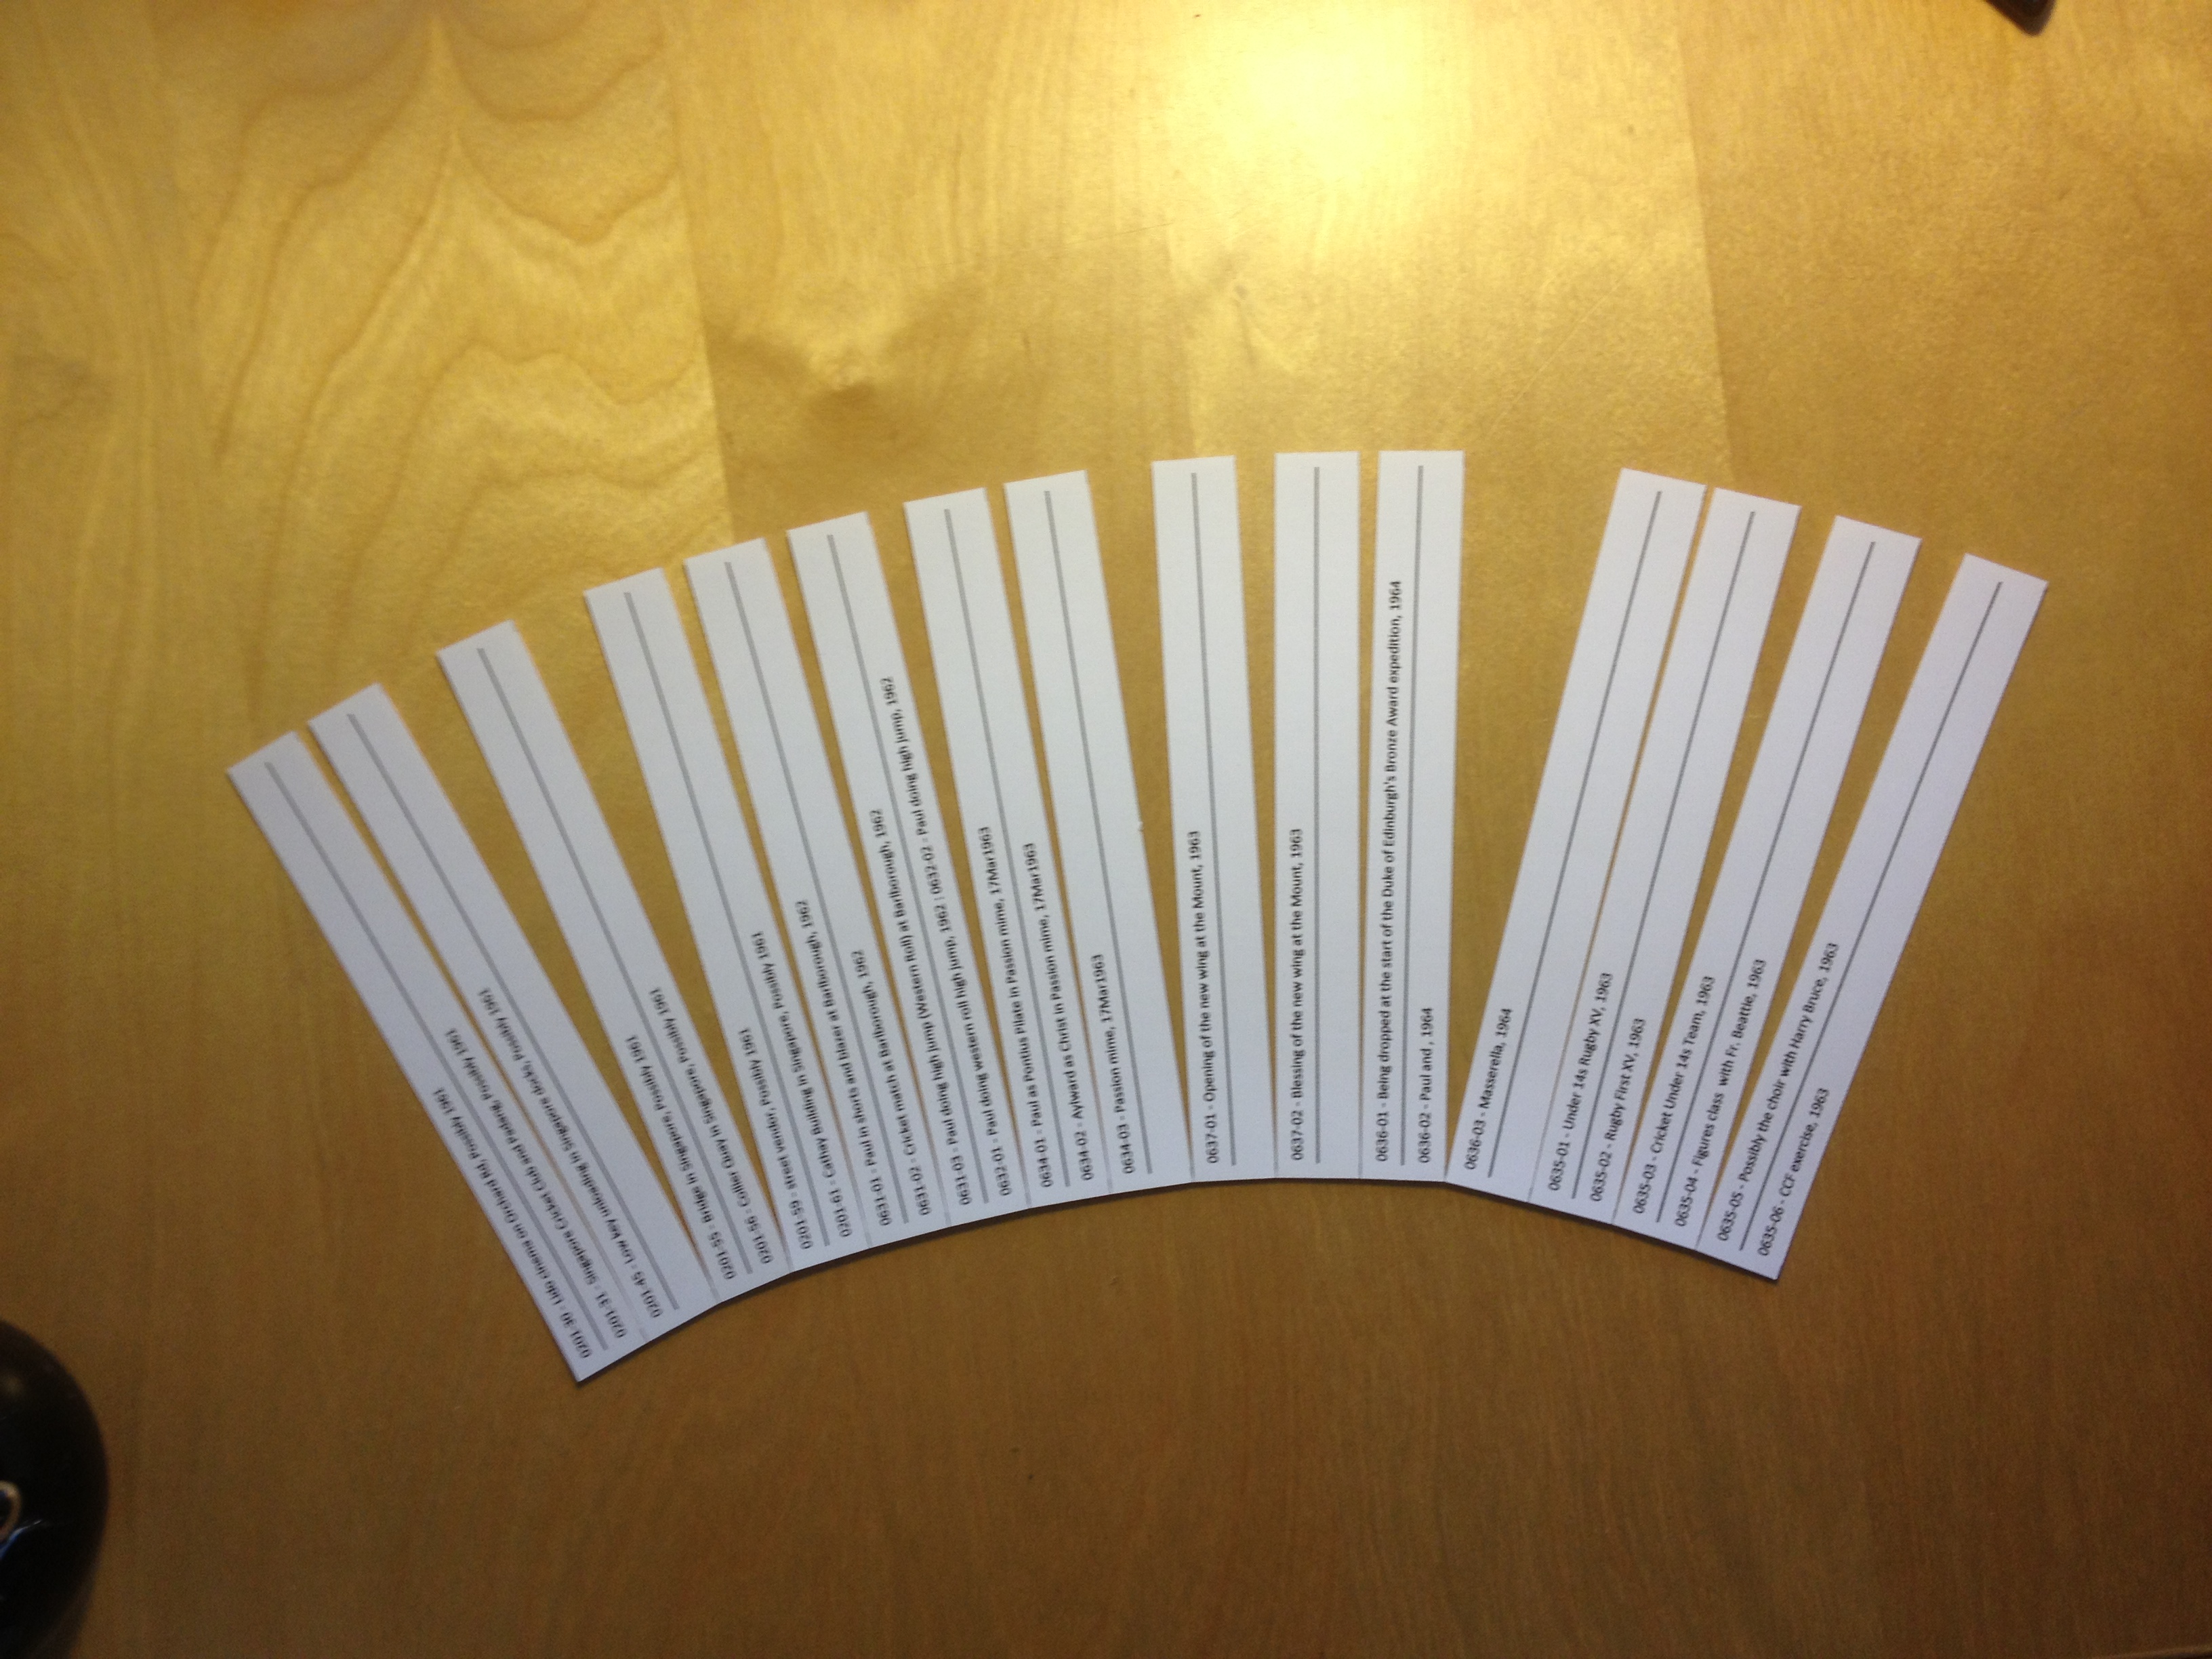
Slip-in tabs: If your album has spaces for slip-in tabs, record each print’s number on the tab together with any descriptive information you want to include. The approach I take is to print out slip-in tabs with the information that’s contained in the file name of each image (i.e. reference number and short description). Detailed instructions and a template for this are provided in another post.

Spine labels: If you fill several photo albums you’ll need something on each album spine to identify it. I try and avoid sticking and gluing approaches as they tend to discolour over the years. Instead I print out a label to the width of the spine and leave enough space at the top to bend it over and push it down the inside of the spine as shown below. The albums I use are sold with removable plastic covers so the labels sit underneath the plastic cover and, with the tops pushed down the inside of the spines, tend to stay in place quite well. If the tops won’t stay in place inside the spine you could try using Glu Dots.

Having done all this, your physical prints and negatives should all have a home. If you have chosen to put your prints into physical photo albums, you may wish to continue the collection with new images even if you don’t normally get prints of the electronic photos you are now taking with your modern camera or phone. I do so – but only with the most interesting photos i.e. a very small subset of the photos I take. On-line photo shops such as Snapfish, PhotoBox and many others make the process of getting prints easy and cheap.

Indexing Photo Collections

The primary purpose of indexing photos is to be able to find them again. This can be achieved with minimal effort using a software application such as Photoshop Elements. Each photo can be tagged with keywords and date; and selected instances of faces can be identified such that the application is then able to pick out all photos in which that face appears.

However, just relying on a software application has the following disadvantages and shortcomings:

  • You’re locked into the software and the need to upgrade it when old versions go out of support and when you upgrade your computer/operating system to a version which doesn’t support the version of the software that you currently possess.
  • If a photo is moved out of the application for whatever reason, there is only the information in the file name and file properties to identify the photo and its contents.
  • Any additional information you wish to hold about a set of photos has to be shoehorned into any available aspects of the software application and digital file properties of each photo, despite them not being designed for that purpose.
  • There is usually insufficient support for the process of organising and digitising a large set of old photos.

To overcome the problems outlined above, I have taken the following approach:

  1. Create an index list in Excel in which a set of photos  (for example a roll of 35mm photos) is allocated a sequential serial number. Serial numbers are included on each package containing negatives and/or photos.
  2. Each photo within a set is given its own unique number, for example, if set Number 72 is “Holiday in Crete, 1982” then the first photo in the set would be 72-1, the second 72-2 etc.. These unique numbers are written on the rear of the physical photo, and in the file name of the digitised version together with a short description of the photo’s contents, for example, “72-1 – View from the villa in Crete, Aug1982”
  3. For each entry in the Excel index, an unlimited selection of information can be recorded about the set in question. I currently record the following:
    • Set number
    • Title
    • Type (can include 110, 120, 126, 127, 127, 35mm, APS, Digital, Digital Movie, Disc Film, Ektachrome Slides, No Negs, Polaroid, Slides, Super 8 Movie, VHS Video)
    • Length (for videos) (hours, minutes, seconds)
    • Number of photos in the set (for still photos)
    • Number on media (any control numbers on the negatives etc.)
    • Year on Media (any year info contained on the negatives)
    • Month on media (any month info contained on the negatives)
    • Day on media (any day info contained on the negatives)
    • Start year (the year in which the first shot  in the set was taken)
    • Status (can include Created digitally, Digitised by shop, Not yet digitised, Scanned by X, To be developed)
    • File type (can include TIF, JPG)
    • Hue (can include B&W, Colour)
    • In PC (Yes, Not yet, No) i.e. specifies whether a digital version is stored in the PC)
    • In Album (Not yet, Yes, Some, Most, No) i.e. specifies if the photos in the set are included in the physical album
    • Album 1 (the name of the first physical album the photos have been included in)
    • Album 2 (should the set have been split across two albums, or should particular photos have been included in more than one album, then this entry will specify the name of the second physical album)
    • Photographer
    • Comments
  4. Once indexing and digitisation have been completed, the physical photos (numbered on the back) can be included in a physical album, and negatives (in numbered packages) can be put away for safe keeping.
  5. For the digital collection, a folder is created for each set with the folder title containing the set number, a short version of the title and the year, for example, “072 – Holiday in Crete, 1982”. The individual digitised photo/movie files are placed within the appropriate folders.

The rigour engendered  by such an indexing approach provides a solid basis on which to start organising a collection of photos – particularly collections containing many types of photos amassed over the years. Once the photos and movies have been indexed, labelled and digitised, they can be stored and managed in a wide variety of ways – including importing them into specialist applications. The challenge after that is to index new photos/movies regularly enough so as not to build up an overwhelming backlog.

Why people keep photos – a note from Rob Hopkins

After completing the previous Post on “Why do people keep photos”, I emailed the philosopher Robert Hopkins of the University of Sheffield, and asked him if he could point me in the direction of someone who is knowledgeable on the subject of why people keep photos.  He very kindly sent me the following reply:

“I don’t know of any philosopher who has addressed this specific question. However, one might use some of the views in the philosophy of photography to try to answer it. As you perhaps know, Kendall Walton, in a famous paper called ‘Transparent Pictures’, argues that to see someone in a photo of them is literally to see that person. So photographs are aids to vision: like spectacles, mirrors, microscopes and night vision goggles, they allow us to see things through them. The special feature of photographs, in this regard, is that they allow us to see things that lie in the past. Walton thinks that, while ordinary folk wouldn’t necessarily put things that way, they are sensitive to this fact about photographs. We treat photos differently from other pictures, and we do so because they put us in some specially intimate relation with the objects in them. His account explains what that intimacy amounts to: it is seeing the thing. If he’s right about all this, the answer to your question comes readily enough. People keep photographs because they want to be able to see scenes, and the people and objects in them, even when those people and things are long gone, or far away, or no longer in the state they once were.”

The paper that Rob refers to is accessible at this address: http://komm.bme.hu/wp-content/uploads/group-documents/76/1315656188-Walton_Transparent_Pictures.pdf

It was published in December 1984 in the journal Critical Enquiry and is 30 pages or so of detailed discussion illustrated by example photos and pictures. At the time of writing it, Kendall Walton was Professor of Philosophy at the University of Michigan.

Why do people keep photos?

A quick analysis of the four pieces I had found on the net to do with ‘Why do people keep photos'[Why-do-people-keep-photos-v1.1-13Jul2012] seems to indicate the following:

The main reasons that people keep photos is a) as a reminder of the past, and b) to share their experiences with others. There are many aspects to the first reason including:

  • To experience a moment again and the feelings you had at that moment.
  • To remind you of someone you really liked – or perhaps hated.
  • To escape from the present to the past because it is somehow more enjoyable than the present.
  • To augment a vague memory and see how it really was.

People also keep other artefacts such as theatre tickets and programmes, but a photo provides a richer memory experience. The saying ‘A picture is worth a thousand words’ is appropriate for a variety of reasons including:

  • Photos tell us about the person photographed, and how they looked, what they did and liked or disliked, and maybe even how they were feeling or what they were thinking.
  • Photos tell us about history, trends and how things have changed or stayed the same.
  • Photos also tell us about the interests , preferences and lives of the people taking the photos.

Photos also have a special value over and above keepsakes or even paintings – they are ‘factive’. That is, we know that, provided things are working properly and have been done right, what’s in a photo actually existed or occurred. Of course, most people are aware that photos can give a false impression or can be doctored, but under normal circumstances photos show things the way they were.

Keeping photos is not normally classified as Hoarding – though a couple of the characteristics of hoarders might apply – no confidence in one’s memory and a fear of forgetting important memories. So, it is likely that someone with hoarding tendencies would probably want to keep photos – but just because someone keeps photos doesn’t make them a hoarder.

Interestingly, I found little mention of specific family reasons for keeping photos – either to see what one’s ancestors were like or to pass photos down to future generations. There was mention that photos tell us about our history and can serve as a linkage of one generation to another but no discussion of why those things are important. My guess is that it is just a natural human trait to be interested in where you came from and what your ancestors were like; and that any desire to hand photos down to the next generation simply reflects the value that individuals place on having such information about their ancestors themselves.

Trawling the net for “why people keep photos”

Today I started looking for info on the net about why people keep photos. There’s a lot of thoughts out there on this topic, for example:

http://youthcoders.net/photo/theory/979-why-do-people-keep-photographs.html

However, more academic discussion about the underlying reasons were harder to find. There is a site which, among other things, summarises aspects of  “The Psychology of photography” which is relevant but not exactly spot on:

http://dynamics.hubpages.com/hub/The-Psychology-of-Photography

I found a piece in the Psychology Today site which describes a paper by  philosopher Robert Hopkins of the University of Sheffield on “what’s special about photographs?”

http://www.psychologytoday.com/blog/maybe-its-just-me/201012/whats-so-special-about-photographs

I also came across a very detailed presentation about hoarding which seems to have some sort of relationship to the question:

http://www.hoardingsqualorconference.com.au/2009/files/presentations/Psychology%20of%20Compulsive%20Hoarding%20-%20Dr%20Christopher%20Mogan.pdf

I think I’ll have a more detailed read of the above links and then maybe contact somebody working in the area to try and have a brief discussion on the subject.