DPC Publication Plans

A few days ago I agreed a way forward with the Digital Preservation Coalition (DPC) regarding the publication of the paper describing the PAWDOC digital preservation work: I will create a post summarising the learnings from the work, and the DPC will attach an edited PDF version of the whole paper, as well as the updated templates, to the original Case Note describing how I derived the preservation process that I applied to the PAWDOC collection. I’m hoping this will all be achieved by the end of October.

Story Board Switch-On

This afternoon my Electronic Story Board went live on the side of the bookcase.

Well, perhaps not so much ‘live’ since this is a simulation in the absence of electronic paper; though the electronic interaction part of the installation does exist – it’s just that its on my iPad in a very useful app called Sidebooks.

For the last week I’ve been slogging through each of the 35 Story Boards, getting the numbers of each one in line with the number of the spines on the virtual bookshelf and making minor adjustments and corrections. This has been a laborious process because the front page Story Boards have been created in PowerPoint, exported as JPGs, and imported into the PDFs. Unfortunately, its the front page Story Boards that have the links to all the accompanying pages in the PDFs, so importing a new version of the Story Board requires all the links to be reset in the new Story Board page. Anyway that all got finished yesterday, after which I was able to finish laminating the front page Story Board pages.

Today, I spent the morning creating the physical Story Board with its holder for the laminated pages, Its sticking-out very small screws on which the hole-punched laminated pages are to be suspended, and its holes and cord to suspend it down the side of the bookcase. The result looks reasonable and seems to work: I’ve just been up to it and changed the existing Story Board on display (7. Grief – CSCW A Book of Readings to 16. Pawson – Expressive Systems) and it was quite quick and easy. However, I think its going to be a while before I know how I  feel about this PHYSICAL Story Board, because its significantly different from the ELECTRONIC PDF versions that I’ve spent a lot of time creating over the last month. Watch this space.

Trekking through Story Board construction

I finished creating the 35 story boards and associated PDFs with linked material, a few days ago and it was quite a trek – despite having previously recorded what events, people and artefacts each book reminded me of. This was because I have a complete collection of indexed work documents and an extensive collection of indexed memorabilia, and each search of these archives brought to light additional material. For example, in searching for details of my visits to the Media Lab, I discovered not only a review of the Media Lab book which I had written for the Hicom Human Computer Interaction forum, but also my Hicom write up of the talk that Nicholas Negroponte, the head of the Media Lab, gave at Imperial College in 1989. Most people don’t have such extensive archives but, even so, I think they would probably still uncover additional forgotten material, if only in their minds, as they focused on the topic in hand.

For many of the books, I tried to find photos of the authors and of other people mentioned in the Story Boards, and, for the most part, this seemed fairly easy to do, though finding versions from the times they wrote their books, or from when I knew them, was a little more difficult; I didn’t really want to include photos of unrecognisable people who were 35 years older than I remembered them. In contrast, there was just no trace of some people, let alone a photo of them.

The other thing that was particularly striking as I waded through the books was the amount of information I came across that was new to me. Several of the authors had died – some at surprisingly young ages (for example, Michael Hammer, the co-author of Re-engineering the Corporation, had died in 2008 aged 60; and Susan Leigh Star, part of the Editorial Collective of the CSCW journal, died in 2010 aged 56); and others had made major job changes (for example, Lucy Suchman, author of Plans and Situated Actions, had moved from Xerox PARC in California to the UK’s Lancaster University). It was also a bit of a revelation to find out that my employer in the early 80s (the National Computing Centre in Manchester) had got into severe financial difficulties in 1996 and, after failing to take advantage of a number of rejuvenation and rescue attempts, was finally totally extinguished in 2017. Much of this additional information came from Wikipedia which often seemed to be the most immediately accessible and complete source of information.

The story boards I was creating are only single numbered pages which will be laminated and placed in a box on the physical Board. However, the PDF versions afford the ability to link an almost unlimited number of pages of additional information from the main Story Board page at the front of the file. I took full advantage of this facility and ended up with between 50 and 150 additional pages for each book. These will be fully accessible when I place the PDFs in the SideBooks app in my iPad. As I put these PDFs together, it wasn’t difficult to imagine all the documents in the collection being interlinked in a giant hypertext framework as envisaged by Jeff Conklin in the early 1980s, such that any of the material in the collection would be accessible via a number of jumps from any Story Board.

Having produced the 0.9 versions of the Story Boards, I turned my attention to creating the page of numbered spines which will act as the index for the physical story board. There wasn’t enough space to put full size spines on a single page, so I elected to have them one third of actual size. Achieving this reduction proved relatively easy by using the PowerPoint proportional formatting function whereby the arrow controlling vertical size is held down until its value is one third of its original value. The current version of this page is below. It’s interesting to note that there’s space for additional items should the need arise.

 I’m now in the process of including the appropriate number on each Story Board and making final adjustments and corrections to each one; it won’t be long before the printed sheets can be laminated and the physical Story Board constructed.

Scanning slog and standardised structure

All the 36 books for which story boards are going to be produced have now been scanned. As I found in the previous Electronic Bookshelf Journey, the scanning process became easier and faster the more books I completed. However, It is still a tedious process which takes a significant amount of time simply because of the volume of paper involved – the photo below shows the stack of cut pages that were dealt with – and there were a few other books which were scanned without being cut. At least this time round I discovered a quicker way of creating Contents bookmarks in the PDF editor.

I’ve also finalised a standard structure and format for the Story Board pages themselves. They will be PDF documents with a front page like the one below (ready to be printed out for the physical Story Board display), and with all the linked pages following on behind i.e. the PDF will be a completely self-contained PDF document so that it can be viewed and explored as a single electronic document within the SideBooks app on the iPad. I would have preferred to link out to other documents within SideBooks rather than packing everything into the one document, but that functionality doesn’t appear to be available (though I couldn’t be absolutely sure because the only documentation I could find for the Sidebooks app is in Japanese).

After much experimenting I found that the best way to insert the links into the document was to a) to place the link arrows in a Powerpoint version of the front page, b) save the front page as a jpg document, c) insert the front page jpg into the PDF Story Board, d) overlay invisible link rectangles around the arrows and set their destinations to be the relevant page elsewhere in the document, e) send the completed PDF Story Board to SideBooks via DropBox, and f) Open the Story Board in SideBooks which displays the link rectangle areas filled in with an yellowy-type colour as shown below.

This first PDF Story Board (for the Levinson Pragmatics book) contains 299 pages even though only a subset of pages from some of the linked documents are included: it would hinder navigation and be generally impractical to include the full text of all the linked books and other large documents.  Hence, I decided to include only the key pages from the longer items and to place a note on the front pages of the items concerned indicating where the full text can be found – as shown in the example below.

With the basic scanning and design work completed, I can now get on and create each of the 35 remaining Story Boards.

Insights prior to creating the boards

I’ve just finished listing the things I would need to see on an Electronic Story Board before sacrificing each of the items concerned during the scanning process. The results are in the spreadsheet Requirements for each Electronic Story Board, and I’ll be using them to create a story board for each of the selected items.

I’ve decided to also create story boards for a few items that I decided to retain in physical format and that won’t, therefore, be fully scanned. As I pondered those items, I got to thinking that I’d like to have story boards for them – even though I started off with the notion that the purpose of a story board would be to compensate for not having the physical item on my bookshelf. It appears that having a story board could be a worthwhile addition to the physical item itself.

The whole analysis exercise has thrown up another interesting observation: creating a story board is not going to be just a matter of illustrating some specific memories. It is also going to involve some investigation to uncover some forgotten, unknown, or additional facts; and it may well also identify that some of my memories are false. In fact, creating a story board will be just an additional iteration of experiencing a plethora of memories centred on the item in question. We may believe our memories of specific objects are static, but, in practice, they live within a moving sea of continually accumulating daily experiences. As time goes by, we forget, we embellish, we connect. I anticipate that the process of creating each story board will itself significantly extend the repertoire of memories and feelings I have for each item.

A bit of Designing and Prototyping

The space I intend to use for the mock-up of my electronic story board is the side of a bookcase just inside the door to my study as shown below.

I figure that, in that position, I’ll be encountering it every day and be encouraged to use it. The side of the bookcase measures about 28 x 200 cm so the design of the Story Board has to fit into that space. Having considered a variety of options, I’ve decided to go with three main components, each of them sitting one below the other: a) a display of the spines of the books next to each other as though they were sitting on a shelf, with a unique number above each spine, b) an area which will display a numbered A4 laminated card containing the story for a particular book in portrait orientation, and c) an open box container for all the A4 laminated cards in number order. The decision to go for a portrait A4 design means that I’ll be able to create each story in Powerpoint and print it out on my printer without any difficulty. My current thoughts about securing all this to the bookshelf are to construct it on two thin wooden struts which would have a hook structure at the top so that it would just hang from the top of the bookshelf – however this will need some further thought and experimentation.

In the meantime, I’ve  been working on a template for the A4 story card and have come up with a design which has three concentric vertical ellipses.

The spine of the book concerned and a thumbnail of its cover, will go in the central ellipse; and the story elements which are strongly related to the book will overlap the other ellipses. Story elements less strongly related will be placed outside the ellipses on the edge of the story board. To see how well this works in practice I tried it out on the first book – Levinson’s ‘Pragmatics’ – see below.

The key points that emerged from this exercise were:

  • Several of the items are text which needs to be readable to be useful, but which is unreadable when reduced to a size which can be fitted onto the story board.
  • The images are easy to recognise even when much reduced in size.
  • The largest ellipse is coloured so lightly that its presence is easy to miss.

The final point should be easy to sort out – I’ll just experiment with the ellipse fills. However, the first point about the text is a serious issue. I think there’s only two ways round it – either to make all the text big enough to read, or else use a thumbnail for the document with a callout box containing a portion of the text which is big enough to read.

Getting my thoughts in order

The primary objects to be addressed in this journey are the books and other items on the topmost shelf in the cabinet in my study, as shown in the photo below.

To get started, I made a quick assessment of what each item means to me by looking at the spines in the photos and writing brief notes in scrawly longhand in my Journeys notebook – somehow, electronic media just can’t replicate the freedom and unconstrained nature of the longhand scrawl. Although this exercise stimulated a good selection of musings, it also made me think that there are probably several different points of view from which a book can be considered and that each of those points of view might stimulate different thoughts. For example, I have a general awareness that the bookshelf contains a set of work books that I don’t look at very often; and I’m aware of that bookshelf in the context of all the other bookshelves I have and of the availability or shortage of space across all of them. When I take a closer look at the bookshelf I recognise specific books; and sometimes when I muse on one of them, thoughts pop into my head about it, including why I have decided to keep it. Finally, if I actually take a book off the bookshelf and handle it and leaf through some of the pages, I experience further thoughts; and, sometimes, the smell of a book might stimulate a memory. To try to be as methodical as possible, these different points of view have been given the following names:

Presence: Awareness of book/s or types of book/s in a particular location.

Space: Awareness of the type, suitability and availability of storage space the book(s) is/are in and the way they are being stored in the space.

Recognition: A consciousness of the Title/Author of a particular book and possibly of what the book is about.

Reason for Keeping: Why this particular book was retained during prior clear outs.

Sight Stimulation: The emergence of thoughts and memories related to a particular book stimulated by looking at the outside of the book (and possibly just the spine).

Handling Stimulation: The emergence of thoughts and memories related to a particular book stimulated by touching the book, opening it and leafing through the pages.

Smell Stimulation: The emergence of thoughts and memories related to a particular book stimulated by the smell of the book.

The first two (Presence and Space) apply to my awareness of the bookshelf as a whole and generated the following thoughts:

Presence (top shelf): Retained work books and some other books on the top shelf of the white cabinet

Space (top shelf): The shelf is full and I’ve run out of shelf space in the whole of my study. I could do with freeing up some shelf space or getting some more shelving.

The remaining points of view were considered with respect to each individual item on the bookshelf in turn. For Sight Stimulation and Handling Stimulation there was no limit placed on the number of separate thoughts that could be recorded. The detailed results are shown in this analysis spreadsheet (note that the Smell Stimulation yielded almost no results – possibly due to a blocked nose, but maybe an indication that this type of stimulation occurs only rarely). The thoughts that were stimulated were then sorted into a two level categorisation. The top level categories are:

Topic, Publisher, Author, Acquisition, Use, Value, People, Events, Places, Experiences, Father, Borrowed, Physical characteristics, Spine, Scanning decision, Not applicable to this exercise.

The lower level categories and their frequency of occurrence are documented in this Types of Thoughts spreadsheet.

With this basic analysis work completed, the next step will be to ask the following question of each item on the shelf: “What would have to be displayed on an electronic story board to make me be prepared to destroy the item in the course of scanning it?”. I shall provide answers while reviewing the thoughts I have recorded for each item.

Under the paper wait

The paper describing the PAWDOC digital preservation work was submitted to the Digital Preservation Coalition (DPC) on 31st May and the organisation responded saying it was interested in the paper but was currently unable to provide a timescale for dealing with it due to a busy work schedule. I guess it might be several months before hearing whether the DPC will want to publish a version of the paper.

Dust Jacket design and production

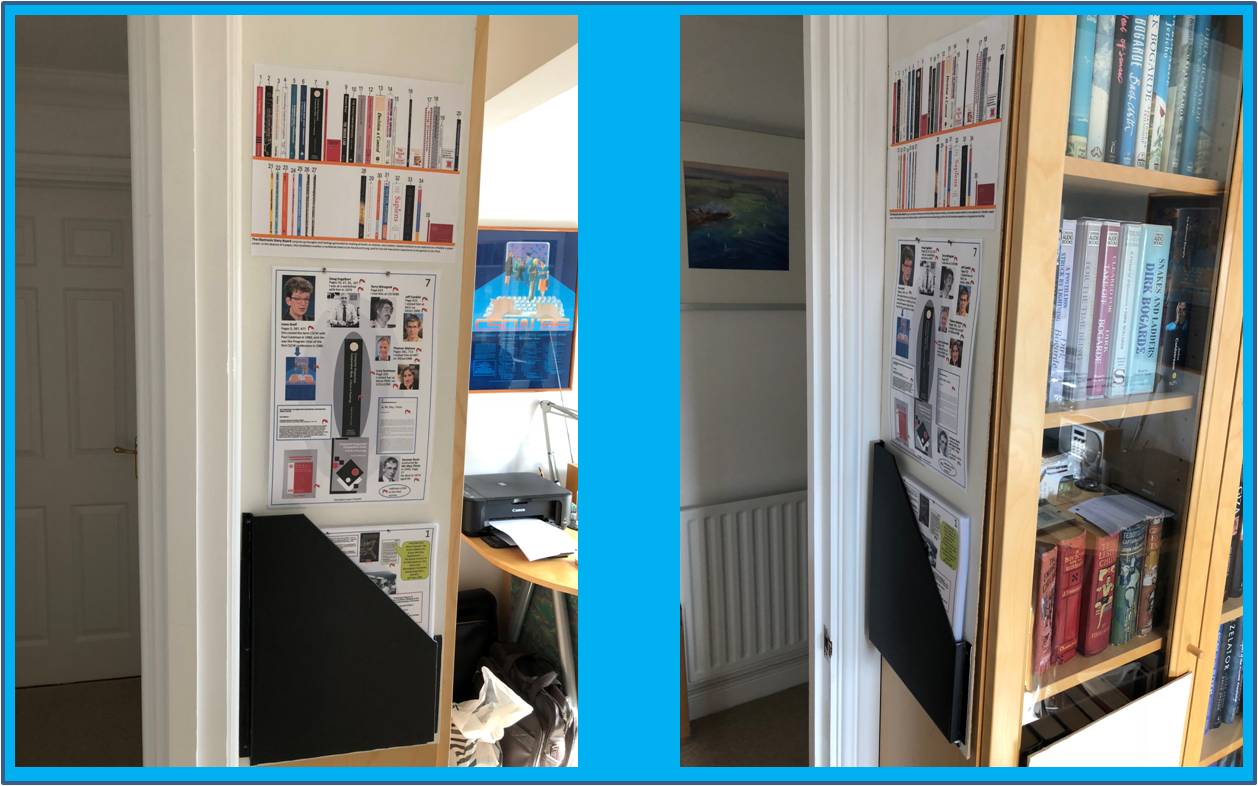
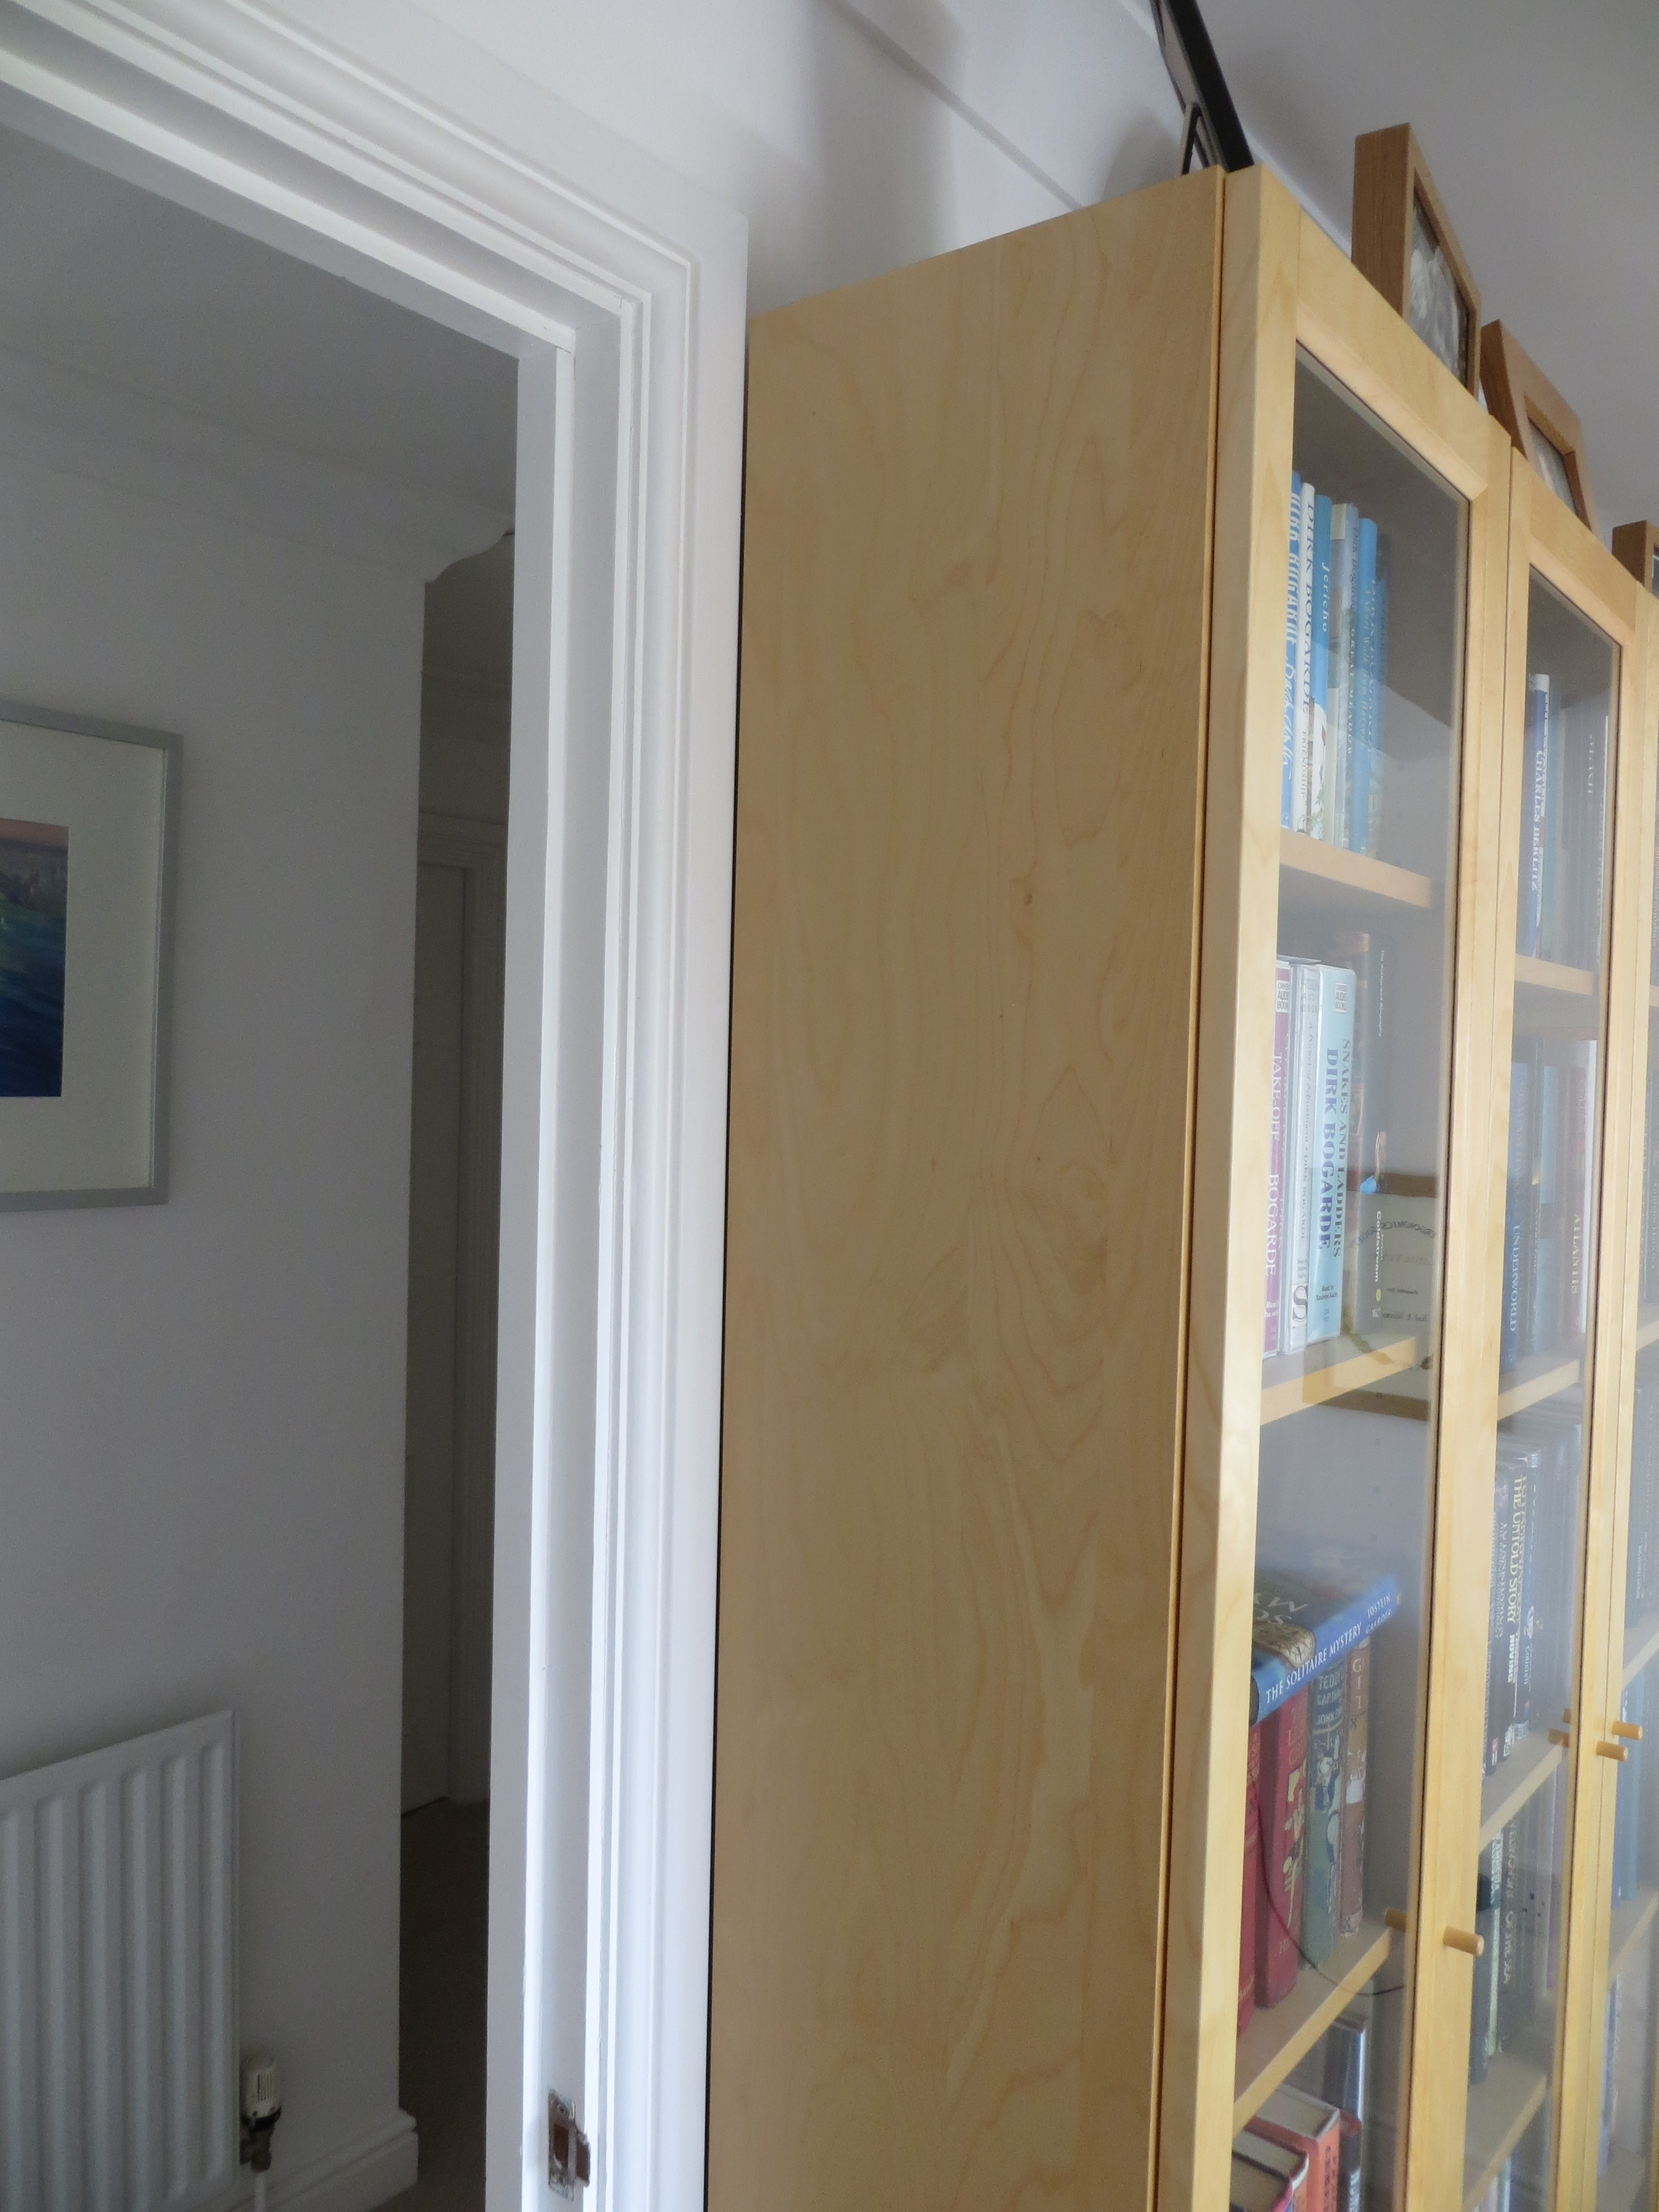
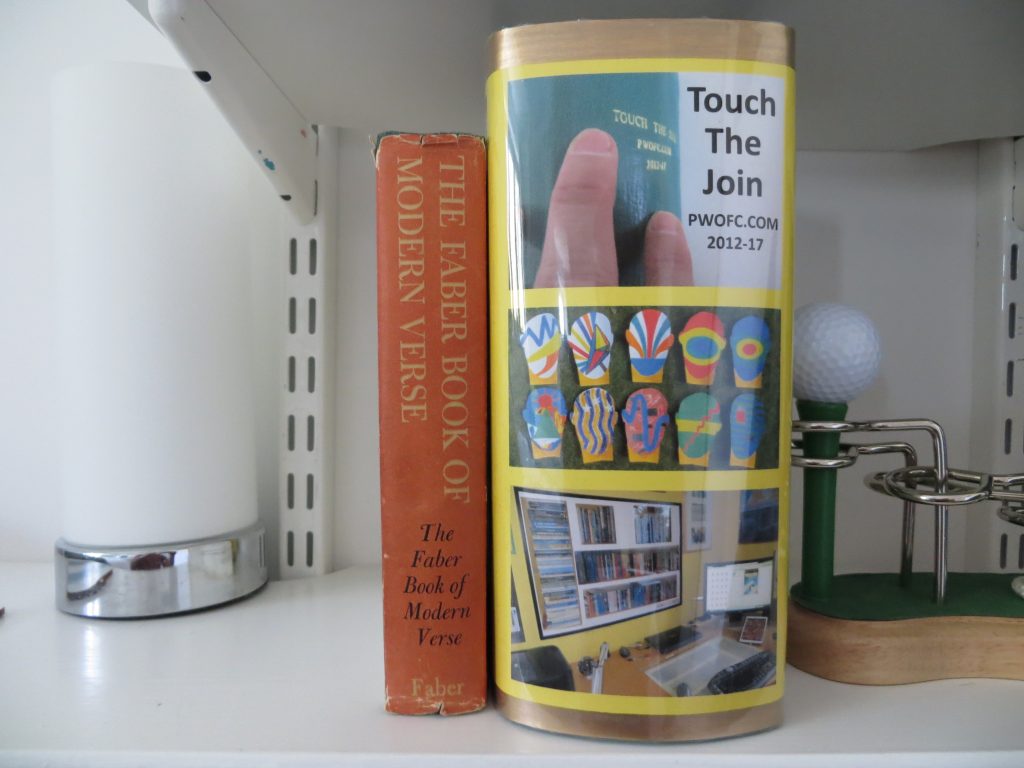
This week I put the finishing touches to ‘Touch the Join’; the end papers were glued to the boards and I completed the dust jacket. The volume now awaits a place on the top shelf of my cabinet when its current contents are digitised in the Electronic Story Board journey.

The creation of the dust jacket was particularly Interesting. The thickness of the book meant that there was considerably more space on the spine to do things that perhaps wouldn’t work at all in a narrower area. I decided to use the space to illustrate the title, so I took lots of photos of my fingers touching the bare leather spine and embedded the title in one of them with the result shown below.

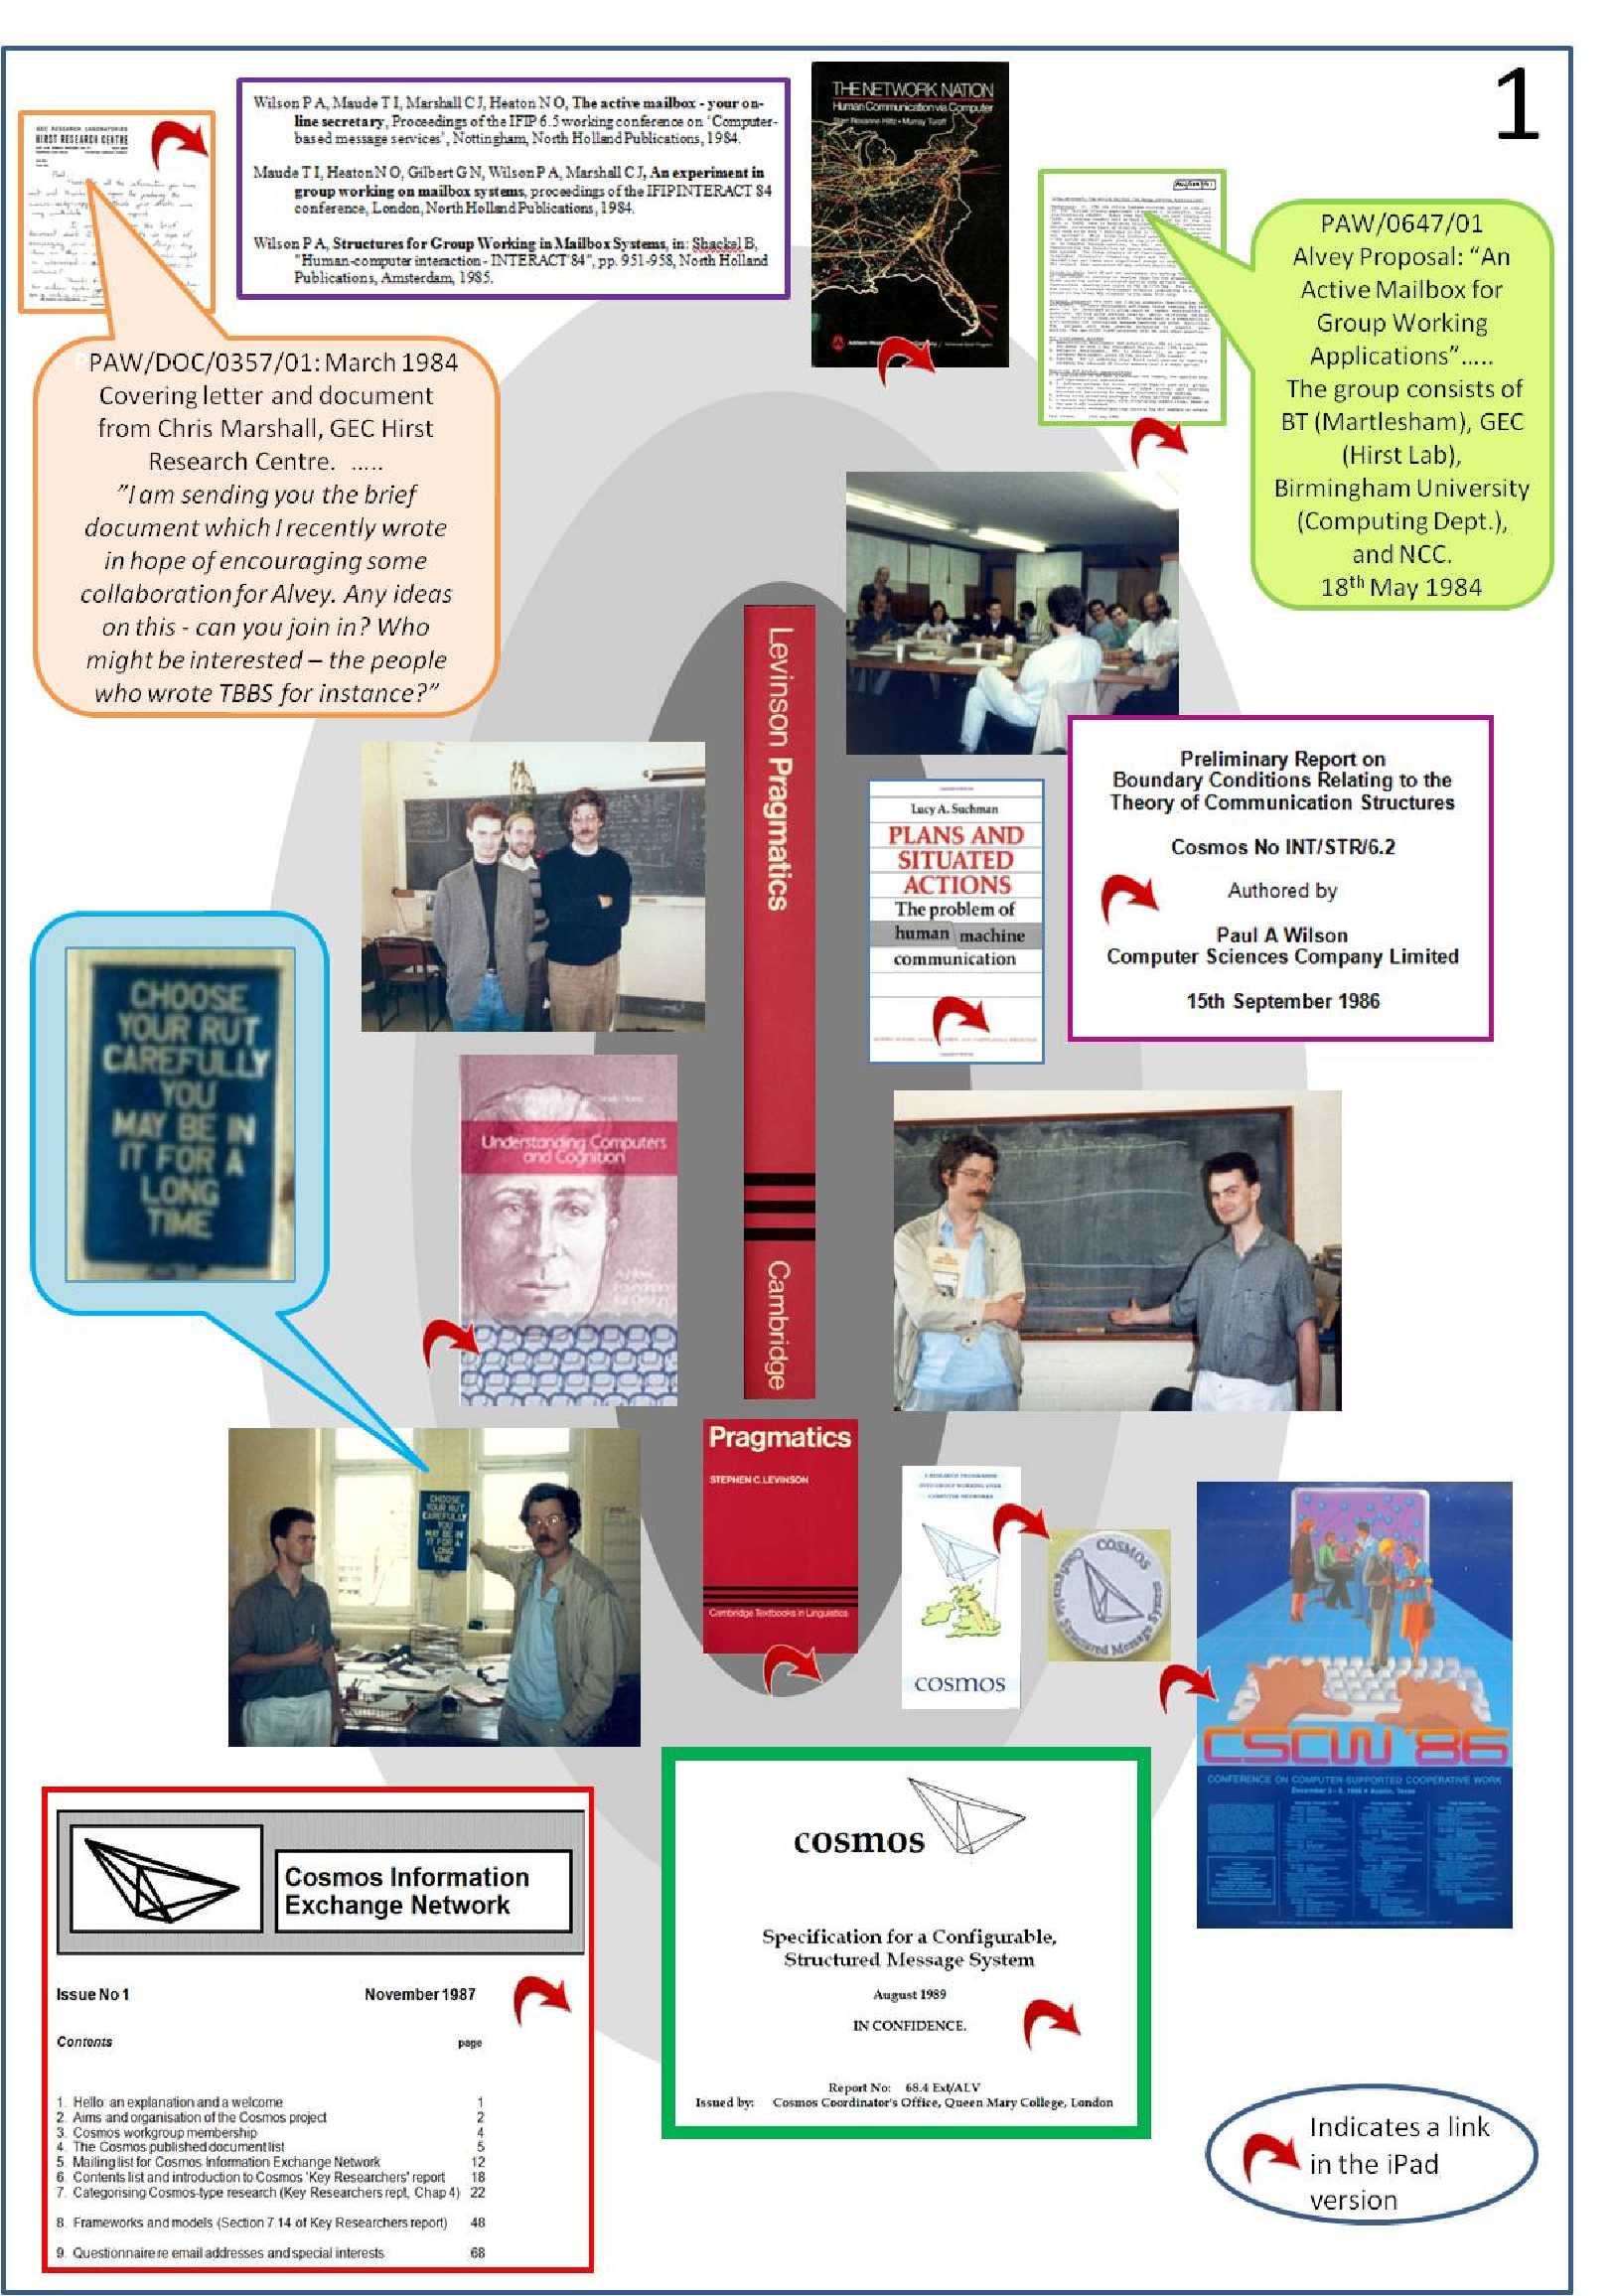
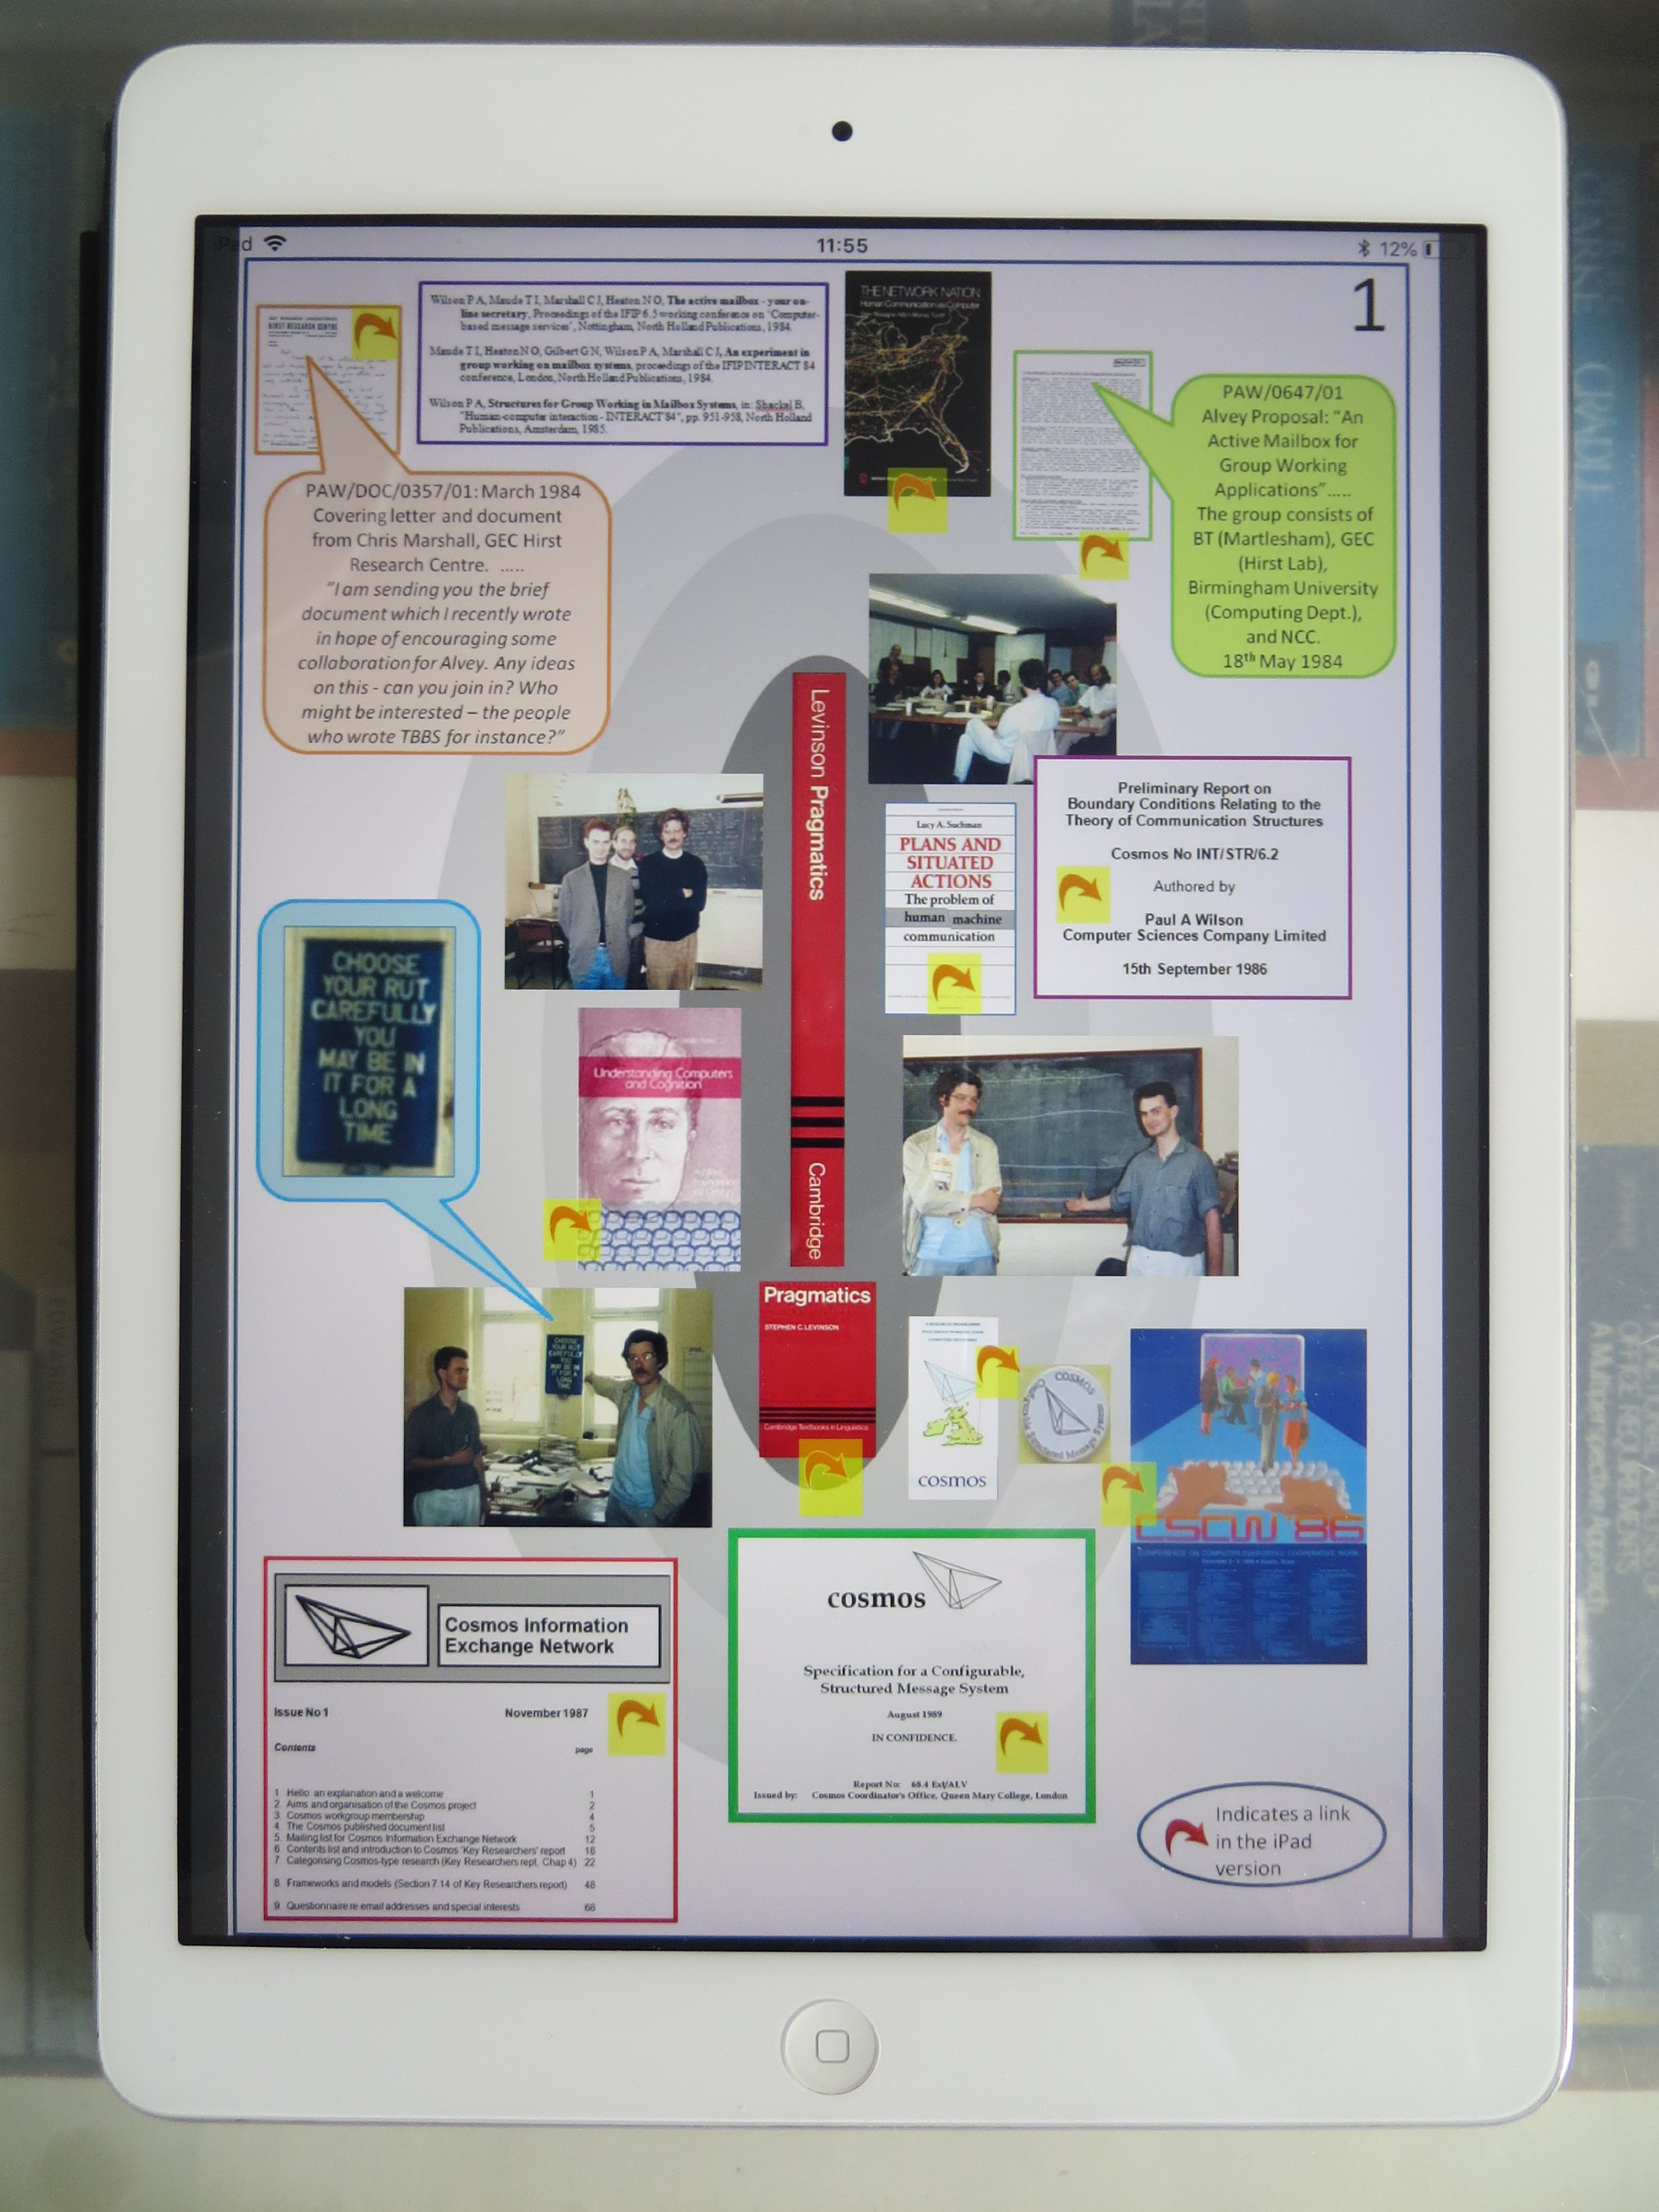
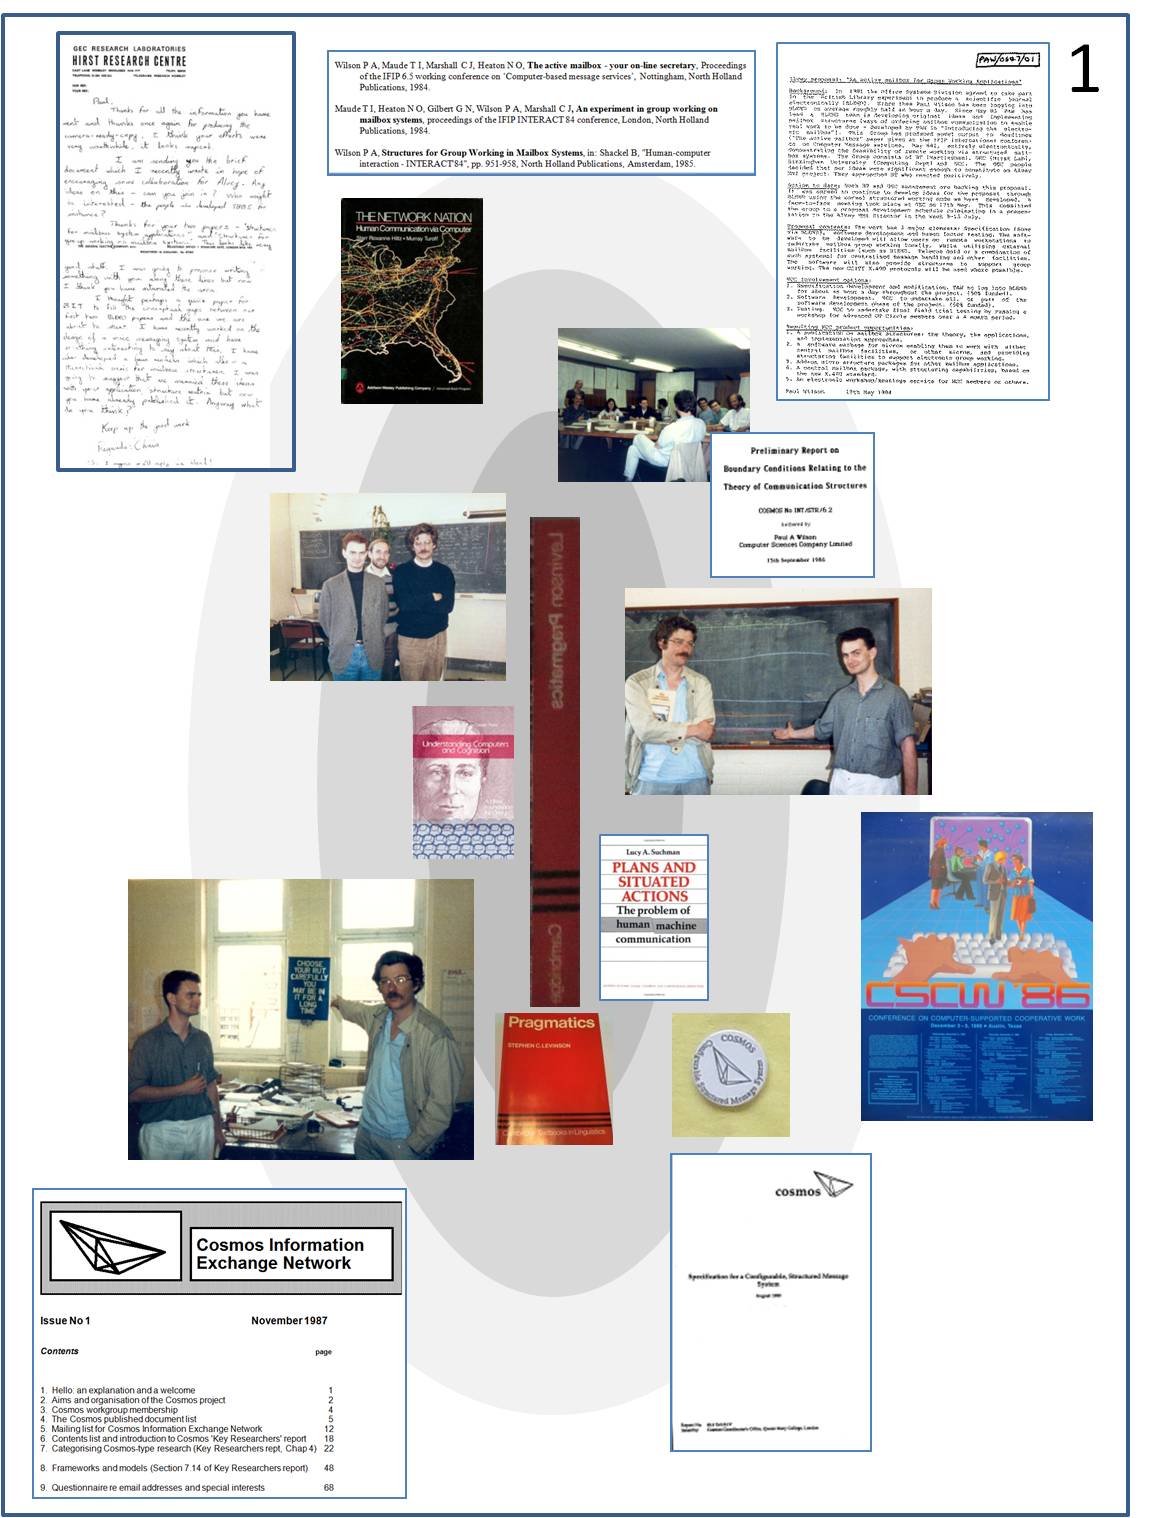
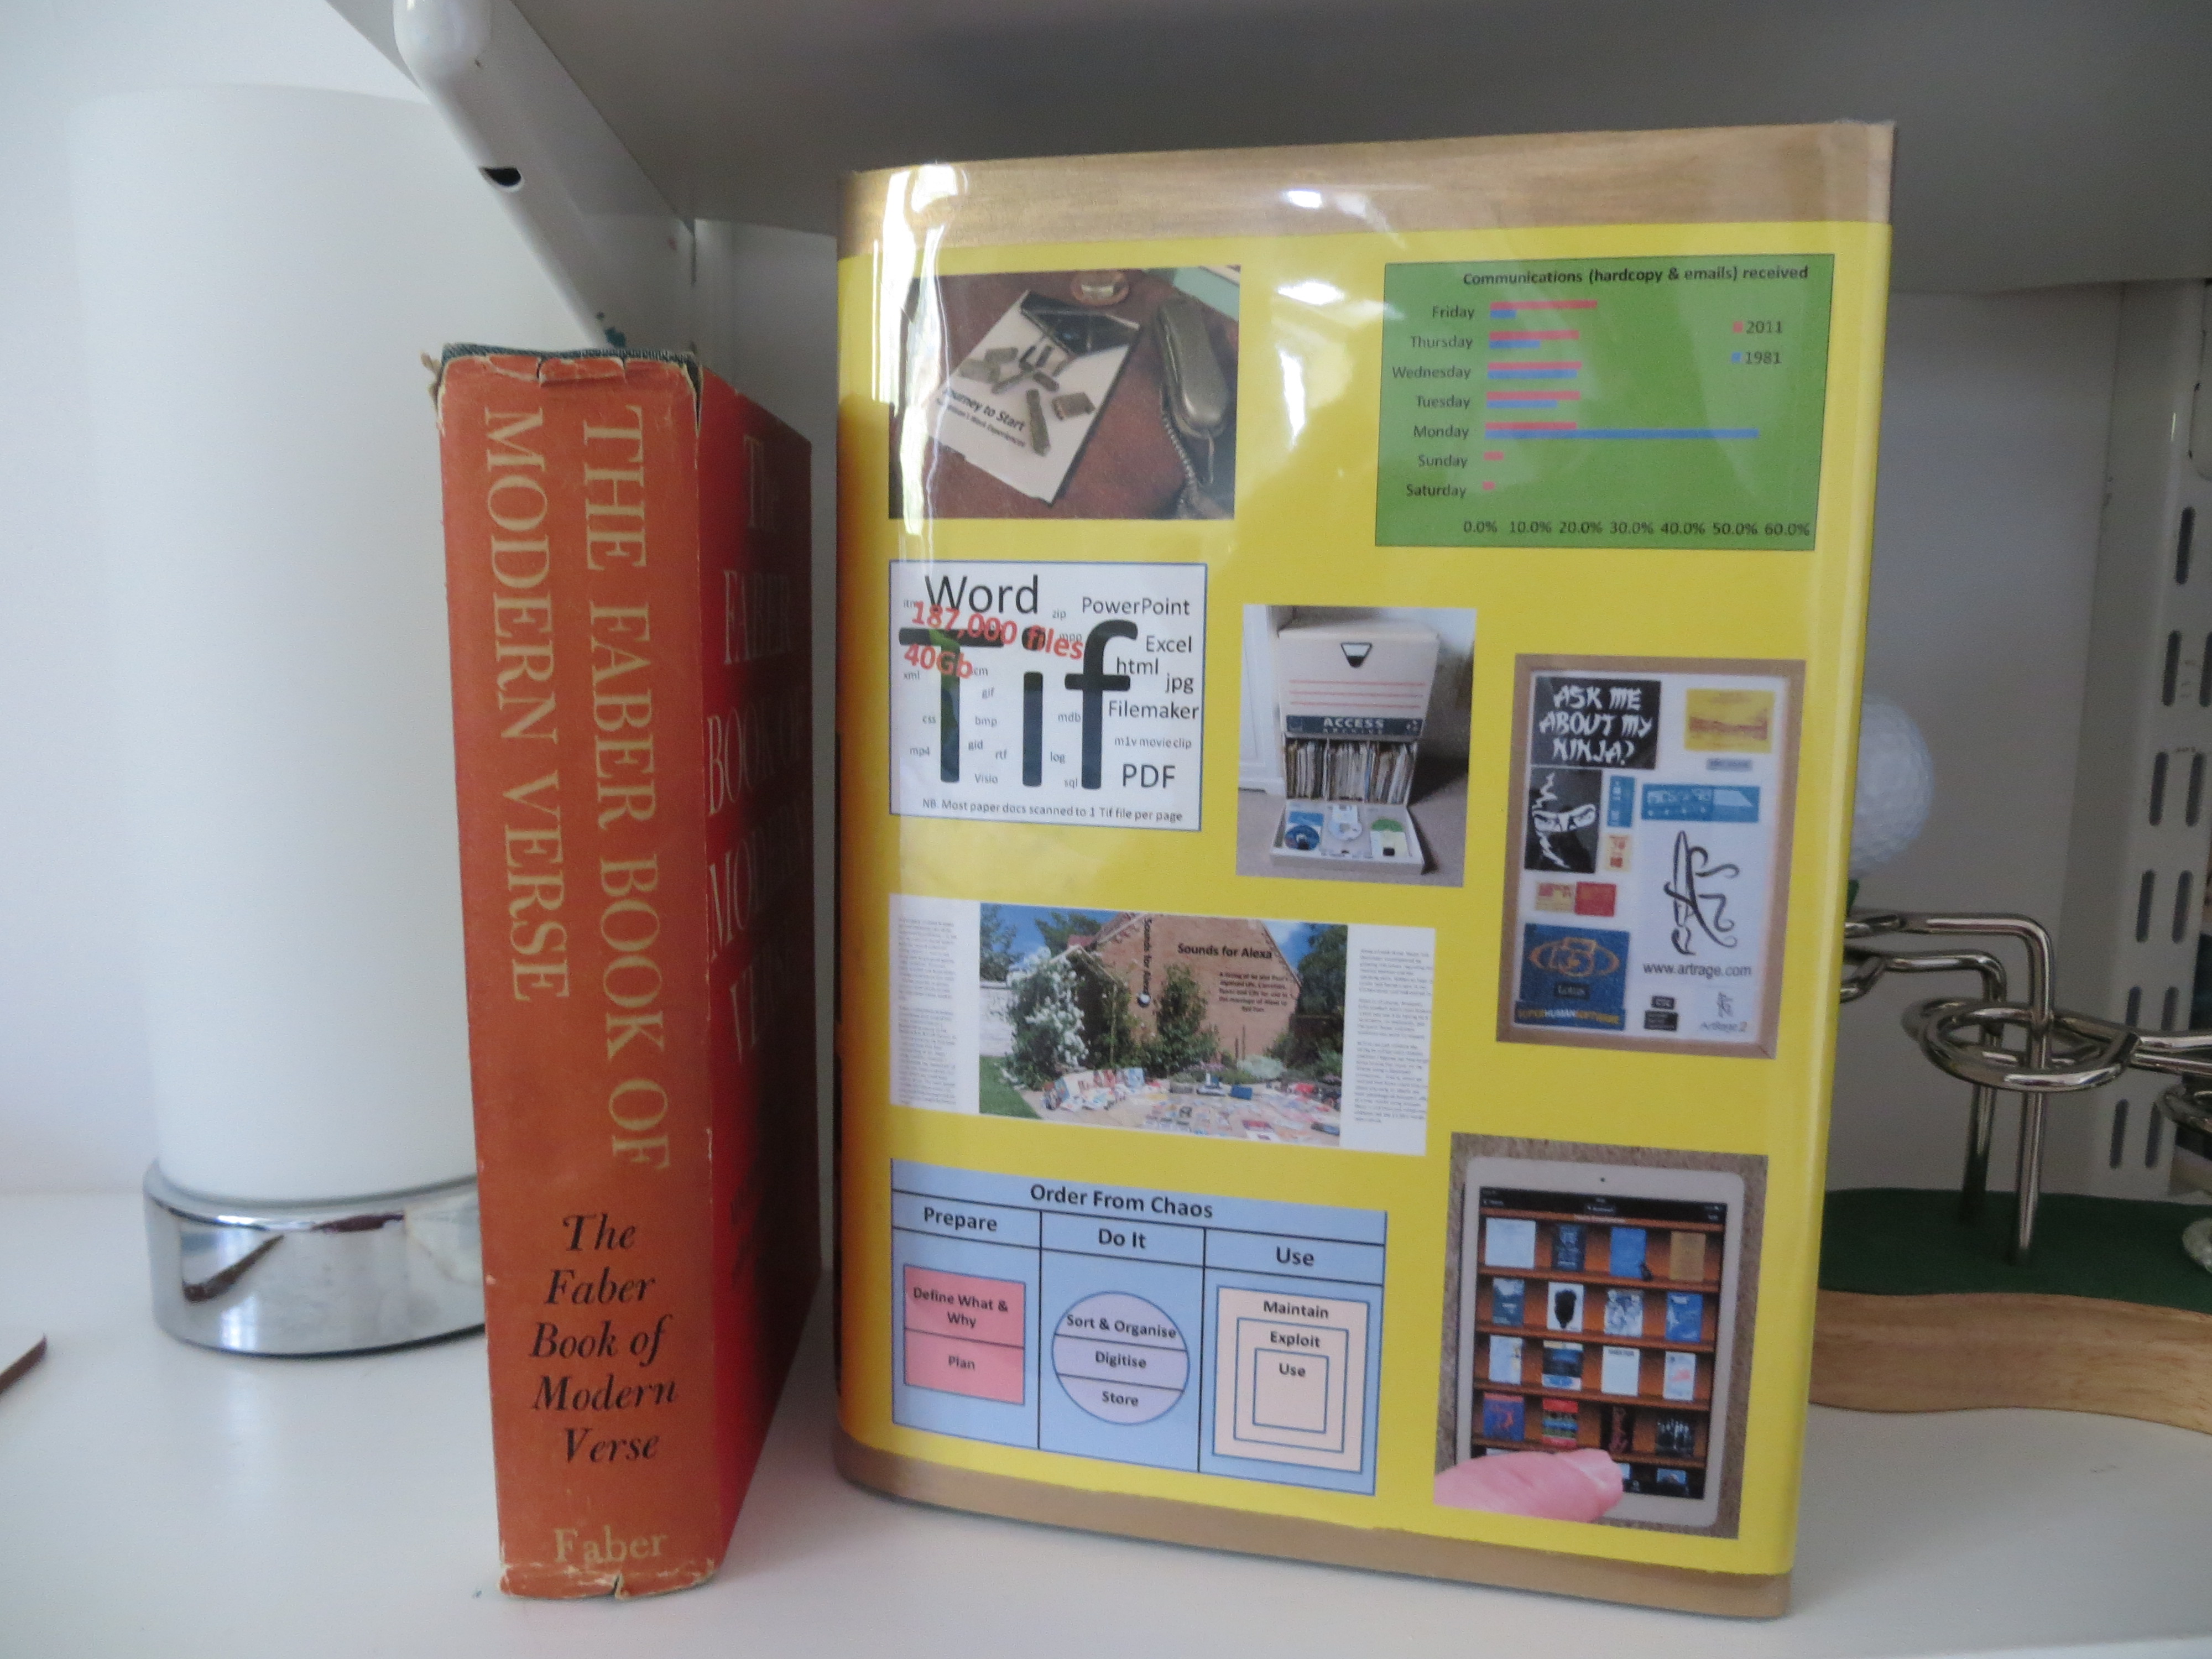
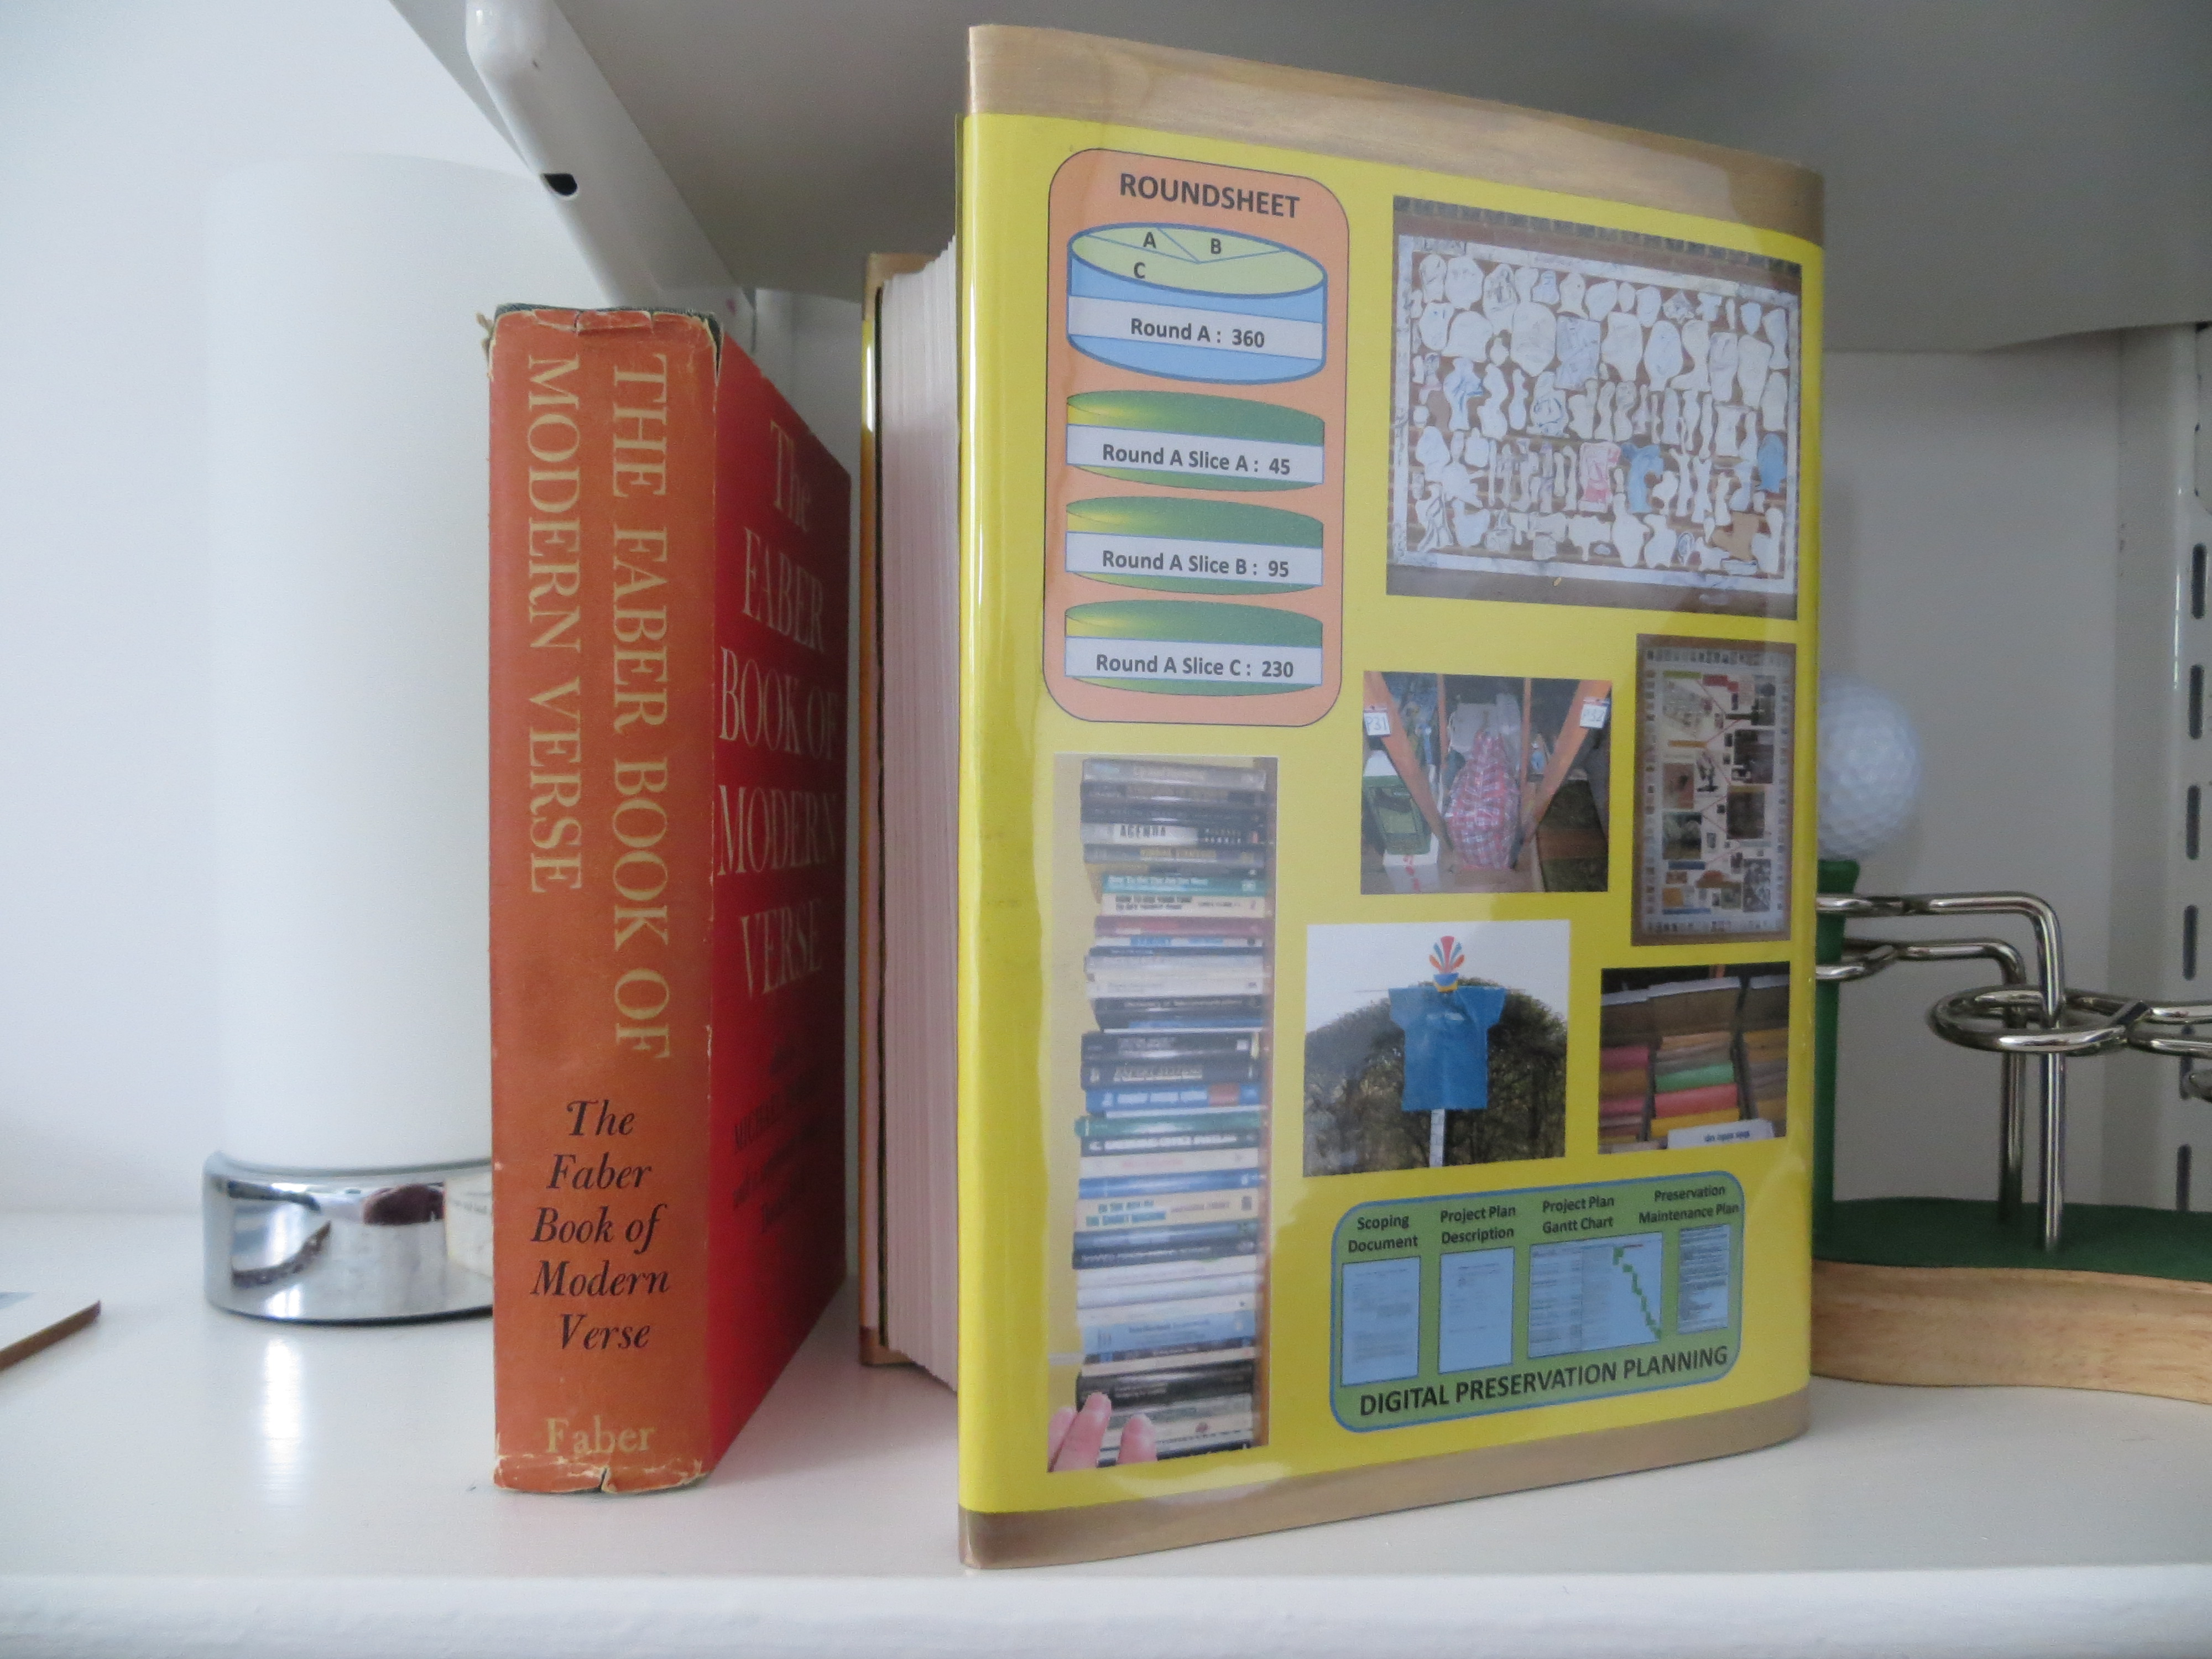
The other two pictures on the spine are taken from within the book itself along with the other sixteen images that appear on the front and back of the jacket – all assembled in a PowerPoint slide. Fingers have been superimposed in another two of them to reiterate the message of the title. The front and back of  the dust jacket are shown below.

The inside flaps provided the opportunity to provide the following rationale for producing the book:

” In the years before retiring in 2012, I had accumulated a number of projects that I didn’t have time to work on. Things like the analysis of why I kept certain documents after scanning and not others; and the comparison of my incoming communications between  1981 and 2011; and the Roundsheet. As retirement approached, I began to realise that I could undertake all of these and more under a collective banner; and that, for some of them, I might be able to find  collaborators, academic or otherwise, to advise me  or to work with me. I thought of these as prospective journeys of discovery, unfettered by organisations or money.

To provide a structured framework within which to work, I decided to record a journal for each journey; and to set up a website to provide an open record of my activities for prospective collaborators to see what I was doing. Consequently, in April 2012, pwofc.com opened for business.   

One of the journeys I embarked on was digital preservation work on my lifetime collection of work documents, to ensure that its contents could be accessed in the future. The collection includes some self-contained web sites, so I investigated the best way of storing web sites long term. However there appeared to be no simple solutions. The industry standard WARK methodology seemed far to complex for my needs, so I stuck to the approach I had always taken – keeping all the files together in a zip file.

However, it did get me thinking about how to preserve pwofc.com; and I suddenly realised that a more tangible way of doing it would be to simply put it on a bookshelf. I had started attending bookbinding classes in Bedford in 2017, and I had already created, printed and bound a book of my own (Sounds for Alexa), so I knew it would be possible. I realised, also, that it would be an interesting opportunity to compare the features of a web blog and a book.

That’s how this tome came about. I wonder what its future life will be? My guess is that it’ll last longer than its electronic counterpart.”

The printing of the dust jacket was quite demanding because its length (60cm) required a custom print size to be set up in the canon MG3550 printer driver software; but the printer driver software does not permit Borderless Printing with custom print sizes. Hence it was not possible to avoid getting a 0.5 cm blank edge all round the print. Furthermore, the height required was exactly the widest the Canon MG3550 printer was physically capable of handling (22cm) but the printer driver software only permitted a custom size of 21.59 cm,  so a further 0.41 cm of blank space was introduced on the top or bottom edge. I produced 4 separate test prints and each time tried to get an equal amount of blank space on the top and bottom edge by moving the image to be printed up and down; but wasn’t able to achieve it, so I ended up with a larger space along the top edge and a smaller space along the bottom edge. I didn’t think this would look very good, so decided to fill the blank edges with gold wax gilt by using masking tape and applying the ‘KIng Gold’ version of Pebeo’s Gede guilding wax using a small paint brush with the hairs cut down to a length of about 5mm.

A further complication arose when trying to wrap the dust jacket around the book with the spine in the appropriate place. Because of the size of the book and the length of the dust jacket it was necessary to handle the print quite a lot to get it in the right place, and I found that some ink was coming off on my fingers. Despite experiencing this on the test prints and then being super careful with the final master version, some ink smears still found their way onto parts of the jacket. I’ve decided I’ll live with these for the time being. Perhaps, at my leisure in the future, I’ll have another go and leave the print for a few weeks in the hope that the ink fixes more securely.

Finally, covering the jacket with a sheet of transparent plastic (probably polypropylene) was relatively straightforward – just cut to size with several centimetre overlap all round and then fold over the top and bottom edges of the dust jacket. However, there’s an issue with using this material that I haven’t yet found a way to resolve: the plastic attracts all the dust and hairs that are already lying on the surface on which you cut it and fold it. I guess if I had a dedicated workbench which I could keep immaculately clean, that would do the job – but I don’t and have to make do with whatever area I can find that’s large enough to take an expanse of the 80cm wide roll. Consequently, the outside of the cover had lots of bits on it which I have tried to remove using a damp cloth. However, there may also be bits on the inside of the plastic. Luckily, once the covered dust jacket is on the book, such bits are not immediately obvious to the casual eye.

So, that’s the whole story of the book of the blog. Perhaps there’ll be an accompanying volume in a few more years.

Telling the story behind emotions and feelings

In a previous journey (electronic bookshelf) I digitised unused university and work books, but retained some of those physical volumes because they had special meaning for me. However, the books I kept are still unused and taking up valuable shelf space; so this journey will digitise them and explore how to represent the meanings that they have for me, and how to stimulate the feelings that sight of the books inspire in me. This is likely to involve telling the story which generates such a response. Some non-work books that are on the same shelf will also be included in the exercise. As was the case in the electronic bookshelf work, the solutions and designs will be based on the assumption that electronic paper will eventually enable large paper-thin wall displays to be created in any shape and size. In the absence of such versatile electronic paper at an affordable price, the work will simulate such a capability using card, posters and iPad.